My friend, Margaret, and I have been studying Spanish together for about four years now and she's about to go to Mexico for a holiday. How could I resist making her a Bon Voyage card with the Festive Birthday Designer Series Paper?!
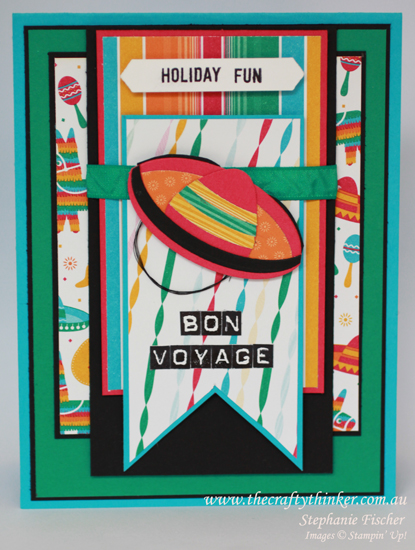 |
| A very layered card with a "die-art" sombrero |
The design of the card is very loosely based on a sketch I saw on Pinterest by Pam Callaghan for Chickaniddy Crafts.
 |
| Pieces required for the sombrero |
I don't have the stamp set or framelits that match this paper so, inspired by the sombreros on the paper, I set about making my own sombrero. I used one of the Layering Ovals framelits and one of the shapes from the Blossom Builder punch.
 |
| Positioning the oval die to trim off an edge |
I first took an oval that I'd cut from another sheet of the DSP and used the same oval framelit to trim a little edge from each long side. The resulting elipse formed the large brim of the hat.
I then glued the piece of blossom builder (Melon Mambo) to the front edge of the elipse for form the crown of the hat. Using the same method as before, I trimmed the long edge off one side of a Melon Mambo Oval and both from a Basic Black oval. I kept only the edges of the black one.
 |
| Elipse for the sombrero |
To create the back turned up hat brim, I used the untrimmed edge of the Melon Mambo oval and lined up and adhered the main piece of hat, with the crown, a little lower to create the pink edge. I then adhered a black edge behind the pink and trimmed where necessary.
I then used the remaining Melon Mambo and Basic Black strips to create the front edge of the hat and adhered them in position - just covering the "petal" edge of the hat crown.
To make the hat trim, I used the same oval framelit to cut strips of
DSP. I decided to position them at the end though, so that I could make
sure they lined up with the hat brim once I'd made it.
I needed to fill a bit more space, so I created a loop with Black Metallic Thread and stuck it to the back of the sombrero.
 |
| The sombrero |
The top greeting is created with two words in the Thoughtful Banners stamp set and I punched it out with the Classic Label Punch.
The Bon Voyage greeting was created with the Labeler Alphabet. I stamped the letters, cut them out and stuck them to another piece of card. I used the corner and edge of that piece of card to ensure that the letters were straight. I then cut around each word and adhered it to the front of the card. Since the letters are photopolymer, it's easy enough to line them and stamp a word at a time but I didn't want the white space between the letters.
 |
| Layers & dimension! |
I used Tempting Turquoise, Basic Black, Melon Mambo and Emerald Envy cardstock to create layers with a variety of the DSP patterns - there are a lot of layers and more than a few Dimensionals! As I put it together I was thinking about Bruno Bertucci and Brian King who LOVE layers and dimensionals!
I hand cut the tails in the banner - only because they were too big for the Banner Triple Punch and I don't yet own the Banners Framelits (note the use of the word "yet"!"
Thanks for visiting
'Til next time
Stephanie
In order that I may provide you with VIP service - when setting up your account, please click "Yes" that you allow your Demonstrator to contact you.
Product List - To shop in my online store - click on one of the product images below (Australian Residents only)