Showing posts with label 2016-2017 Stampin' Up! Catalogue. Show all posts

Wednesday, 19 April 2017

Lovely Friends Gift Bag

On a recent trip to Tasmania, I bought my lovely friend some earrings at Salamanca Market.  They just screamed her name at me because they were in her colours and matched a ring that she often wears!

I used the Gift Bag Punch Board to make this packaging for the present.  I think she liked it almost as much as the earrings!
Lovely Friends, Just Add Text, Sneak Peek Annual Catalogue, Gift Bag Punch Board, #thecraftythinker, Stampin Up Australia Demonstrator, Stephanie Fischer, Sydney NSW
The little flowers and leaves in the Lovely Friends stamp set make for a great patterned paper

I used the new double stamping flower images and leaves from the new Lovely Friends stamp set that will be available in the 2017-2018 Annual Catalogue to turn a piece of Thick Very Vanilla cardstock (also in the new catalogue) into patterned cardstock.  The colours I chose to use match those in the earrings: Perfect Plum, Elegant Eggplant, Old Olive, Peekaboo Peach and Tangerine Tango.
Lovely Friends, Just Add Text, Sneak Peek Annual Catalogue, Gift Bag Punch Board, #thecraftythinker, Stampin Up Australia Demonstrator, Stephanie Fischer, Sydney NSW
This Just Add Text image makes a great gift tag

I tied the bag with a length of Peekaboo Peach Ruched Ribbon and added a gift tag stamped with the new Just Add Text stamp set (from the 2017-2018 Annual Catalogue).  I used my Stampin' Write markers in the same colours as the gift bag to colour the flowers and added a little flower made with the retiring Botanical Builder framelits (I'm REALLY going to miss those!).  The little flower covers up the words "to me" because I didn't want the message to sound weird!

Thank you for visiting.
'Til next time!
Stephanie


Product List - To make a purchase, click on one of the product images below (Australian Residents only)

Sunday, 16 October 2016

Thanksgiving cutlery pouch and mini journal

Although it may seem a little unusual for an Australian family, we will be hosting a "Thanksgiving" dinner for 25 people in November.

My husband and his family are from Chicago and like to continue their traditions and, whilst I'm a British born Australian, I very much enjoy the occasion ... but (with apologies to our American friends) I've tweaked it!
Stamin Up, #thecraftythinker, Thanksgiving, Table Setting, Cutlery holder, pouch, mini journal, Vintage Leaves, Stampin Up Australia Demonstrator, NSW
This will be our Gratitude Gathering (Thanksgiving) place setting
I call it a Gratitude Gathering.  Our friends and family hail from all corners of the planet and we take the opportunity to express our gratitude while we enjoy each others company and, it has to be said, a rather traditional, American-style, Thanksgiving meal.

I was hunting around for ideas for table settings when I came across a cutlery pouch on Pinterest that I believe was originally to be found on www.feeling-crafty.co.uk.  I didn't find the blog post but the picture got my brain whirring and I decided to make something similar.  The pocket holds a table napkin, cutlery and a book excerpt explaining how gratitude increases our happiness and which suggests journalling something about which we're grateful every day for 30 days.
Stamin Up, #thecraftythinker, Thanksgiving, Table Setting, Cutlery holder, pouch, mini journal, Vintage Leaves, Stampin Up Australia Demonstrator, NSW
Petals & Paisleys paper teamed with Vintage Leaves and Mint Macaron ribbon

To match the cutlery pouch I have made a little journal with 30 numbered pages for each guest to take home with them.
Stamin Up, #thecraftythinker, Thanksgiving, Table Setting, Cutlery holder, pouch, mini journal, Vintage Leaves, Stampin Up Australia Demonstrator, NSW
I stamped the days in Mint Macaron ink using the Large Numbers stamp set

Since it's Spring here in Australia, rather than Autumn, I'm always in a bit of quandrary when it comes to decorations!  I did make a floral version with more Spring-like colours but eventually decided to go with the traditional Autumnal decorations.  I think, in Australia,we're quite adept at regarding things as traditional themes rather than seasonal - we'll quite happily give each other Christmas cards featuring snowmen and wintry scenes as we bask in the sunshine in our gardens or at the beach!
Stamin Up, #thecraftythinker, Thanksgiving, Table Setting, Cutlery holder, pouch, mini journal, Vintage Leaves, Stampin Up Australia Demonstrator, NSW
This was my alternate, Spring, version.  I think I'll turn it into a card!
 Method for the Cutlery Pocket
  1. Cut cardstock to 7.5" x 6"
  2. With 7.5" horizontal on the scoreboard, score at 0.5" and 4"
  3. Turn cardstock 90 degrees and score at 1".
  4. Cut along the score line at 1" from both edges until you meet a score line.
  5. Trim back the edges of the fold back flaps to reduce some bulk.
  6. Use a Layering Circle framelit to cut a semi circle from the side of the pocket that has no flaps.  Hint: Place the framelit half on and half off the cardstock to cut the semi-circle.  In order to fit it through the Big Shot, you may have to fold up the flaps.
  7. Fold in the flaps and place adhesive on them
  8. Fold over the section with the semi circle to complete the pocket.
  9. Decorate as desired.
Stamin Up, #thecraftythinker, Thanksgiving, Table Setting, Cutlery holder, pouch, Stampin Up Australia Demonstrator, NSW

Method for the 30 day note book
  1. Cut 30 pieces of lined paper to 4 1/8" x 2 7/8"
  2. Glue the sheets together at the top by placing a few small dots of Liquid Multipurpose Glue at the top of each sheet before carefully aligning it with the next sheet
  3. For the cover, cut a piece of cardstock to 6" x 4 1/4"
  4. Score along long side at 2.5", 2 7/8", 3 1/8", 3.5"
  5. Fold the middle two score lines
  6. Place Liquid Multipurpose Glue between the score lines
  7. Place the pre-prepared pad of paper face up into the space between the two folded score lines.  Make sure it's all lined up while the glue is still wet enough.
  8. Decorate as desired
  9. Fold up the front of the pad on the score line to facilitate writing.

Thank you for visiting.
'Til next time!
Stephanie

Product List - Click on a product image below to visit my online store (Australian Residents only)

Friday, 30 September 2016

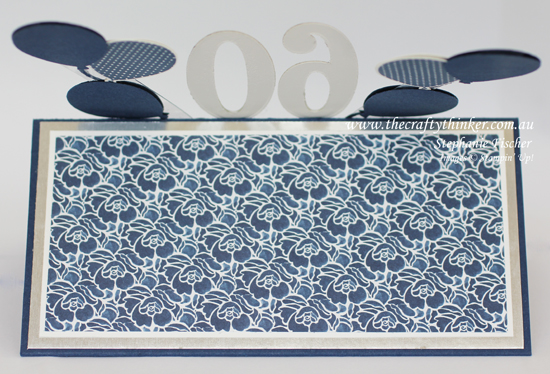
Floral Boutique 60th Surprise Card


A lovely friend is having a special birthday this week - so I wanted to make a special card to match and, for special, I find it hard to go past the beautiful Floral Boutique suite!

Stampin Up, #thecraftythinker, Easel Card with Pop Up balloons, Floral Boutique, 60th birthday card, Fun Fold, Stampin Up Australia demonstrator
I chose papers that would contrast with the numbers and banners

 SURPRISE!!  It's an easel card with pop ups!
Stampin Up, #thecraftythinker, Easel Card with Pop Up balloons, Floral Boutique, 60th birthday card, Fun Fold, Stampin Up Australia demonstrator
When the easel is folded into position, the numbers and balloons stand up by themselves

The base card is Night of Navy cut to 12" x 6" then scored and folded at 6" and 9".  The decorative panels on the front are:
Silver Foil:  5 7/8" x 2 7/8" 
Whisper White:  5 5/8" x 2 5/8"
Floral Boutique paper: 5 1/2" x 2 1/2"

The dimensions for the decorative panel on the inside of the card that props up the easel are:
Silver Foil: 5 7/8" x 2"
Whisper White:  5 5/8" x 1 7/8"
Floral Boutique paper:  5 1/2" x 1 3/4"
Stampin Up, #thecraftythinker, Easel Card with Pop Up balloons, Floral Boutique, 60th birthday card, Fun Fold, Stampin Up Australia demonstrator
I adhered a square of Whisper White to the inside of the card so that I could write a message

The numbers are cut with the Large Numbers Framelits from Silver Foil and again from Thick Whisper White.  I stuck the two layers of numbers together, sandwiching some strips of Window Sheet between the layers at the bottom.

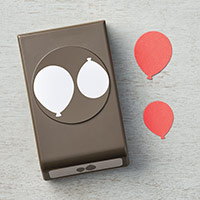
Using a balloon image from the Birthday Banners stamp set, I used Night of Navy ink to stamp onto Whisper White ink and heat embossed the same image in Silver onto Night of Navy cardstock then punched out the images with the matching Balloon Bouquet Punch.  I also punched some extra balloons and made a "sandwich" with a couple of strips of Window Sheet.  For the balloon strings, I used the long curly die from the Cupcake Cutout Framelits and snipped and glued pieces of it here and there. 

I adhered the numbers and balloon bouquets to the back of the lower panel for card front before positioning the panel. 
Stampin Up, #thecraftythinker, Easel Card with Pop Up balloons, Floral Boutique, 60th birthday card, Fun Fold, Stampin Up Australia demonstrator
The stitched look on this banner is very appropriate for a friend who likes to sew!

The banner and Happy Birthday greeting are both from the Birthday Banners stamp set and the word Friend is from the Bloomin Love stamp set.  I adjusted the greetings on the acrylic blocks to have the same curvature as the banner.  I stamped all of these in Versamark onto Night of Navy cardstock (banner first and then placing the greetings into the banner) and then heat embossed with silver before cutting out the banner with the matching Bunch of Banners Framelit.

For the decoration on the easel support, I cut a piece of Night of Navy cardstock 5" x 2" and punched the ends with the Banner Triple Punch.  Deciding I wanted to have a white matt for it, I cut a piece of Whisper White cardstock to 5 1/8" x 2 1/8", and carefully centred each end in the Triple Banner Punch.

I cut two flowers in Silver Foil using the Flourish Thinlits and adhered them to the blue banner.  To cover the join, I cut the smallest of the Lots of Labels in Night of Navy and adhered a Silver Foil decoration cut with a die from the Cheerful Tags Framelits set, sticking it to the centre with a dimensional.


Stampin Up, #thecraftythinker, Easel Card with Pop Up balloons, Floral Boutique, 60th birthday card, Fun Fold, Stampin Up Australia demonstrator
The back view of the easel card
 I hope you like this card.

Thank you for visiting
'Til next time!
Stephanie


Product List - To shop in my online store, click on a product image below (Australian Residents only)