Showing posts with label Hot Air Balloon. Show all posts

Friday, 5 January 2018

Lift Me Up over the Lovely Trees - fun with Brusho Crystal Colour

This card is entered into the Crazy Crafters Project Highlights this week.  Click here to see the fully array and vote for your favourites.

The other day, in the post Christmas quiet, I got out the Brusho Colour Crystals again.
#thecraftythinker, #cardmaking, #brusho, #stampinup, #rubberstamping, Brusho Colour Crystals, Lift Me Up, Hot Air Balloon, Stampin' Up Australia Demonstrator, Stephanie Fischer, Sydney NSW
Brusho Crystal Colour background and heat embossed hot air balloons
 I knew I wanted to create a tree line and thought I'd make it easier for myself by using the Lovely As A Tree stamp to guide my water application.  So I stamped it in Pear Pizzazz onto the watercolour paper.
#thecraftythinker, #cardmaking, #brusho, #stampinup, #rubberstamping, Brusho Colour Crystals, Lift Me Up, Hot Air Balloon, Stampin' Up Australia Demonstrator, Stephanie Fischer, Sydney NSW
The Lovely as a tree image was a helpful guide for where to apply the water

I then liberally applied water (with a mop brush) to the area of the trees and ground and sprinkled on Brusho crystals, starting with yellow towards the top, then green and then blue and overlapping a little.
#thecraftythinker, #cardmaking, #brusho, #stampinup, #rubberstamping, Brusho Colour Crystals, Lift Me Up, Hot Air Balloon, Stampin' Up Australia Demonstrator, Stephanie Fischer, Sydney NSW
Once the project is dry, any excess colour crystals can be tapped off 

As you can see - I used plenty of crystals to get a dense colour coverage.  I just left it like this to dry.  Once dry, I tapped the back of the paper to remove the loose crystals.

The remnants on my work surface didn't go to waste!  I spritzed on more water and grabbed some leftover bits of Whisper White cardstock to press into it.  I'll show you what I did with those at a later date!

So this is what it looked like once it had dried.  I decided to use the Lovely As a Tree stamp again to add a bit of definition to my wooded area.
#thecraftythinker, #cardmaking, #brusho, #stampinup, #rubberstamping, Brusho Colour Crystals, Lift Me Up, Hot Air Balloon, Stampin' Up Australia Demonstrator, Stephanie Fischer, Sydney NSW
As with any watercolour, the colours dry lighter

I stamped with Early Espresso several times and then didn't like what I'd done!  So I got out a damp brush and softened the stamping a little.  I still didn't love it but it was an improvement!  I then put a tiny amount of the blue crystals in a container and added quite a lot water.  I used this and a wet brush to paint the sky, using more pigment at the top of the card.
#thecraftythinker, #cardmaking, #brusho, #stampinup, #rubberstamping, Brusho Colour Crystals, Lift Me Up, Hot Air Balloon, Stampin' Up Australia Demonstrator, Stephanie Fischer, Sydney NSW
I added a wash of blue Brusho for the sky, stamped the trees and then softened with a wet brush

Then I copper heat embossed the balloons from the Lift Me Up stamp set, watercoloured them with Elegant Eggplant ink and cut them out.  Initially, I used the matching dies but I didn't want the white outline around the balloons so I ended up fussy cutting them.
#thecraftythinker, #cardmaking, #brusho, #stampinup, #rubberstamping, Brusho Colour Crystals, Lift Me Up, Hot Air Balloon, Stampin' Up Australia Demonstrator, Stephanie Fischer, Sydney NSW
The larger balloon is attached with dimensionals

The larger balloon is adhered with dimensionals.

The base card is Perfect Plum, followed by a layer of Whisper White.

Thank you for visiting.
'Til next time!
Stephanie

Product List - Click on an image to shop in my online store (Australian Residents only)


Monday, 20 February 2017

Lifting Me Up Tag Pull

I love this bundle and decided I wanted to help it live up to its name.  So this balloon lifts up.

www.thecraftythinker.com.au, Lift Me Up, Hot Air Balloon, Interactive card, #thecraftythinker, Stampin Up Australia Demonstrator, Stephanie Fischer, Sydney NSW
At rest, the balloon is towards the bottom of the card

It took me all afternoon to work out how to accomplish my goal but it was worth it because I'm very happy with the result!

www.thecraftythinker.com.au, Lift Me Up, Hot Air Balloon, Interactive card, #thecraftythinker, Stampin Up Australia Demonstrator, Stephanie Fischer, Sydney NSW
As the tag is pulled up to reveal the greeting, the balloon rises too

I'm not normally big on planning, so this was a bit of a departure for me!  The first thing I did was to work out my sizes and plan my layers.
www.thecraftythinker.com.au, Lift Me Up, Hot Air Balloon, Interactive card, #thecraftythinker, Stampin Up Australia Demonstrator, Stephanie Fischer, Sydney NSW
The mechanism prevents the tag pulling out further or the balloon rising more

Then I took a scrap piece of watercolour paper and used, more or less, the smooching method to apply Crushed Curry and Tangerine Tango inks.  I did this twice, drying the piece off with a heat tool in between.  While the second coat was wet, I picked up a little Real Red ink with a damp brush and dabbled it on so that it blended a bit.

www.thecraftythinker.com.au, Lift Me Up, Hot Air Balloon, Interactive card, #thecraftythinker, Stampin Up Australia Demonstrator, Stephanie Fischer, Sydney NSW, watercolour background, Colour Smooshing
This piece of watercolour paper "smooched" with Crushed Curry and Tangerine Tango sits behind the balloon die cut

 While the watercolour was drying, I cut my layers and the pieces for the mechanism which comprises the front "pocket" with the slit cut into it, a tag and a little piece of window sheet (cut and bent as per the photo below).
www.thecraftythinker.com.au, Lift Me Up, Hot Air Balloon, Interactive card, #thecraftythinker, Stampin Up Australia Demonstrator, Stephanie Fischer, Sydney NSW
I've drawn pencil marks to make the cut and the score lines more visible
I cut my pocket from Carried Away Designer Series Paper (free during Sale-A-Bration with a $90 purchase).  The size is 4" wide by 5.5" long.  I scored each of the sides at 1/2" and made a cut in the centre from 1 3/8" from the top down to 3 7/8" from the top.  I also cut half a circle from the top centre using a 3/4" circle punch.

The tag is just a fraction smaller and I cut it from Mint Macaron cardstock.  I cut a 3/4" circle of Smoky Slate cardstock, folded it in half and then glued it over the centre of one end to form the tag pull.


www.thecraftythinker.com.au, Lift Me Up, Hot Air Balloon, Interactive card, #thecraftythinker, Stampin Up Australia Demonstrator, Stephanie Fischer, Sydney NSW
I attached the lower flaps of window sheet to the tag and the upper ones to the balloon

I cut a small piece of window sheet and cut and bent it to the above shape to attached the balloon.  The lower two flaps I glued to the tag.  I then pushed the window sheet up through the slit from the back and bent the upper two tags into shape before using glue dots to adhere them to the finished balloon.  when the tag is pulled, the small straight piece of window sheet slides up the slit in the pocket.
To finish the mechanism, I folded back the 1/2" flaps on either side of the pocket piece, added Fast Fuse adhesive and then adhered the pocket to the top of the card.

www.thecraftythinker.com.au, Lift Me Up, Hot Air Balloon, Interactive card, #thecraftythinker, Stampin Up Australia Demonstrator, Stephanie Fischer, Sydney NSW
There is depth to the card between the lifting mechanism and the Stampin' Dimensionals

I cut the clouds from Whisper White cardstock and sponged around the edges with Smoky Slate ink, adding more ink to the bottom of the cloud.  These are adhered to the card with Stampin' Dimensions.  The tiny cloud is sitting in front of the top cloud, so I used a double layer of dimensionals.


The balloon is very simple.  I cut the outline from Basic Gray cardstock with the Up & Away Framelit and then glued it to the piece of watercolour paper.  Once the adhesive was dry, I trimmed away the excess watercolour paper, including the little piece between the basket and the balloon, which I trimmed away with a craft knife.

I've kept my card relatively small because I wanted to used the Thick Whisper White card for the card base.  These are the sizes I used:

Card base:         6" x 7" scored and folded at 3.5"
Basic Gray:       3 3/8" x  5 7/8"
Mint Macaron:  3.25" x 5.75"

Thank you for visiting.
'Til next time!
Stephanie

Product List - To visit my online store, click on a product image below (Australian Residents only)


Sunday, 5 February 2017

Crazy Crafters Blog Hop with Special Guest: Shannon Lane - Lift Me Up

Image may contain: text
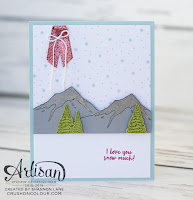
http://crushoncolour.blogspot.com.au/2016/11/snow-much-love.htmlWelcome to the Crazy Crafters' Blog Hop with our Special Guest stamper, Shannon Lane - we are thrilled to have Shannon join us this month and so excited to CASE (Copy And Selectively Edit) any project that has been created by her.
Whether you are starting the blog hop here at my blog, Stephanie Fischer - The Crafty Thinker, or have come from the person before me, be sure to click on the person listed under me further down the page to continue your journey on this blog hop.

This is Shannon's card that I have chosen to CASE.  As soon as I saw the mountain elements, I thought of the gorgeous Carried Away paper in the Sale-A-Bration catalogue (free with a purchase of $90).  


So this is my card based on Shannon's.  I cut the mountains out and glued them onto the sheet of paper with the cloud images (from the same paper pack). 
#thecraftythinker, #crazycraftersbloghop, Lift Me Up Bundle, Stampin' Up! Australia Demonstrator, Stephanie Fischer, Sydney NSW, Hot Air Balloon
I love the Lift Me Up suite and the way that it coordinates with the Carried Away Paper pack
The balloon is stamped in Basic Black ink onto Real Red cardstock and cut out with the matching die (buying the stamp set and thinlits as a bundle gives a saving of 10%). To blend the balloon basket with the sky, I cut off the lower part of the red balloon and replaced it with one I had created with Mint Macaron cardstock.  I used a Chocolate Chip Stampin' Write Marker to colour the basket.  I then adhered the balloon to the card front with Stampin' Dimensionals.

I hope you've enjoyed this card and I welcome your comments. 

Thanks for following our blog hop. Remember that currently you are at my blog - Stephanie Fischer - so click on the next name in the list to ensure that you don't miss out of seeing any of the blogs and the amazing inspiration they contain.

Thanks for visiting
'Til next time
Stephanie

Product List - To browse my online store, click on a product image below (Australian Residents only)