Monday, 24 October 2016

Magic Merry Mice

I value my son's opinion and artistic eye so, when I make a card, I usually ask his opinion.  

When I made this card for yesterday's blog hop, he told me that he liked it but why not make it into a slider so that the mice travel from window to window.  What a great idea!

So I stepped it up a bit and made this magic card!  My son really likes it!

Stampin Up, #thecraftythinker, Christmas Card, Xmas Card, Magic Card, Merry Mice, Stampin Up Australia Demonstrator, Stephanie Fischer, NSW
"At rest", the card looks very much like its predecessor


Stampin Up, #thecraftythinker, Christmas Card, Xmas Card, Magic Card, Merry Mice, Stampin Up Australia Demonstrator, Stephanie Fischer, NSW
But pull the tag and things start to look a bit different!


Stampin Up, #thecraftythinker, Christmas Card, Xmas Card, Magic Card, Merry Mice, Stampin Up Australia Demonstrator, Stephanie Fischer, NSW
Magic mice!

Stampin Up, #thecraftythinker, Christmas Card, Xmas Card, Magic Card, Merry Mice, Stampin Up Australia Demonstrator, Stephanie Fischer, NSW
The locking mechanism prevents the removal of the entire magic strip

It seems the mice are leaving the card to go to their Christmas party!

Thank you for visiting.
'Til next time!
Stephanie 

Product List - To visit my online store, click on a product image below (Australian Residents only)


Sunday, 23 October 2016

Crazy Crafters Blog Hop - 23 October 2016 with Guest Bibi Cameron


Welcome to the Crazy Crafters Blog Hop with our Special Guest stamper, Bibi Cameron - we are thrilled to have Bibi join us this month and so excited to CASE (Copy And Selectively Edit) any project that has been created by her .  We hope you find great inspiration from the projects.

Whether you are starting the blog hop here at my blog, Stephanie Fischer - The Crafty Thinker, or have come from the person before me, be sure to click on the person listed under me further down the page to continue your journey on this blog hop.

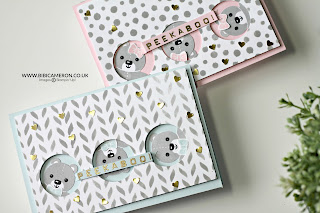
This is the card by Bibi that I have chosen to CASE.

http://www.bibicameron.co.uk/2016/09/make-baby-cards-with-cookie-cutter.html
Click on image to link to Bibi's post

I decided to use a similar layout to create a Christmas card with the Merry Mouse stamp set.
Stampin' Up, #thecraftythinker, Christmas Card, Merry Mice, Xmas, Stampin Up Australia Demonstrator, NSW
Traditional colours & cute mice make for a cheery Christmas Card


The base card is an A5 piece of Thick White Cardstock folded in half.  I cut a layer of Real Red cardstock and added a slightly smaller layer of Candy Cane Lane Designer Series Paper.  I then used the layering circles framelits to cut the circular holes in the layer, laid the piece on top of the card base and lightly marked the positioning of the holes with a pencil.   
Stampin' Up, #thecraftythinker, Christmas Card, Merry Mice, Xmas, Stampin Up Australia Demonstrator, NSW 
I used a Basic Black Stampin' Write marker to ink up one image at a time on the stamp and placed the images within the pencil drawn circles using my faithful Stamp-A-Ma-Jig to help with positioning.
Stampin' Up, #thecraftythinker, Christmas Card, Merry Mice, Xmas, Stampin Up Australia Demonstrator, NSW
Inking the stamp with a Stampin' Write Marker
Stampin' Up, #thecraftythinker, Christmas Card, Merry Mice, Xmas, Stampin Up Australia Demonstrator, NSW
Lightly drawing around the inside of the cutouts helps with correctly positioning the images


I then used Stampin' Write Markes in Real Red, Emerald Envy, Sahara Sand, Crumb Cake and Pink Pirouette to colour the images along with a few touches of gold and clear Wink of Stella.

I adhered the top layer over the stamped card front with Stampin' Dimensionals and then added circular frames cut from Emerald Envy cardstock. 

The greeting is stamped in Basic Black ink onto Emerald Envy cardstock.  I used the banner die from to cut it out and then cut another with Real Red cardstock.  I wanted to pop the banner up on dimensionals, so I glued the pieces to some Think Whisper White cardstock and trimmed around the edges. 

I hope you've enjoyed this card and I welcome your comments. 

Thanks for following our blog hop. Remember that currently you are at my blog - Stephanie Fischer - so click on the next name in the list to ensure that you don't miss out of seeing any of the blogs and the amazing inspiration they contain.

Thanks for visiting
'Til next time
Stephanie  


Product List - Click on a product image below to browse my online store (Australian Residents only sadly)