Showing posts with label Xmas card. Show all posts

Friday, 22 July 2022

Kindest Gnomes Christmas Waterfall card

#thecraftythinker, #kindestgnomes, #waterfallcard, #funfold, #christmascard, #xmascard, #stampinup, #stampinupdemonstratorstephaniefischer
A Christmas Waterfall card featuring Kindest Gnomes

I made this card as a sample for a class teaching Waterfall cards - and because it's that time of year when I start the Christmas card making process.

I changed the dimensions for the waterfall to accommodate these gorgeous gnomes - the ones that I promised myself I wasn't going to buy ....!

#thecraftythinker, #kindestgnomes, #waterfallcard, #funfold, #christmascard, #xmascard, #stampinup, #stampinupdemonstratorstephaniefischer
Each of the "flip" sections features a different gnome

The waterfall mechanism is made from Real Red cardstock and perfectly fits my normal size base card (1/2 sheet of A4 folded in half).  The base card is also Real Red, with mats of Old Olive.  The Designer Series Paper is from the July-December 2022 Mini Catalogue and is called Boughs of Holly.

#thecraftythinker, #kindestgnomes, #waterfallcard, #funfold, #christmascard, #xmascard, #stampinup, #stampinupdemonstratorstephaniefischer
There are four gnome images in the stamp set along with a "dwelling"

I used Real Red and Old Olive Stampin' Blends alcohol markers to coordinate with the paper.  The ribbon picks out the darker green splodges in the paper and is also in the Mini Catalogue in the Real Red & Garden Green 1cm ribbon combo pack.

#thecraftythinker, #kindestgnomes, #waterfallcard, #funfold, #christmascard, #xmascard, #stampinup, #stampinupdemonstratorstephaniefischer
The stamp set is very versatile with greetings covering a variety of occasions, not just Christmas

I made the Whisper White pieces 2 1/2" square to accommodate the gnome without seeing lots of feet in the waterfall!  The Real Red mats are 2 3/4" which means I also made the waterfall mechanism strip 2 3/4" wide.  See image below for the full dimensions.  Although I've changed the dimensions, the method for making the waterfall card remains as per usual.

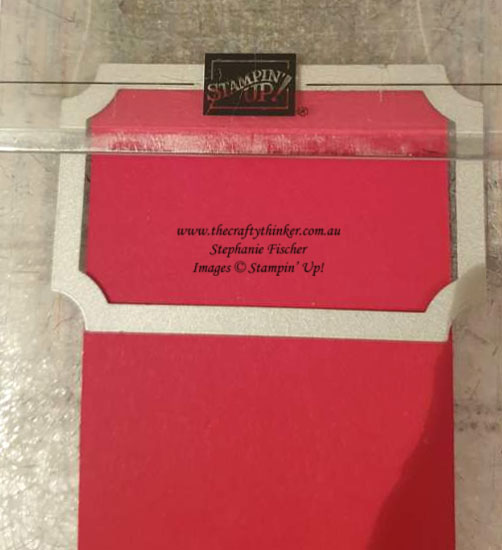
I wanted to shape the pull tag and decided to use this die from the Painted Labels die set.  I just wanted to shape the very end, so I lined up the die with edge of the card and then placed the top cutting plate just over that edge so that only the end would cut (see below).
#thecraftythinker, #kindestgnomes, #waterfallcard, #funfold, #christmascard, #xmascard, #stampinup, #stampinupdemonstratorstephaniefischer
I used a label die to trim and shape just the end of the waterfall mechanism

#thecraftythinker, #waterfallcard, #funfold, #stampinup, #stampinupdemonstratorstephaniefischer
These are the dimensions I used for my waterfall mechanism

I hope you've enjoyed this card.  I have not included full waterfall card instructions since there are many great video tutorials to be found but will be happy to supply my written tutorial if requested.

Until another time!

Stephanie
The Crafty Thinker


Monday, 17 August 2020

Christmas Card, Easy & Quick with Poinsettia Place Papers

#thecraftythinker #stampinup #cardmaking #christmascard #poinsettiaplace , Poinsettia Place, Easy Christmas card, Stampin' Up Demonstrator, Stephanie Fischer, Sydney NSW
The Poinsettia Place Suite of Products makes Christmas cards quick, easy and elegant!

Continuing on with singing the praises of the Poinsettia Place Suite of products! See here, here and here for others.

For this super quick and easy card, I used one of the coordinating Poinsettia Dies to cut out a flower from the Poinsettia Place Designer Series Paper.  Just look for the flowers that have clear space all around them (see below).

#thecraftythinker #stampinup #cardmaking #christmascard #poinsettiaplace , Poinsettia Place, Easy Christmas card, Stampin' Up Demonstrator, Stephanie Fischer, Sydney NSW
Cutting flowers from the Poinsettia Place paper - look for the flowers with a space all around - the Poinsettia Die will cut these flowers perfectly!

Below, I've included the link for the Poinsettia Place Suite but the items are also available separately or bundled.

Thank you for visiting.
'Til next time!
Stephanie

Product List - All available for purchase from my online store

Thursday, 13 August 2020

Stampin' Dreams Blog Hop - Mini Catalogue: Poinsettia Place Suite - Plush Poinsettia die cut

Welcome to the monthly Stampin' Dreams Blog Hop.  This month we are showcasing products from the new August-December 2020 Mini Catalogue.

You are currently visiting Stephanie Fischer (The Crafty Thinker) from Australia.  I hope you enjoy my card and then click on "Click here to enter" and click through the little images to see all of the other great projects in the hop!
#thecraftythinker #stampinup #xmascard #plushpoinsettia #cardmaking , Christmas Card, Plush Poinsettia, Forever Gold SDSP, Subtle Embossing Folder, Stampin' Up Demonstrator, Stephanie Fischer, Sydney NSW
Incredibly quick and easy Christmas card made with Stampin' Up products 
from the August-December 2020 Mini Catalogue

As always with metallic cards, I had enormous problems photographing this card! I haven't done it justice - it looks so much prettier in person!
#thecraftythinker #stampinup #xmascard #plushpoinsettia #cardmaking , Christmas Card, Plush Poinsettia, Forever Gold SDSP, Subtle Embossing Folder, Stampin' Up Demonstrator, Stephanie Fischer, Sydney NSW
Such an easy but elegant Christmas card! 
Forever Gold and Plush Poinsettia Specialty Papers,  Poinsettia Die

This card continues with my exploration of the Poinsettia Place Suite and the more I use it, the more I love it!  See more here and  here.

This card was sooo quick and easy!  

I made a base card with Thick Whisper White card, then cut layers with Gold Foil Sheet and normal Whisper White.  I gave the top white layer some texture with the Subtle Embossing Folder and then adhered the gold centre piece from the Forever Gold Specialty Paper.  

TIP:  To minimise usage, I like to cut out the centres of my metallic layers, leaving a frame shape which is covered by the top layer!

#thecraftythinker #stampinup #xmascard #plushpoinsettia #poinsettiaplacesuite #cardmaking , Christmas Card, Die cut flower from Plush Poinsettia,  Stampin' Up Demonstrator, Stephanie Fischer, Sydney NSW
With the coordinating Poinsettia Dies, it's so easy to cut out soft, velvety Plush Poinsettias!

The flower was really easy to cut from the Plush Poinsettia paper using the coordinating Poinsettia die.  Then I just added one of the Beaded Pearls to finish it off!

All of the large poinsettias on this sheet fit the die.

I hope you've enjoyed the card you've seen here on my blog today.  You are currently visiting Stephanie Fischer.  

Please click on "click here to enter" below and click on each of the little images to hop through all of the people on the list to see all our projects.  You don't want to miss any!

Thank you for visiting.
'Til next time!
Stephanie

You are invited to the Inlinkz link party!

Click here to enter
Product List - All products are available for purchase from my online store

Friday, 24 July 2020

Christmas cards: Poinsettia Petals Die Cuts on Plush Poinsettia


#thecraftythinker #stampinup #sneakpeekminicatalogue #christmascards #cardmaking #poinsettiapetalsbundle #plushpoinsettia , Christmas Cards, Poinsettia Place Suite, Mini Catalogue Sneak Peek, Xmas Cards, Stampin' Up Demonstrator, Stephanie Fischer, Sydney NSW
Poinsettia Place Suite and Red & Green Foil:
the shiny foil and soft, velvety Plush Poinsettia paper look stunning together!

Back to the Christmas focus!

I LOVE easy,quick but beautiful cards - especially at Christmas when I'm making lots!  So I'm really grateful for the Poinsettia Petals Bundle - in fact, I purchased the entire Poinsettia Place Suite and I'm so glad I did!  It makes Christmas cardmaking effortless as well as stylish!

For the first card, I used the new Red & Green Foil Sheets for the poinsettia.  For the second I used Garden Green and Cherry Cobbler cardstock.

For both, I added elements of Gold Foil Sheet and a greeting stamped with Cherry Cobbler ink.
#thecraftythinker #stampinup #sneakpeekminicatalogue #christmascards #cardmaking #poinsettiapetalsbundle #plushpoinsettia , Christmas Cards, Poinsettia Place Suite, Mini Catalogue Sneak Peek, Xmas Cards, Stampin' Up Demonstrator, Stephanie Fischer, Sydney NSW
The Poinsettia Place Suite - makes Christmas card-making soooo easy!

I cut the banners with the new, incredibly useful, Banners Pick A Punch: one punch that offers two end shapes in three sizes each.

Also from the Poinsettia Place Suite are the gorgeous Beaded Pearls (what perfect Poinsettia centres!) and Plush Poinsettia Specialty Paper.

In an upcoming post, I'll be sharing another card that I made with the Plush Poinsettia paper that illustrates that it's not just for Christmas!

In next week's posts, I'll be sharing more Christmas cards that show how cleverly the products in the suite work together.

The Poinsettia Place Suite Comprises:
Poinsettia Petals Bundle (Poinsettia Petals stamp set & Poinsettia Dies)
Plush Poinsettia Specialty Paper
Beaded Pearls
Poinsettia Place Designer Series Paper 
Real Red 3/8" (1cm") Sheer Ribbon

Thank you for visiting.
'Til next time!
Stephanie

Product List - These products are currently available in my online store.  The products from the August to December 2020 Mini Catalogue will be available from 4 August 2020.

Friday, 29 November 2019

Two Christmas Cards featuring the Brightly Gleaming Suite

#thecraftythinker #stampinup #cardmaking #christmascard #brightlygleaming , Christmas card, Brightly Gleaming Suite, Stampin' Up Demonstrator, Stephanie Fischer, Sydney NSW
An easy Christmas card to make using the Brightly Gleaming Suite and Beautiful Boughs dies
This is such a simple card but it ended up rather "busy".  However, there's always a place for a busy Christmas card.

The base card is Gray Granite to which I added a triangle of Pretty Peacock and then set about decorating.  I used elements cut with the Beautiful Boughs and Seasonal Layers dies as well as some Brightly Gleaming Foil Elements.  For a bit of extra sparkle, I added some Holiday Rhinestone Basic Jewels.

#thecraftythinker #stampinup #cardmaking #christmascard #brightlygleaming , Christmas card, Brightly Gleaming Suite, Stampin' Up Demonstrator, Stephanie Fischer, Sydney NSW
A variation of the Christmas card using the Brightly Gleaming Suite
Then I made another using the same methodology but reversed colours.  I placed circles of Gray Granite behind the copper baubles and added a few Star Designer Elements and a greeting cut from the Classic Weave Ribbon.

My aim was to make use of the Brightly Gleaming Foil Elements that I purchased as part of the Brightly Gleaming Suite Bundle.  There's a very generous amount of elements in the pack!

Thank you for visiting.
'Til next time!
Stephanie

Product List - All available for purchase in my online store


Wednesday, 27 November 2019

Christmas Gleaming Buckle Cards

#thecraftythinker #stampinup #cardmaking #bucklefold #christmascard #funfold , Buckle Fold, Brightly Gleaming, Christmas Card, Stampin' Up Demonstrator, Stephanie Fischer, Sydney NSW
Buckle Fold cards decorated with Brightly Gleaming SDSP and Foil Elements are quick and easy to make
I had so much fun making buckle fold cards the other day that I just kept on!  

These ones are made with exactly the same method but are decorated with papers and elements from the Brightly Gleaming Suite of products.  I added a snowflake from the Seasonal Layers dies to the centre of the copper star.
#thecraftythinker #stampinup #cardmaking #bucklefold #christmascard #funfold , Buckle Fold, Brightly Gleaming, Christmas Card, Stampin' Up Demonstrator, Stephanie Fischer, Sydney NSW
This photo shows one of the buckle fold cards open which shows the closing mechanism
Thank you for visiting.
'Til next time!
Stephanie

Product List- All available for purchase from my online store