Showing posts with label #christmascard. Show all posts

Friday, 22 July 2022

Kindest Gnomes Christmas Waterfall card

#thecraftythinker, #kindestgnomes, #waterfallcard, #funfold, #christmascard, #xmascard, #stampinup, #stampinupdemonstratorstephaniefischer
A Christmas Waterfall card featuring Kindest Gnomes

I made this card as a sample for a class teaching Waterfall cards - and because it's that time of year when I start the Christmas card making process.

I changed the dimensions for the waterfall to accommodate these gorgeous gnomes - the ones that I promised myself I wasn't going to buy ....!

#thecraftythinker, #kindestgnomes, #waterfallcard, #funfold, #christmascard, #xmascard, #stampinup, #stampinupdemonstratorstephaniefischer
Each of the "flip" sections features a different gnome

The waterfall mechanism is made from Real Red cardstock and perfectly fits my normal size base card (1/2 sheet of A4 folded in half).  The base card is also Real Red, with mats of Old Olive.  The Designer Series Paper is from the July-December 2022 Mini Catalogue and is called Boughs of Holly.

#thecraftythinker, #kindestgnomes, #waterfallcard, #funfold, #christmascard, #xmascard, #stampinup, #stampinupdemonstratorstephaniefischer
There are four gnome images in the stamp set along with a "dwelling"

I used Real Red and Old Olive Stampin' Blends alcohol markers to coordinate with the paper.  The ribbon picks out the darker green splodges in the paper and is also in the Mini Catalogue in the Real Red & Garden Green 1cm ribbon combo pack.

#thecraftythinker, #kindestgnomes, #waterfallcard, #funfold, #christmascard, #xmascard, #stampinup, #stampinupdemonstratorstephaniefischer
The stamp set is very versatile with greetings covering a variety of occasions, not just Christmas

I made the Whisper White pieces 2 1/2" square to accommodate the gnome without seeing lots of feet in the waterfall!  The Real Red mats are 2 3/4" which means I also made the waterfall mechanism strip 2 3/4" wide.  See image below for the full dimensions.  Although I've changed the dimensions, the method for making the waterfall card remains as per usual.

I wanted to shape the pull tag and decided to use this die from the Painted Labels die set.  I just wanted to shape the very end, so I lined up the die with edge of the card and then placed the top cutting plate just over that edge so that only the end would cut (see below).
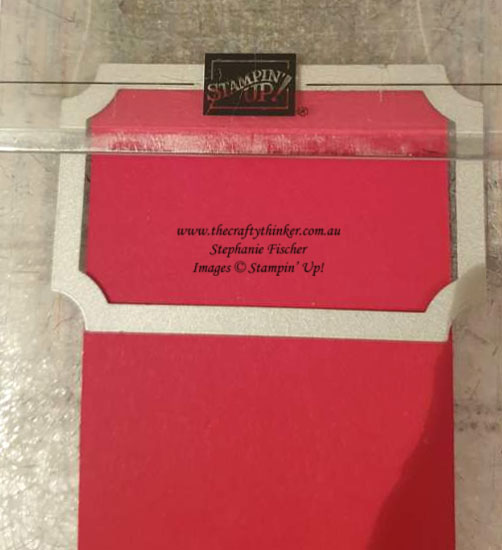
#thecraftythinker, #kindestgnomes, #waterfallcard, #funfold, #christmascard, #xmascard, #stampinup, #stampinupdemonstratorstephaniefischer
I used a label die to trim and shape just the end of the waterfall mechanism

#thecraftythinker, #waterfallcard, #funfold, #stampinup, #stampinupdemonstratorstephaniefischer
These are the dimensions I used for my waterfall mechanism

I hope you've enjoyed this card.  I have not included full waterfall card instructions since there are many great video tutorials to be found but will be happy to supply my written tutorial if requested.

Until another time!

Stephanie
The Crafty Thinker


Monday, 16 November 2020

Joyful Holly Metallics

#thecraftythinker #stampinup #christmascard #joyfulholly #metallicxmascard #heatembossing #cardmaking , Christmas card, Joyful Holly, Brushed Metallics, Heat Embossing, Stampin' Up Demonstrator, Stephanie Fischer, Sydney NSW
A metallic Christmas card featuring the Joyful Holly stamp set

Such a simple card!  .... So hard to photograph!  One day I'll remember that I struggle to photograph metallic cards!

The image from the Joyful Holly stamp set is gold heat embossed onto a piece of Brushed Metallic cardstock.  Then I silver heat embossed the greeting.

I cut a Silver Foil frame with a couple of the Stitched Rectangle dies and then adhered the pieces to the Blackberry Bliss base card.

Final touches were to add the bow of Basket Weave Metallic ribbon and some Red Rhinestone Basic Jewels.

The little black cat is my shadow - he follows me from room to room all day ... lucky I don't live in 17th Century Salem!  Mostly, he's well-behaved but as soon as I stand up and turn around, he steals my chair!

Chair thief and bin emptier!

Thank you for visiting.
'Til next time!
Stephanie

Product List - All available for purchase in my online store

Monday, 2 November 2020

Poinsettia Place & Forever Gold Christmas Card


#thecraftythinker #stampinup #cardmaking #christmascard #xmascard #poinsettiaplace #poinsettiapetals , Christmas card, Poinsettia Place, Stampin' Up Demonstrator Stephanie Fischer, Sydney NSW
The Poinsettia Place Suite - everything you need to make gorgeous Christmas cards!

I had a narrow strip of Glittery black and vanilla scalloped edge leftover from this card - it was the cutting remnants that I glued together slightly offset.  So the rest of the card was built around that strip - so easy to do with a suite of products like Poinsettia Place.  By the way - the products are also available individually as well as in the suite or bundle.


Feeling a bit lazy - I also added foliage from the Forever Gold Specialty Designer Series Paper, some with the gold side up and some reversed.

Thank you for visiting.
'Til next time!
Stephanie

Product List - All products available for purchase from my online store

Friday, 30 October 2020

Snowflake Wishes Red Black & Gold : Using leftovers

#thecraftythinker #cardmaking #stampinup #christmascard #xmascard #snowflakewishes , Christmas card, Snowflake Wishes, Stampin' Up Demonstrator, Stephanie Fischer, Sydney NSW
A Christmas card that uses up some of my leftover Snowflake Wishes


Well, here's the latest in my series of cards using up leftovers - my desk is looking clearer all the time!

The vanilla and black snowflakes were sitting on my desk - so I simply glued them together.  Then I saw the little piece of Gold Foil Sheet so I cut a snowflake from the centre (there's bound to be a card coming up soon that features a gold snowflake!). I adhered the gold rectangle (it's almost but not quite square) to a leftover piece of black cardstock that just needed a tiny bit of trimming.  Then I glued the vanilla snowflake into position.

TIP:  I used adhesive tape to adhere the gold rectangle as I find that wet glues show up on the front of  the metallic card.

HINT: If I were to do this again - I would hide the edges of the gold foil by using a die to cut suitable aperture in the black card and positioning the gold behind it, to form a sort of frame effect with the black.

I stamped the greeting onto a scrap piece of Very Vanilla cardstock and cut it out with one of the Ornate Frames dies.

Thank you for visiting.
'Til next time!
Stephanie

Product List  - All available for purchase from my online store

Monday, 26 October 2020

Snowflake Wishes Shades of Green

Stephanie Fischer, www.thecraftythinker.com.au, Stampin' Up Demonstrator, Sydney NSW
The kittens' fascination with the light box continues!  

I suppose I need to learn to focus in spite of the cute and adorable four-footed distractions!  They really have a fascination with the light box (that I fear will not end well for the box!). They rumble and tumble in there but as soon as I turn on the lights and point a lens in their direction they sit and pose!  Natural models?

#thecraftythinker #cardmaking #stampinup #christmascard #xmascard #snowflakewishes , Christmas card, Snowflake Wishes, Stampin' Up Demonstrator, Stephanie Fischer, Sydney NSW
A Christmas card that used up some of my leftover bits and pieces!

OK - let's look at the card I was trying to focus on making!
As you may know, I don't like to throw away leftovers!  

The Very Vanilla oval is sort of a double-leftover!  When I wanted to cut a vanilla snowflake, I rummaged in my drawer of white and vanilla "bits" and found the oval that must have been leftover from a previous project.  I'll admit that I took a little bit of care to line up the die within the oval with the thought in mind that I could then make use of the negative shape.

I had cut several Black Glitter snowflakes for this card (which was also all about using a leftover) but didn't use them all, so one of the leftovers found it's way into the centre of the oval.

The Pool Party rectangle was one of the leftover pieces in my blue/green drawer and I cut the scalloped edges from, you guessed it, leftover strips of Very Vanilla cardstock and Black Glitter paper and  I've kept the leftovers from these cuts for future use!

As my grandmother always used to say, "waste not, want not"!
 

Thank you for visiting.
'Til next time!
Stephanie

Product List - All available for purchase from my online store

Friday, 23 October 2020

Snowflake Wishes Glittery Step Card

#thecraftythinker #stampinup #cardmaking #christmascard #xmascard #snowflakewishes #funfold #stepcard , Christmas Card, Snowflake Wishes, Step Card, Fun Fold, Stampin' Up Demonstrator, Stephanie Fischer, Sydney NSW
I really needed a piece of 12" square cardstock to make this centre fold card but
made it in two pieces instead

I kind of made this one up as I went along - but I think I got away with it!  It started with the glittery black rectangle with the snowflake negative die cut.  This had been sitting on my table for a while - it was a mistake I made the first time I used this die - I hadn't noticed that it cut the negative shapes.  
I finally got around to doing something with it.

A centre fold fun fold Christmas card featuring a panel cut with one of the Snowflake Wishes Dies

I wanted to use Gray Granite for the card base and for some reason had my heart set on making a centre fold.  The only challenge being that I only had A4 size .   
If you look carefully, you can see where the two pieces have been joined

So this is a centre fold card made in two pieces!  Where there's a will, there's a way - another of my Grandmother's favourite sayings!

Just add glue to the 1.25" section of the main piece and stick it to the underside of the separate tent fold.

#thecraftythinker #stampinup #tutorialstepcard #funfold #funfoldtutorial ,Tutorial , Step Card, Fun Fold, Stampin' Up Demonstrator Stephanie Fischer, Sydney NSW
Diagram for Part 1 of the long Centre Fold fun fold using A4 size cardstock
#thecraftythinker #stampinup #tutorialstepcard #funfold #funfoldtutorial ,Tutorial , Step Card, Fun Fold, Stampin' Up Demonstrator Stephanie Fischer, Sydney NSW
Diagram for Part 2 of the long Centre Fold fun fold using A4 size cardstock

Thank you for visiting today.
'Til next time!
Stephanie

Product List - All available for purchase from my online store