Showing posts with label #funfold. Show all posts

Tuesday, 16 January 2024

Concertina Pop Up Card using A4 cardstock with tutorial links


#concertinapopupcardfora4, #thecraftythinker, #stephaniefischer, #stampinupdemonstrator, #funfold, #masculinecard, #trustytoolbox, #concertinapopupcard
Fun fold: Concertina Pop Up Card suitable for A4 cardstock
Featuring Trusty Toolbox paper (162978)

Hello again!

I made a series of Concertina Pop Up cards which I thought I'd share with you.  

I first became aware of this impressive-looking fun fold while perusing Sam Calcott's tutorial videos.  I really admire her work and never fail to find inspiration from her.  So, following her clear instructions, I made the following card using one of the paper packs that I got FREE in Sale-A-Bration.  

The resulting card might just be one of my all-time favourite makes.

#concertinapopupcard, #thecraftythinker, #stephaniefischer, #stampinupdemonstrator, #funfold, #flightandairy, #concertinapopupcard
Concertina Pop Up Card featuring Flight & Airy paper available FREE during Sale-A-Bration

However, it didn't fit two of my criteria: it didn't fit into one of my standard envelopes and it required 12" x 12" cardstock for the concertina section, which is why my concertina section is a different colour - I had to use something from my odds and ends collection!  I think it works though.
#concertinapopupcard, #thecraftythinker, #stephaniefischer, #stampinupdemonstrator, #funfold, #flightandairy, #concertinapopupcard
The Flight & Airy Concertina Pop Up card when closed

I then made a card using the dimensions at Maria's Crafting Corner that inspired Sam Calcott but used Sam's methodology for the extra pop up dimension.  Whilst smaller, it still didn't fit my criteria.

So I altered the dimensions to suit my needs and created the masculine card at the top of this post using more paper that I got FREE during Sale-A-Bration.  It fits a C6 envelope (although it is a bit bulky) and only requires A4 size cardstock.

#concertinapopupcardfora4, #thecraftythinker, #stephaniefischer, #stampinupdemonstrator, #funfold, #masculinecard, #trustytoolbox, #concertinapopupcard
The A4 friendly version of the Concertina Pop Up Card when closed

If you'd like to create one of these gorgeous Concertina Pop Up cards using A4 cardstock, you'll find my dimensions and instructions HERE. (Edit: But please don't make any alterations to it -  I can't remove anything that other people add).

If you have any questions or comments - I'd love to hear from you.

'Til next time

Stephanie Fischer
The Crafty Thinker

Tuesday, 9 January 2024

Double Diamond Pop Up Card with Tutorial links


#stephaniefischer #thecraftythinker  #doublediamondpopupcard  #funfold  #flightandairy  #saleabration  #stampinupdemonstrator
Fun fold: Double Diamond Pop Up Cards


Hello again ... it's been a while!!!  I do apologise.

Whilst I have been rather quiet for the last year, I have still been thinking about you and I've still been creating in my craft room from time to time - I just didn't feel I had much to share.

However, I was really pleased with the way these Double Diamond Pop Up cards turned out.  I used the very pretty Flight & Airy Designer Series Paper (162977) that I received FREE in Sale-A-Bration.

Fun fold: Double Diamond Pop Up Card


Fun fold: Double Diamond Pop Up Card
Flight & Airy paper (162977) and Wanted to Say dies (161594)

The inspiration for the card fold came from Sam Calcott who was in turn inspired by Julie from Trenouths Card Creations.  I used Sam's very easy to follow video but changed the dimensions so that I could use my A4 cardstock.

Sam's card folds down to a 6" square and mine fold down to a 5 3/4" square.  If, like me, you tend to keep A4 cardstock rather than 12"x 12" but would like to make a Double Diamond Pop Up card click HERE for my instructions.

If you have any questions or comments - I'd love to hear from you.

I have a couple more things to share, so I promise I'll be back again soon!

'Til then, happy crafting

Stephanie Fischer
The Crafty Thinker

#stephaniefischer #thecraftythinker  #doublediamondpopupcard  #funfold  #flightandairy  #saleabration  #stampinupdemonstrator
The back of the card: I'll write my message on the white panels


Friday, 22 July 2022

Kindest Gnomes Christmas Waterfall card

#thecraftythinker, #kindestgnomes, #waterfallcard, #funfold, #christmascard, #xmascard, #stampinup, #stampinupdemonstratorstephaniefischer
A Christmas Waterfall card featuring Kindest Gnomes

I made this card as a sample for a class teaching Waterfall cards - and because it's that time of year when I start the Christmas card making process.

I changed the dimensions for the waterfall to accommodate these gorgeous gnomes - the ones that I promised myself I wasn't going to buy ....!

#thecraftythinker, #kindestgnomes, #waterfallcard, #funfold, #christmascard, #xmascard, #stampinup, #stampinupdemonstratorstephaniefischer
Each of the "flip" sections features a different gnome

The waterfall mechanism is made from Real Red cardstock and perfectly fits my normal size base card (1/2 sheet of A4 folded in half).  The base card is also Real Red, with mats of Old Olive.  The Designer Series Paper is from the July-December 2022 Mini Catalogue and is called Boughs of Holly.

#thecraftythinker, #kindestgnomes, #waterfallcard, #funfold, #christmascard, #xmascard, #stampinup, #stampinupdemonstratorstephaniefischer
There are four gnome images in the stamp set along with a "dwelling"

I used Real Red and Old Olive Stampin' Blends alcohol markers to coordinate with the paper.  The ribbon picks out the darker green splodges in the paper and is also in the Mini Catalogue in the Real Red & Garden Green 1cm ribbon combo pack.

#thecraftythinker, #kindestgnomes, #waterfallcard, #funfold, #christmascard, #xmascard, #stampinup, #stampinupdemonstratorstephaniefischer
The stamp set is very versatile with greetings covering a variety of occasions, not just Christmas

I made the Whisper White pieces 2 1/2" square to accommodate the gnome without seeing lots of feet in the waterfall!  The Real Red mats are 2 3/4" which means I also made the waterfall mechanism strip 2 3/4" wide.  See image below for the full dimensions.  Although I've changed the dimensions, the method for making the waterfall card remains as per usual.

I wanted to shape the pull tag and decided to use this die from the Painted Labels die set.  I just wanted to shape the very end, so I lined up the die with edge of the card and then placed the top cutting plate just over that edge so that only the end would cut (see below).

#thecraftythinker, #kindestgnomes, #waterfallcard, #funfold, #christmascard, #xmascard, #stampinup, #stampinupdemonstratorstephaniefischer
I used a label die to trim and shape just the end of the waterfall mechanism

#thecraftythinker, #waterfallcard, #funfold, #stampinup, #stampinupdemonstratorstephaniefischer
These are the dimensions I used for my waterfall mechanism

I hope you've enjoyed this card.  I have not included full waterfall card instructions since there are many great video tutorials to be found but will be happy to supply my written tutorial if requested.

Until another time!

Stephanie
The Crafty Thinker


Saturday, 12 March 2022

Calming Camellia Twisted Easel Card


www.thecraftythinker.com.au, Calming Camellia, Twisted Easel Fun Fold, Stampin' Up Demonstrator Stephanie Fischer, Sydney NSW
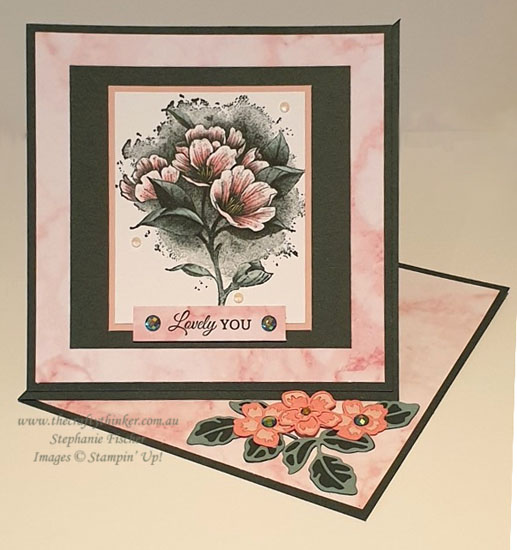
Twisted Easel fun fold card featuring Calming Camellia stamp and Summer Shadows dies

Calming Camellia has now officially been added to my list of all-time favourite stamp sets!  This distinktive stamp is perfect just as is and also looks beautiful with the addition of a little simple colouring.  It's also perfect for multiple occasions or purposes.

For this card, I stamped with Evening Evergreen ink onto Whisper White card and then enhanced it a little with some Stampin' Blend alcohol markers.

The Twisted Easel is such a simple, versatile and effective fun fold!  I cut the base and several layers from Evening Evergreen cardstock, adding layers of Blushing Bride and Simply Marbleous Designer Series Paper (that I got free in Sale-A-Bration).

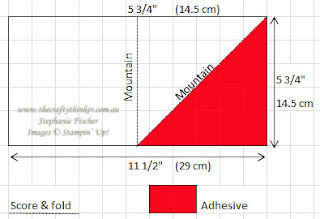
The base card measures 5 3/4" square (cut the cardstock to 5 3/4" x 11 1/2" and score the long side at 5 3/4".  Score a diagonal from the top right corner to bottom left corner of the card front) and I cut the layer that adheres to the lower section of the base card a little smaller at 5 1/2" square so did not apply adhesive all the way to the edge of the base card.

www.thecraftythinker.com.au, Twisted Easel Diagram Tutorial, Fun Fold tutorial, Stephanie Fischer, Stampin Up Demonstrator, Sydney NSW
Diagram for Twisted Easel base card

The flowers and foliage that decorate the corner of the inside of the card were created with the Summer Shadows dies.  The centre flower is popped up on a Dimensional to form a prop to hold open the easel.

Thank you for visiting.

Until next time!

Stephanie


Friday, 4 December 2020

Arrow Fold Square fun fold with World Map - A Masculine Card

#thecraftythinker #stampinup #cardmaking #masculinecard #funfold #arrowfold #worldofgood #worldmapdies , Arrow Fold Card, Fun Fold, Masculine Card, World of Good DSP, World Map Dies, Stampin' Up Demonstrator, Stephanie Fischer, Sydney NSW
A masculine square Arrow Fold card featuring the World Map Dies and World of Good papers
 
This is a square version of last week's Arrow Fold card.  Again, I basically used this tutorial by the very talented Sam Calcott but changed the dimensions to better suit my A4 size cardstock.  Obviously, a 6" square card is more comfortable to make (in terms of score line placement) but it's very convenient to use an A4 piece of cardstock rather than a 12" square.

I started with a piece of Basic Black measuring 29cm x 14.5cm, scored in half at 14.5cm.   The finished card is a 14.5cm square.  On the top flap of the card, I scored lines radiating from the centre bottom (7.25cm) to three locations on each side of the piece: the top corner, 4.8cm and 9.6cm down.  I then folded following Sam's instructions.

I put a layer of Cinnamon Cider (14cm square) cardstock onto the "inside" of the card, followed by a layer of World of Good Designer Series Paper (12.5cm square).

I had intended to also place a layer of the Cinnamon Cider onto the triangular flap (I had even cut it!) but at the last minute decided that I preferred it without.  I simply used the single layer of World of Good paper.
#thecraftythinker #stampinup #cardmaking #masculinecard #funfold #arrowfold #worldofgood #worldmapdies , Arrow Fold Card, Fun Fold, Masculine Card, World of Good DSP, World Map Dies, Stampin' Up Demonstrator, Stephanie Fischer, Sydney NSW
The Arrow Fold card stands up by itself, resting on its point.

I cut the pieces for the globe with the World Map Dies from Brushed Metallic and Cinnamon Cider cardstocks.
#thecraftythinker #stampinup #cardmaking #masculinecard #funfold #arrowfold #worldofgood #worldmapdies , Arrow Fold Card, Fun Fold, Masculine Card, World of Good DSP, World Map Dies, Stampin' Up Demonstrator, Stephanie Fischer, Sydney NSW
This was the Cinnamon Cider triangle I originally cut for the front of the card

Even though I didn't use the Cinnamon Cider triangular layer, I've included the photo as it gives a good idea of how I cut it from a 13cm (w) x 14cm (h) rectangle.
The next layer (the decorative paper that I did use) I cut in the same way from a rectangle that measured 12cm x 13cm. 
#thecraftythinker #stampinup #cardmaking #masculinecard #funfold #arrowfold #worldofgood #worldmapdies , Arrow Fold Card, Fun Fold, Masculine Card, World of Good DSP, World Map Dies, Stampin' Up Demonstrator, Stephanie Fischer, Sydney NSW
I covered the entire "inner" layer of the card with decorative paper and added a label
for writing a message

The greeting from the Four Seasons Floral stamp set is stamped with Tuxedo Black ink onto a Very Vanilla label cut with one of the Tasteful Labels dies.


Thank you for visiting.
'Til next time!
Stephanie

Product List - All available for purchase from my online store

Friday, 27 November 2020

Arrow Fold fun fold with Boho Indigo and Peony

#thecraftythinker #arrowfold #funfold #cardmaking #stampinup #bohoindigo , Arrow Fold Card, Fun Fold, Boho Indigo, Stampin' Up Demonstrator, Stephanie Fischer, Sydney NSW
Arrow Fold card featuring the gorgeous Boho Indigo product medley

My thanks go to my lovely friend, Satomi, for bringing this gorgeous fold to my attention and to Sam Calcott of Mixed Up Craft for creating it!  

I've basically followed Sam's tutorial, with just a couple of minor alterations that embrace our metric measurements.

#thecraftythinker #arrowfold #funfold #cardmaking #stampinup #bohoindigo , Arrow Fold Card, Fun Fold, Boho Indigo, Stampin' Up Demonstrator, Stephanie Fischer, Sydney NSW
The Tasteful Label provides a space to write a message

I used an A4 sheet of Very Vanilla cardstock and cut it to 30cm x 10.5cm scored and folded in the middle to create a folded card measuring 15cm x 10.5cm.

Following Sam's tutorial, I placed the fold at the top and then made little pencil marks on each side at 3.5cm and 7cm.  I also made a pencil mark on the bottom edge at 7.5cm.  Then, having opened up the card so that I only scored the top layer, I carefully scored a line from the centre point on the bottom edge to each of the marks on the side and also to the top corners.  So that's 3 scored lines on each side, meeting at the centre point at the bottom of the card.

I then burnished the scored lines and folded as shown in Sam's tutorial.

To create the triangular layers, I cut a piece of Night of Navy cardstock to 14cm x 10cm.  I made a little pencil mark in the centre of the bottom edge (at 7cm) and then carefully cut from each top corner down to that centre point.

For the layer of patterned paper, I cut a rectangle 13cm x 9.5cm.  Placing a pencil mark on the bottom edge at 6.5cm, I repeated the previous steps.

Instead of using the remaining triangles of paper to decorate the inside of the card, I cut rectangles 14.5cm x10cm for the Night of Navy and 14cm x 9.5cm for the Boho Indigo paper.

I then adhered a Very Vanilla label cut with one of the Painted Labels dies, stamped with a sentiment from the Four Seasons Floral stamp set.

I had so much fun and the fold is so gorgeous that I then set about making another!  This time I used Whisper White and Gray Granite cardstock, Peony Garden Designer Series Paper, Old World Paper 3D Embossing Folder, Peony Dies and Petal Pink cardstock.  I used Basic Gray and Sahara Sand cardstock for the leaves.
#thecraftythinker #arrowfold #funfold #peonydies #peonygardendsp #stampinup #cardmaking , Arrow Fold Card, Fun Fold, Peony Dies, Old World Paper Embossing folder, Peony Garden DSP, Stampin' Up Demonstrator, Stephanie Fischer, Sydney NSW
This arrow fold card features the Peony Dies and some Peony Garden paper
The colour scheme is Gray Granite, White and Petal Pink

The label inside the card was cut with one of the Tasteful Labels Dies.
#thecraftythinker #arrowfold #funfold #peonydies #peonygardendsp #stampinup #cardmaking , Arrow Fold Card, Fun Fold, Peony Dies, Old World Paper Embossing folder, Peony Garden DSP, Stampin' Up Demonstrator, Stephanie Fischer, Sydney NSW
The Old World Paper embossing folder give a lovely finish 


I hope you've enjoyed these cards and I do encourage you to visit Sam Calcott's tutorial.

Next week, I'll share my square version of this Arrow Fold, which I've also adapted from one of Sam's tutorials.

Thank you for visiting.
'Til next time!
Stephanie
Product List - All available for purchase from my online store

Friday, 23 October 2020

Snowflake Wishes Glittery Step Card

#thecraftythinker #stampinup #cardmaking #christmascard #xmascard #snowflakewishes #funfold #stepcard , Christmas Card, Snowflake Wishes, Step Card, Fun Fold, Stampin' Up Demonstrator, Stephanie Fischer, Sydney NSW
I really needed a piece of 12" square cardstock to make this centre fold card but
made it in two pieces instead

I kind of made this one up as I went along - but I think I got away with it!  It started with the glittery black rectangle with the snowflake negative die cut.  This had been sitting on my table for a while - it was a mistake I made the first time I used this die - I hadn't noticed that it cut the negative shapes.  
I finally got around to doing something with it.

A centre fold fun fold Christmas card featuring a panel cut with one of the Snowflake Wishes Dies

I wanted to use Gray Granite for the card base and for some reason had my heart set on making a centre fold.  The only challenge being that I only had A4 size .   
If you look carefully, you can see where the two pieces have been joined

So this is a centre fold card made in two pieces!  Where there's a will, there's a way - another of my Grandmother's favourite sayings!

Just add glue to the 1.25" section of the main piece and stick it to the underside of the separate tent fold.

#thecraftythinker #stampinup #tutorialstepcard #funfold #funfoldtutorial ,Tutorial , Step Card, Fun Fold, Stampin' Up Demonstrator Stephanie Fischer, Sydney NSW
Diagram for Part 1 of the long Centre Fold fun fold using A4 size cardstock
#thecraftythinker #stampinup #tutorialstepcard #funfold #funfoldtutorial ,Tutorial , Step Card, Fun Fold, Stampin' Up Demonstrator Stephanie Fischer, Sydney NSW
Diagram for Part 2 of the long Centre Fold fun fold using A4 size cardstock

Thank you for visiting today.
'Til next time!
Stephanie

Product List - All available for purchase from my online store