Showing posts with label #3dproject. Show all posts

Monday, 21 September 2020

2020 Birthday Card - The year that went down the toilet! : An exploding box card

Warning:  This card and post get a bit down and dirty when you get to the inside of the box!
#thecraftythinker #stampinup #explodingboxcard #3dtoiletcard #prizedpeony #funfold #cardmaking #3d , exploding box card, 3D toilet card, Prized Peony Bundle, Stampin' Up Demonstrator, Stephanie Fischer, Sydney NSW
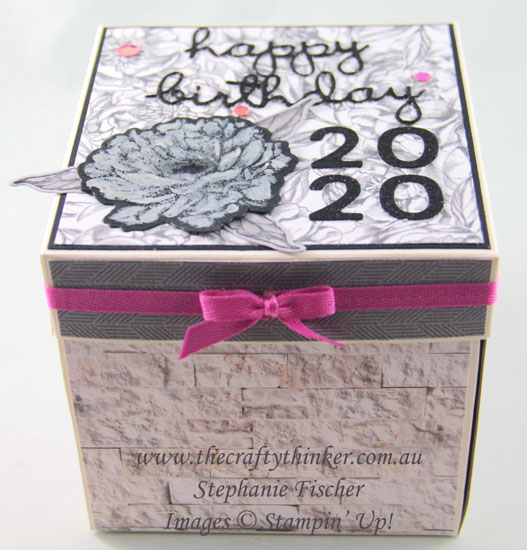
The outside of my exploding box card "bathroom"
 
I think I need to provide a little background to this Exploding Box Card.  It's for a friend of mine who recently made a fabulous birthday cake for a mutual friend that was a toilet roll surrounded by cupcakes in the guise of little shit emoji's!  We all laughed and agreed that this was the perfect theme for 2020!
#thecraftythinker #stampinup #explodingboxcard #3dtoiletcard #prizedpeony #funfold #cardmaking #3d , exploding box card, 3D toilet card, Prized Peony Bundle, Stampin' Up Demonstrator, Stephanie Fischer, Sydney NSW
I clear heat embossed the Peony on black cardstock and then painted it with
Frost White Shimmer Paint
Then I saw an amazing project by the very clever Anna Helman .  She created a perfect 3D imitation of a toilet that she filled with Tootsie Rolls and made a card to go with it featuring a toilet roll.  Click here to see her project and find the link to her tutorial.

I don't have any of the dies or products that she used and Tootsie Rolls are a little difficult to find here so, inspired by her creation, I set about making my own version with what I had available in my craft room.  Then I decided to make box for it and then that idea morphed into the exploding box card that kinda looks like a bathroom.

#thecraftythinker #stampinup #explodingboxcard #3dtoiletcard #prizedpeony #funfold #cardmaking #3d , exploding box card, 3D toilet card, Prized Peony Bundle, Stampin' Up Demonstrator, Stephanie Fischer, Sydney NSW
The greeting is cut from Black Glitter Paper with Well Written Dies and Playful Alphabet Dies

But I decided to make the lid look a bit pretty and feminine!

I attached a little message to the back of the toilet that says (please excuse my language!) "2020 may be the shit year that flushed itself down the toilet but I hope you still have an enjoyable and memorable birthday".
#thecraftythinker #stampinup #explodingboxcard #3dtoiletcard #prizedpeony #funfold #cardmaking #3d , exploding box card, 3D toilet card, Prized Peony Bundle, Stampin' Up Demonstrator, Stephanie Fischer, Sydney NSW
The exploding card that turns into a little toilet!

I used some window sheet between the paper layers on the bottom and side to keep the "wall" with the toilet roll vertical when the lid is removed (just cut a couple of strips of window sheet, score them and fold them to a 90 degree angle).
#thecraftythinker #stampinup #explodingboxcard #3dtoiletcard #prizedpeony #funfold #cardmaking #3d , exploding box card, 3D toilet card, Prized Peony Bundle, Stampin' Up Demonstrator, Stephanie Fischer, Sydney NSW
I used a Layering Ovals and Layering Circles Die, positioned thus, to create the toilet seat

I cut three of the toilet seat shapes and used two of them, with some window sheet sandwiched between to make the seat that can be lifted to get to the little pile of chocolate drops inside.

I lined the inside of the toilet with a little bit of plastic wrap to avoid the appearance of over-realistic skid marks on the bowl!
#thecraftythinker #stampinup #explodingboxcard #3dtoiletcard #prizedpeony #funfold #cardmaking #3d , exploding box card, 3D toilet card, Prized Peony Bundle, Stampin' Up Demonstrator, Stephanie Fischer, Sydney NSW
The lid of the toilet opens

To make the toilet roll, I cut a strip of kitchen paper (that's always at hand in my craft room!) and wrapped it around a little roll of Soft Suede card.  Then I bent a paper clip to hang it from.
#thecraftythinker #stampinup #explodingboxcard #3dtoiletcard #prizedpeony #funfold #cardmaking #3d , exploding box card, 3D toilet card, Prized Peony Bundle, Stampin' Up Demonstrator, Stephanie Fischer, Sydney NSW
I used a die in the Smooth Sailing set, trimmed, to create the flush handle.

#thecraftythinker #stampinup #explodingboxcard #3dtoiletcard #prizedpeony #funfold #cardmaking #3d , exploding box card, 3D toilet card, Prized Peony Bundle, Stampin' Up Demonstrator, Stephanie Fischer, Sydney NSW
I used papers from the In Good Taste pack because I though they looked like bathroom tiles
The card is probably not in good taste!

I'm quite happy with the result of my endeavours and I know my friend will love it - but if you're in the mood to make a toilet - I'd really recommend using Anna's tutorial if you have the necessary bits and pieces - I think it looks better and a would be a bit less fiddly.  However, I'll be happy to have a go at explaining what I did for anyone who wants to try this version.

Thank you for visiting.
'Til next time!
Stephanie

 Product List - All available for purchase from my online store

Friday, 25 October 2019

Ink it! Stamp it! International Design Team Blog Hop - 3D Project - Dashing Deer Table Favour

Welcome to the Ink It! Stamp It! Design Team Blog Hop - we hop every month so be sure to pop back and visit us again!  

Today we are sharing 3D Projects!

You are currently at my page - Stephanie Fischer, The Crafty Thinker.  At the end of my post there is a full line up of team members, please click on the name after mine in the list to continue the hop.

#thecraftythinker #stampinup #3dxmasbox #christmastablefavor #dashingdeer , Dashing Deer, Detailed Deer, Christmas Table Favor, Xmas Table Favour, Stampin' Up Demonstrator, Stephanie Fischer, Sydney NSW, 3D project
A Christmas table favor featuring the Dashing Deer stamp set and coordinating Detailed Deer dies
I've made a little Christmas table favour.  There's space inside for two Lindt chocolates.  Over the next couple of months, I'll be making 22 of them for my family Christmas gathering and will add names to the side of the box so that they double as place names.
#thecraftythinker #stampinup #3dxmasbox #christmastablefavor #dashingdeer , Dashing Deer, Detailed Deer, Christmas Table Favor, Xmas Table Favour, Stampin' Up Demonstrator, Stephanie Fischer, Sydney NSW, 3D project
Cutting and scoring the box base
For the box base:
  1. Cut cardstock to 6.5" x 5"
  2. Score each side 1.5" from the edge and fold to reinforce the score lines
  3. Trim off the corners
  4. Cut along the right hand side vertical score line until it meets the first horizontal score line
  5. Repeat step 4 on each side.
  6. Bend in each of the four corner pieces and add glue as shown in the photograph below
  7. Raise the sides and press the corners into position to form the box
#thecraftythinker #stampinup #3dxmasbox #christmastablefavor #dashingdeer , Dashing Deer, Detailed Deer, Christmas Table Favor, Xmas Table Favour, Stampin' Up Demonstrator, Stephanie Fischer, Sydney NSW, 3D project
Gluing the box base

#thecraftythinker #stampinup #3dxmasbox #christmastablefavor #dashingdeer , Dashing Deer, Detailed Deer, Christmas Table Favor, Xmas Table Favour, Stampin' Up Demonstrator, Stephanie Fischer, Sydney NSW, 3D project
The finished box base is partitioned for two chocolates
I created a double compartment inside the box by cutting a piece of cardstock to 2" x 5.5" and scoring at 1.75", 2.75" and 3.75" then folding and gluing as shown in the photograph below.  Press the glued pieces together to form the central partition.  The insert fits snugly, so I didn't glue it into position.
#thecraftythinker #stampinup #3dxmasbox #christmastablefavor #dashingdeer , Dashing Deer, Detailed Deer, Christmas Table Favor, Xmas Table Favour, Stampin' Up Demonstrator, Stephanie Fischer, Sydney NSW, 3D project
Making the partition for the box base
Box Lid:
Cut a piece of cardstock to 4 5/8" x 3 1/8".
Score each side 1/2" from the edge
Make the lid using the same method as for the box base
Cut a piece of Feels Like Frost Specialty Designer Series Paper to 2" x 3.5" and glue to the top of the lid.

I stamped the Dashing Deer onto black cardstock with Silvery Shimmer metallic ink.  
By using the Stamparatus, I could overstamp multiple times until I was happy with the strength of colour.

I then used the coordinating Detailed Deer die to cut out the deer but I was careful to position the top cutting plate just above the feet - as seen in the photograph below.  TIP: I also used a very small piece of washi tape to secure the die in position.
#thecraftythinker #stampinup #3dxmasbox #christmastablefavor #dashingdeer , Dashing Deer, Detailed Deer, Christmas Table Favor, Xmas Table Favour, Stampin' Up Demonstrator, Stephanie Fischer, Sydney NSW, 3D project
Cutting the deer to stand on top of the box
This allowed me to create long tabs at the end of each foot (or hoof!).
#thecraftythinker #stampinup #3dxmasbox #christmastablefavor #dashingdeer , Dashing Deer, Detailed Deer, Christmas Table Favor, Xmas Table Favour, Stampin' Up Demonstrator, Stephanie Fischer, Sydney NSW, 3D project
The finished deer waiting to be applied to the box lid
I then used my craft knife to cut slots into the top of the box lid, through which I pushed the tabs and secured them to the underside of the lid with sticky tape.  I then chose to cover up the tabs and tape with a piece of cardstock which I glued into position.
#thecraftythinker #stampinup #3dxmasbox #christmastablefavor #dashingdeer , Dashing Deer, Detailed Deer, Christmas Table Favor, Xmas Table Favour, Stampin' Up Demonstrator, Stephanie Fischer, Sydney NSW, 3D project
The legs of the deer are threaded through little slots cut into the lid so that it will stand up
Thank you so much for joining us today and we hope you'll join us again next month when we'll be sharing Christmas Cards.

I'm Stephanie Fischer and to keep hopping around see the list below to see who is up next with another great project.

Thanks for visiting
'Til next time!
Stephanie

Edit: 17 November 2019 - I've now finished all the table favours for the Christmas table!  
#thecraftythinker #stampinup #3dxmasbox #christmastablefavor #dashingdeer , Dashing Deer, Detailed Deer, Christmas Table Favor, Xmas Table Favour, Stampin' Up Demonstrator, Stephanie Fischer, Sydney NSW, 3D project
My Dashing Deer table favors ready for the Christmas table!


Product List - All available for purchase from my online store