Showing posts with label 3D project. Show all posts

Friday, 25 October 2019

Ink it! Stamp it! International Design Team Blog Hop - 3D Project - Dashing Deer Table Favour

Welcome to the Ink It! Stamp It! Design Team Blog Hop - we hop every month so be sure to pop back and visit us again!  

Today we are sharing 3D Projects!

You are currently at my page - Stephanie Fischer, The Crafty Thinker.  At the end of my post there is a full line up of team members, please click on the name after mine in the list to continue the hop.

#thecraftythinker #stampinup #3dxmasbox #christmastablefavor #dashingdeer , Dashing Deer, Detailed Deer, Christmas Table Favor, Xmas Table Favour, Stampin' Up Demonstrator, Stephanie Fischer, Sydney NSW, 3D project
A Christmas table favor featuring the Dashing Deer stamp set and coordinating Detailed Deer dies
I've made a little Christmas table favour.  There's space inside for two Lindt chocolates.  Over the next couple of months, I'll be making 22 of them for my family Christmas gathering and will add names to the side of the box so that they double as place names.
#thecraftythinker #stampinup #3dxmasbox #christmastablefavor #dashingdeer , Dashing Deer, Detailed Deer, Christmas Table Favor, Xmas Table Favour, Stampin' Up Demonstrator, Stephanie Fischer, Sydney NSW, 3D project
Cutting and scoring the box base
For the box base:
  1. Cut cardstock to 6.5" x 5"
  2. Score each side 1.5" from the edge and fold to reinforce the score lines
  3. Trim off the corners
  4. Cut along the right hand side vertical score line until it meets the first horizontal score line
  5. Repeat step 4 on each side.
  6. Bend in each of the four corner pieces and add glue as shown in the photograph below
  7. Raise the sides and press the corners into position to form the box
#thecraftythinker #stampinup #3dxmasbox #christmastablefavor #dashingdeer , Dashing Deer, Detailed Deer, Christmas Table Favor, Xmas Table Favour, Stampin' Up Demonstrator, Stephanie Fischer, Sydney NSW, 3D project
Gluing the box base

#thecraftythinker #stampinup #3dxmasbox #christmastablefavor #dashingdeer , Dashing Deer, Detailed Deer, Christmas Table Favor, Xmas Table Favour, Stampin' Up Demonstrator, Stephanie Fischer, Sydney NSW, 3D project
The finished box base is partitioned for two chocolates
I created a double compartment inside the box by cutting a piece of cardstock to 2" x 5.5" and scoring at 1.75", 2.75" and 3.75" then folding and gluing as shown in the photograph below.  Press the glued pieces together to form the central partition.  The insert fits snugly, so I didn't glue it into position.
#thecraftythinker #stampinup #3dxmasbox #christmastablefavor #dashingdeer , Dashing Deer, Detailed Deer, Christmas Table Favor, Xmas Table Favour, Stampin' Up Demonstrator, Stephanie Fischer, Sydney NSW, 3D project
Making the partition for the box base
Box Lid:
Cut a piece of cardstock to 4 5/8" x 3 1/8".
Score each side 1/2" from the edge
Make the lid using the same method as for the box base
Cut a piece of Feels Like Frost Specialty Designer Series Paper to 2" x 3.5" and glue to the top of the lid.

I stamped the Dashing Deer onto black cardstock with Silvery Shimmer metallic ink.  
By using the Stamparatus, I could overstamp multiple times until I was happy with the strength of colour.

I then used the coordinating Detailed Deer die to cut out the deer but I was careful to position the top cutting plate just above the feet - as seen in the photograph below.  TIP: I also used a very small piece of washi tape to secure the die in position.
#thecraftythinker #stampinup #3dxmasbox #christmastablefavor #dashingdeer , Dashing Deer, Detailed Deer, Christmas Table Favor, Xmas Table Favour, Stampin' Up Demonstrator, Stephanie Fischer, Sydney NSW, 3D project
Cutting the deer to stand on top of the box
This allowed me to create long tabs at the end of each foot (or hoof!).
#thecraftythinker #stampinup #3dxmasbox #christmastablefavor #dashingdeer , Dashing Deer, Detailed Deer, Christmas Table Favor, Xmas Table Favour, Stampin' Up Demonstrator, Stephanie Fischer, Sydney NSW, 3D project
The finished deer waiting to be applied to the box lid
I then used my craft knife to cut slots into the top of the box lid, through which I pushed the tabs and secured them to the underside of the lid with sticky tape.  I then chose to cover up the tabs and tape with a piece of cardstock which I glued into position.
#thecraftythinker #stampinup #3dxmasbox #christmastablefavor #dashingdeer , Dashing Deer, Detailed Deer, Christmas Table Favor, Xmas Table Favour, Stampin' Up Demonstrator, Stephanie Fischer, Sydney NSW, 3D project
The legs of the deer are threaded through little slots cut into the lid so that it will stand up
Thank you so much for joining us today and we hope you'll join us again next month when we'll be sharing Christmas Cards.

I'm Stephanie Fischer and to keep hopping around see the list below to see who is up next with another great project.

Thanks for visiting
'Til next time!
Stephanie

Edit: 17 November 2019 - I've now finished all the table favours for the Christmas table!  
#thecraftythinker #stampinup #3dxmasbox #christmastablefavor #dashingdeer , Dashing Deer, Detailed Deer, Christmas Table Favor, Xmas Table Favour, Stampin' Up Demonstrator, Stephanie Fischer, Sydney NSW, 3D project
My Dashing Deer table favors ready for the Christmas table!


Product List - All available for purchase from my online store

Friday, 22 February 2019

Ink it! Stamp it! International Design Team Blog Hop - 3D Project - Retirement Mini Album

Welcome to the Ink It! Stamp It! Design Team Blog Hop - we hop every month so be sure to pop back and visit us again!  

Today our theme is a 3D Project.

You are currently at my page - Stephanie Fischer, The Crafty Thinker.  At the end of my post there is a full line up of team members, please click on the name after mine in the list to continue the hop.

#thecraftythinker  #stampinup  #cardmaking  #minialbumtutorial  #3dproject , Ink It Stamp It Blog Hop, 3D project, Mini Album, Frosted Bouquet Framelits, Delicate Lace Edgelits, Stampin' Up Australia Demonstrator, Stephanie Fischer, Sydney NSW
The closed memorabilia "retirement card" album
Since this post is very image-heavy, I'm not going to say a lot.  But I do have a tutorial (with diagrams and pictures) of the basis of this project for anyone who would like it.
#thecraftythinker  #stampinup  #cardmaking  #minialbumtutorial  #3dproject , Ink It Stamp It Blog Hop, 3D project, Mini Album, Frosted Bouquet Framelits, Delicate Lace Edgelits, Stampin' Up Australia Demonstrator, Stephanie Fischer, Sydney NSW
First stage of opening the album.  I could have put something on that right side - but the paper is just too pretty!
We are so blessed in our company - we have wonderful staff who seem to enjoy their work and so they stay ... until they retire!  When someone retires, I like to make a "card" that also acts as a piece of memorabilia for them.  This is for the most recent retirement.
#thecraftythinker  #stampinup  #cardmaking  #minialbumtutorial  #3dproject , Ink It Stamp It Blog Hop, 3D project, Mini Album, Frosted Bouquet Framelits, Delicate Lace Edgelits, Stampin' Up Australia Demonstrator, Stephanie Fischer, Sydney NSW
Second stage of opening the album
The base is created with three A4 pieces of Tranquil Tide cardstock, decorated with Share What You Love Designer Series Paper.
#thecraftythinker  #stampinup  #cardmaking  #minialbumtutorial  #3dproject , Ink It Stamp It Blog Hop, 3D project, Mini Album, Frosted Bouquet Framelits, Delicate Lace Edgelits, Stampin' Up Australia Demonstrator, Stephanie Fischer, Sydney NSW
The "flip mechanism" has space for 12 photos
There's space for lots of photographs, providing memories of people, events and activities through the years.
#thecraftythinker  #stampinup  #cardmaking  #minialbumtutorial  #3dproject , Ink It Stamp It Blog Hop, 3D project, Mini Album, Frosted Bouquet Framelits, Delicate Lace Edgelits, Stampin' Up Australia Demonstrator, Stephanie Fischer, Sydney NSW
The third stage of opening the album reveals some of the pockets holding personal messages
There's also space for individual cards on which co-workers will write personal messaages.
#thecraftythinker  #stampinup  #cardmaking  #minialbumtutorial  #3dproject , Ink It Stamp It Blog Hop, 3D project, Mini Album, Frosted Bouquet Framelits, Delicate Lace Edgelits, Stampin' Up Australia Demonstrator, Stephanie Fischer, Sydney NSW
The fully opened album
Underneath all of the flip photos there is a card, written in my poor attempt at calligraphy, with a company message and the start and finish dates for our retiree.
#thecraftythinker  #stampinup  #cardmaking  #minialbumtutorial  #3dproject , Ink It Stamp It Blog Hop, 3D project, Mini Album, Frosted Bouquet Framelits, Delicate Lace Edgelits, Stampin' Up Australia Demonstrator, Stephanie Fischer, Sydney NSW
The album and presentation box
I didn't have time to correct the situation but I should have made an even deeper gusset to allow for the depth of all the photos.  Something I've corrected in my tutorial.  I also made a presentation box.
#thecraftythinker  #stampinup  #cardmaking  #minialbumtutorial  #3dproject , Ink It Stamp It Blog Hop, 3D project, Mini Album, Frosted Bouquet Framelits, Delicate Lace Edgelits, Stampin' Up Australia Demonstrator, Stephanie Fischer, Sydney NSW
A close up of the "dedication" on the top of the album
Click here if you would like the PDF instructions for the basic build.  I must add though that I made some adjustments to create a deeper gusset that I hope will work but I haven't tested them.  Please contact me if you run into problems.

Thank you so much for joining us today and we hope you'll join us again next month when we'll be showing you our favourite colour combo

I'm Stephanie Fischer and, to keep hopping around, see the list below to see who is up next with another great project.

Thanks for visiting
'Til next time!
Stephanie


Product List - All products used available for purchase in my online store

Monday, 18 July 2016

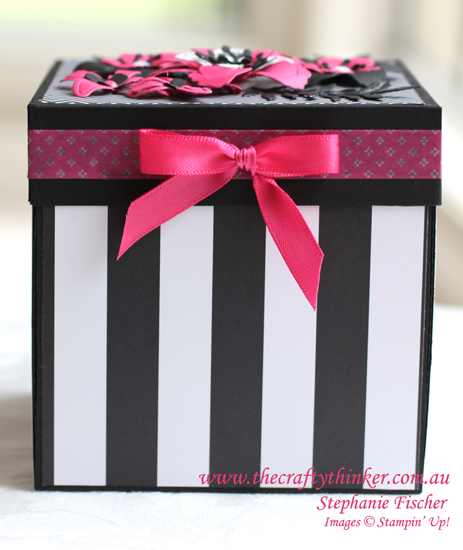
Pop of Pink Botanical Exploding Box Card

There's a standing joke in our family that I'm always away for my niece Erin's birthday - it's not intentional, it just seems to happen!  I was very relieved and pleased that this year, by the narrowest of margins, I shall be here to celebrate her 21st!

Stampin Up, #thecraftythinker, Exploding Box Card, Fun Fold, 21st birthday card, Botanical Builder, Stampin Up Australia Demonstrator
I haven't yet purchased the Melon Mambo Stitched Ribbon, so I had to raid my stash

I've used Pop of Pink Designer Series Paper and Washi Tape to create an exploding box card for her.
Stampin Up, #thecraftythinker, Exploding Box Card, Fun Fold, 21st birthday card, Botanical Builder, Stampin Up Australia Demonstrator
Melon Mambo is such a pretty colour and adds a touch of drama against black & white

The box is also decorated with flowers created with the Botanical Builder Framelits that have Enamel Shape centres.

Stampin Up, #thecraftythinker, Exploding Box Card, Fun Fold, 21st birthday card, Botanical Builder, Stampin Up Australia Demonstrator
The centrepiece can hold either a gift card or some folding money

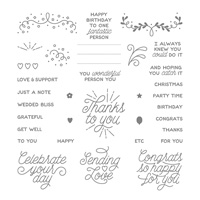
The greetings are both from Designer Tin of Cards
Stampin Up, #thecraftythinker, Exploding Box Card, Fun Fold, 21st birthday card, Botanical Builder, Stampin Up Australia Demonstrator
I used the Classic Label Punch to create the slot to hold the Gift card or money


There is a little slot in the base of the card that will hold some birthday money.  The numbers were cut with the Large Numbers Framelits and stand up by themselves with the help of some strips of Window Sheet.  Like the black petals, the numbers have a touch of gold Wink of Stella on them.

I sponged a little Whisper White Craft ink onto the black leaves on the inside of the box.

Thank you for visiting.
'Til next time
Stephanie

Product List - To shop in my online store - click on a product image below (Australian Residents only)