Showing posts with label Birthday Banners. Show all posts

Friday, 10 March 2017

Special Reason Dragonfly

It's Friday which means .... Crazy Crafters' Projects Highlights day!  To see all the amazing entries and vote for your favourites, click here.

I made a few inky backgrounds the other day (I like to do messy things like that in batches!) and used one of them for this card.
#thecraftythinker, Special Reason, Dragonfly Dreams, Watercolour background, Stampin Up Australia Demonstrator, Stephanie Fischer, Sydney NSW, Copper, ink smooshing
Copper makes everything "special" as well as warm and inviting!

Having cut my piece of Shimmery White cardstock to the size I wanted, the first thing I did was to Copper heat emboss the dragonfly image.

Then, to make the background I used Peekaboo Peach and Watermelon Wonder ink pads, a water spritzer, plastic bag and waterproof craft mat.

I basically used the plastic bag smooshing method of applying ink to wet cardstock (wet the cardstock, pat the ink pad down on the plastic bag to transfer ink, smoosh inky bag onto wet cardstock) but, not quite happy with my result, I also patted some ink down onto the craft mat, spritzed it with some water and tapped the cardstock into it.


#thecraftythinker, Special Reason, Dragonfly Dreams, Watercolour background, Stampin Up Australia Demonstrator, Stephanie Fischer, Sydney NSW, Copper, ink smooshing
The touches of copper provide interest to the otherwise simple card

Once it was all dry, I layered up the cardstock and added the remaining elements.  I cut flowers with the Stylish Stems small flower framelits - one in Watermelon Wonder and two in Cherry Cobbler.  Having adhered them into place, I cut just the petals in Peekaboo Peach cardstock and glued them into position in the Watermelon Wonder flower.

I then partially cut three more flowers with Copper Sheet.  The centres were adhered into the three flowers and I sprinkled some of the petals around the dragonfly.  I'm so proud of myself for achieving "random"!!

I copper heat embossed the banner and sentiment before cutting out the banner with the matching die from the Bunch of Banners framelits.

To finish the inside of the card, I stamped flowers from the Special Reason set in one corner using Peekaboo Peach, Watermelon Wonder and Wild Wasabi inks.

Thank you for visiting - don't forget to visit the highlights!
'Til next time!

Stephanie

Product List - To visit my online store, click on a product image below (Australian Residents only)

Wednesday, 3 August 2016

Floral Botanical

There's not really a lot to say about this card, so I'll let the pictures speak for themselves.  The colours are Basic Gray and Very Vanilla with a touch of Pear Pizzazz and Real Red.
Stampin Up, SU, #thecraftythinker, Floral Phrases, Botanical Builder, Stampin Up Australia Demonstrator
Stampin Dimensionals add depth and movement to the card front

Stampin Up, SU, #thecraftythinker, Floral Phrases, Botanical Builder, Stampin Up Australia Demonstrator
I've always loved the combination of grey, cream and pink
Stampin Up, SU, #thecraftythinker, Floral Phrases, Botanical Builder, Stampin Up Australia Demonstrator
The edge from the Floral Phrases stamp set finishes off the inside of the card
Thank you for visiting
'Til next time
Stephanie

Product List - To shop in my online store, click on one of the product images below (Australian Residents only)

Monday, 20 June 2016

Foxy cat

It was my son's birthday recently and since he loves cats I decided to try out my new Foxy Friends stamp set.
Stampin Up, #thecraftythinker, Foxy Friends, Cat, Double Porthole card, Fun Fold, Stampin Up Australia Demonstrator
A friendly and slightly curious cat
 I made the card with a piece of Early Espresso cardstock measuring 6" x 12", scored on the long side at 4" and 8".

For the front of the card, I cut a piece of Crumb Cake cardstock to 3.75" x 5.75" and used Versamark and the Diagonal Stripe background stamp to create the diagonal lines.  I adhered that piece to the front of the card and then used the second largest Layering Ovals Framelit to cut a window.
 
Stampin Up, #thecraftythinker, Foxy Friends, Cat, Double Porthole card, Fun Fold, Stampin Up Australia Demonstrator
I'm struggling to adapt to the winter light for my photographs!

I cut a piece of Crumb Cake DSP (from the Neutrals DSP Stack) to 3.75" x 5.75" and adhered that to the next piece of the card.  I refolded the card and used a pencil to lightly draw around the inside of the aperture in the front of the card.  I used the pencil marks to line up the same die to cut a window in this layer.
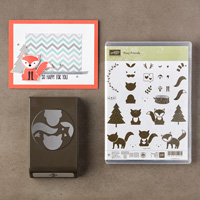
I then used the same oval die and the largest oval die to cut two frames from Mint Macaron cardstock and glued them in place.

I cut a piece of Very Vanilla cardstock to 3.75" x 5.75" and temporarily positioned it on the middle section while I made a very light mark through the "window" to help me line up the stamped image.  I then stamped the body of the cat using Soft Suede ink (stamped off).  I masked the body and stamped the tail with Soft Suede ink.  I only half inked the legs because cats have shorter legs than foxes! I inked up the head with Soft Suede ink and stamped off once, then I tapped jusst the ears into Early Espresso ink and stamped the image on a scrap piece of Very Vanilla cardstock.  I added the face stamped in Basic Black and then punched out the head.  I trimmed back to the ink line on the bottom half of the head with snips and then stuck the head to the body with a dimensional.
Stampin Up, #thecraftythinker, Foxy Friends, Cat, Double Porthole card, Fun Fold, Stampin Up Australia Demonstrator
I left the inside of the card fairly simple to maximise space for my loving message to my son

I used Birthday Banners bundle and Banners For You Bundle using Early Espresso ink and Rich Razzleberry cardstock for the front of the card.  I also cut thin strips of Mint Macaron and stamped the paw print from Foxy Friends with Early Espresso ink and stuck them to the top and bottom of both flaps of the card.

The banner on the inside flap of the card uses the Birthday Banners and matching framelit and a sentiment from Feather Together.  I just picked up a little Soft Suede ink with an aqua painter to add a little shadow to "ground" the cat.

Thanks for your visit
'Til next time

Stephanie


Product List - To shop in my online store - click on one of the product images below (Australian Residents only)
