Showing posts with label Making a stencil from a die. Show all posts

Sunday, 30 July 2017

Crazy Crafters Blog Hop with Special Guest: Susan Wong

Image may contain: text
Image may contain: 1 person, smiling, close-up and outdoor
Click on this image to get to know
Susan Wong and her work
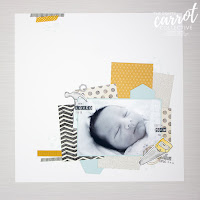
Nailed It Baby Scrapbook Page - Susan Wong for The Crafty Carrot Co.
Click image to link to Susan's blog
Welcome to the Crazy Crafters' Blog Hop with our Special Guest stamper, Susan Wong from Auckland, New Zealand - we are thrilled to have Susan join us this month and so excited to CASE (Copy And Selectively Edit) any project that has been created by her . 
 
Whether you are starting the blog hop here at my blog, Stephanie Fischer - The Crafty Thinker, or have come from the person before me, be sure to click on the person listed under me further down the page to continue your journey on this blog hop.

Although I'm not a scrapbooker, I have chosen one of Susan's gorgeous memory keeping projects to CASE .... but I've made it into a 5.5" square card.
#crazycraftersbloghop, card layout, Oh So Eclectic, Embossing Paste, #thecraftythinker, Stampin' Up Australia Demonstrator, Stephanie Fischer, Sydney NSW
A great layout can be put to any purpose and using pieces of printed paper makes for a very quick and easy card!

To a base card of Whisper White Thick cardstock, I've added a variety of offcuts from the Delightful Daisy Designer Series Paper and the Fresh Florals paper stack.

The rectangular focal is a piece that was already sitting on my desk - I made it to use some excess Embossing Paste that I had coloured with Tranquil Tide ink for this card.

The large flower is made from Peekaboo Peach and Calypso Coral cardstock.  The three smaller flowers are made using this method but with Calypso Coral ink.
#crazycraftersbloghop, card layout, Oh So Eclectic, Embossing Paste, #thecraftythinker, Stampin' Up Australia Demonstrator, Stephanie Fischer, Sydney NSW
Embossing paste provides such great depth and textural contrast

I hope you've enjoyed this card and I welcome your comments. 

Thanks for following our blog hop. Remember that currently you are at my blog - Stephanie Fischer - so click on the next name in the list to ensure that you don't miss out of seeing any of the blogs and the amazing inspiration they contain.

Thanks for visiting
'Til next time
Stephanie


Product List

Wednesday, 26 July 2017

Cardfront Builder with Embossing Paste

Continuing my quest to attack everything that doesn't breath with Embossing Paste!  I started out by making stencils with the dies in the Cardfront Builder set (which matches the Carols of Christmas stamp set - available as a bundle to save 10%).  These products will be available from 1st August as an early release from the Holiday Catalogue (due later this year).
Cardfront Builder, Embossing Paste, Christmas Card, #thecraftythinker, Stampin' Up Australia Demonstrator, Stephanie Fischer, Sydney NSW
My first Christmas card for the year!  It features stencils I made with the Cardfront Builder dies
and Embossing paste

I then placed the moon and stars stencil onto a piece of Smoky Slate cardstock and used a small amount of Embossing Paste straight from the pot.

When that embossing was dry, I positioned the two tree stencils and used Embossing Paste that I had coloured with a drop of Tranquil Tide ink.  Once that layer was dry, I went back to using the paste direct from the pot to add snow to the trees and foreground.  While it was still wet, I sprinkled it with some Dazzling Diamonds which sparkles nicely - although I didn't manage to capture it with my photography.

I have mislaid my stamp set (!!!) so I cut out the deer and watercoloured her.  I stamped the greeting with Tranquil Tide ink and then added a layer of Wink of Stella to the word "sparkle", although it doesn't show in my photographs.

Cardfront Builder, Embossing Paste, Christmas Card, #thecraftythinker, Stampin' Up Australia Demonstrator, Stephanie Fischer, Sydney NSW
The trees have quite a bit of depth to them!

Thank you for your visit.
'Til next time!
Stephanie

Product List - click on a product image below to visit my online store (Australian Residents only)

Sunday, 23 July 2017

Detailed Floral Stencilled White on Black

The other day I made this card with embossing paste and a stencil I made with Window Sheet and the Detailed Floral Thinlit.  I made a black and white panel at the same time which I've used in today's card.
Embossing Paste, making a stencil, Faux metal medallion, Oh So Eclectic, Sympathy Card, Detailed Floral, #thecraftythinker, Stampin' Up Australia Demonstrator, Stephanie Fischer, Sydney NSW
A touch of Powder Pink brightens up an otherwise monochromatic card

I added the Basic Gray stripes to the Powder Pink layer by temporarily adhering little strips of cardstock to the panel as a mask and sponging with Basic Gray ink.  I added a small piece of Basic Gray cardstock under the pink and grey panel to put a full stop under that section.
Embossing Paste, making a stencil, Faux metal medallion, Oh So Eclectic, Sympathy Card, Detailed Floral, #thecraftythinker, Stampin' Up Australia Demonstrator, Stephanie Fischer, Sydney NSW
The card base is made with Whisper White Thick A4 cardstock. 
A card suitable for any occasion from birthday to sympathy

I stamped the flowers and foliage from the Oh So Eclectic stamp set with Basic Gray ink onto a mix of Basic Gray and Smoky Slate cardstock pieces and cut them out with the matching Eclectic Layers Thinlits (buy as a bundle to save 10%).  

I had already created a mask for the flowers for this card and used it again with embossing paste coloured with a drop of Smoky Slate ink.  When the embossing paste was dry, I added some shading by watercolouring with Memento Tuxedo Black ink.
Embossing Paste, making a stencil, Faux metal medallion, Oh So Eclectic, Sympathy Card, Detailed Floral, #thecraftythinker, Stampin' Up Australia Demonstrator, Stephanie Fischer, Sydney NSW
The faux metal medallion made with silver heat embossing impressed with a
black-inked stamp

To create the faux metallic medallion, I added four layers of silver heat embossing to a small piece of cardstock.  Before I heated the fifth (and final) layer, I inked up the stamp with Basic Black ink.  While the silver embossing was still warm and soft, I stamped the greeting.  Once it was cool, I cut out with one of the Stitched Shapes framelits and added it to the card front with Stampin' Dimensionals.

I had some flowers and foliage left over, which I used on the card that I'll share on tomorrow's post.

Thank you for visiting.
'Til next time!
Stephanie

Product List - To visit my online store, click on a product image below (Australian Residents only)

Wednesday, 19 July 2017

Detailed Floral Stencil

I've been having loads of fun searching through my stash of dies for ones that seem suitable for making stencils with pieces of Window Sheet.  Today I selected the Detailed Floral Thinlits.
Detailed Floral Thinlits, Embossing Paste, Stencilling, #thecraftythinker, Stampin' Up Australia Demonstrator, Stephanie Fischer, Sydney NSW
I know the recipient likes to keep things simple, otherwise my inclination would have been to
add some bling to the flower centres!

Having smooshed (yes, I'm sure that's the technical term!) the embossing paste through the stencil onto Crumb Cake cardstock and let it dry, I put the (clean, dry) stencil back in position and used a sponge dauber to apply colour to the floral pattern.

I layered the piece onto Very Vanilla and Fresh Fig panels and adhered it to the front of my Crumb Cake card base.

The greeting is stamped onto Very Vanilla with Berry Burst ink.  The label shape is stamped with Fresh Fig ink and the label cut with the matching die from the Rose Garden thinlits.

Detailed Floral Thinlits, Embossing Paste, Stencilling, #thecraftythinker, Stampin' Up Australia Demonstrator, Stephanie Fischer, Sydney NSW, Making a stencil
Progress shot showing the stencil and the die that created it

 I used the stencil and sponge daubers to decorate the inside of the card to match.
Detailed Floral Thinlits, Embossing Paste, Stencilling, #thecraftythinker, Stampin' Up Australia Demonstrator, Stephanie Fischer, Sydney NSW
I used the same stencil and inks to decorate the inside of the card

Can you keep a secret?  I'll be posting this card on Monday to someone who's initials are KB - the person who introduced me to the world of Stampin' Up! and who heads up the Crazy Crafters team - ssshhhhh!

Thank you for your visit.
'Til next time!
Stephanie

Product List - All products used can be purchased in my online store by clicking on a product image below (Australian Residents only)