Showing posts with label Embossing Paste. Show all posts

Monday, 25 December 2017

Card Front Builder Blocks Christmas Card

This card started life as experimentation with my new pot of Silver Embossing Paste (available on 3 January in the new Occasions Catalogue). 

I cut Window Sheet stencils with dies in the Card Front Builder set.  Not very happy with my silver results, I repeated the process (using the same stencils) with the Shimmery White Embossing Paste to check the differences.  
#thecraftythinker, #christmascard, #cardmaking, #embossingpaste, Christmas card, Card Front Builder, Stampin' Up Australia Demonstrator, Stephanie Fischer, Sydney NSW
The Silver Embossing Paste is much runnier than either of the other two pastes and for this reason, I had less control of the paste and it kept squeezing its way under the stencil - to disastrous effect (as you'll see the photo below).
#thecraftythinker, #christmascard, #cardmaking, #embossingpaste, Christmas card, Card Front Builder, Stampin' Up Australia Demonstrator, Stephanie Fischer, Sydney NSW
Comparison of Silver Embossing paste and Shimmery White Embossing Paste from Stampin' Up

I then tried out the Silver paste with one of the Pattern Party Decorative Masks and had a much better result - perhaps because those stencils are little thicker and sturdier than my home made one and also have smaller "open" areas.  I used that test in this card.

When I used the Shimmery White Embossing Paste with my home made stencils, the seepage was very limited and easy to clean up.  There were originally smudged areas on the reindeer in the corner between the head and horns, between the hind legs and near the stomach. They looked very much like the area on the left of the tree.  Before the paste was completely dry, I gently scraped away the offending bits with the end of my Paper-Piercing tool and then finished the cleaning process with a barely damp small brush.

Thank you for visiting.
'Til next time!
Stephanie

PS  I wish you all the joys of the season!

Product List - Click a product image below to shop in my online store (Australian Residents only)

Wednesday, 22 November 2017

Pattern Party Sleigh Christmas Card

This card came about because I wanted to test out the new sparkly embossing paste that will be available in the Occasions Catalogue (3 January to 31 May 2018).  I was curious to see if/how the result would differ from using the plain white embossing paste with Dazzling Diamonds added. 
#thecraftythinker, #christmascard, #cardmaking, #embossingpaste, Pattern Party, Embossing paste, Santa's Sleigh, Xmas card, Stampin' Up Australia Demonstrator, Stephanie Fischer, Sydney NSW
This Christmas card has some sneak peeks and some old favourites

The result?  It's just as sparkly - maybe a little finer and, best of all, I can save my Dazzling Diamonds for other purposes!

So I had the red and white pattern and my mind went blank (not an unusual state of affairs!).   When in doubt - add a sleigh full of gifts!
#thecraftythinker, #christmascard, #cardmaking, #embossingpaste, Pattern Party, Embossing paste, Santa's Sleigh, Xmas card, Stampin' Up Australia Demonstrator, Stephanie Fischer, Sydney NSW
A mix of old and new products in this Christmas card
Curious about the greenish embellishment?  The Tutti-frutti Sequins are self-adhesive and will also be available in the new Occasions Catalogue. I noticed that the blue ones are so pale as to be almost transluscent so I layered one on top of a Lemon Lime Twist one to get a more muted green better suited to my colour scheme.  In the centre is a Rhinestone Jewel that I coloured with Stampin' Blends alcohol markers.

Thank you for visiting.
'Til next time!
Stephanie


Product List - Click on a product image below to visit my online store (Australian Residents only)

Sunday, 10 September 2017

Crazy Crafters Blog Hop with Special Guest Stesha Bloodhart

Image may contain: text  Welcome to the Crazy Crafters' Blog Hop with our Special Guest stamper, Stesha Bloodhart - we are thrilled to have Stesha join us this month and so excited to CASE (Copy And Selectively Edit) any project that has been created by her . 
 
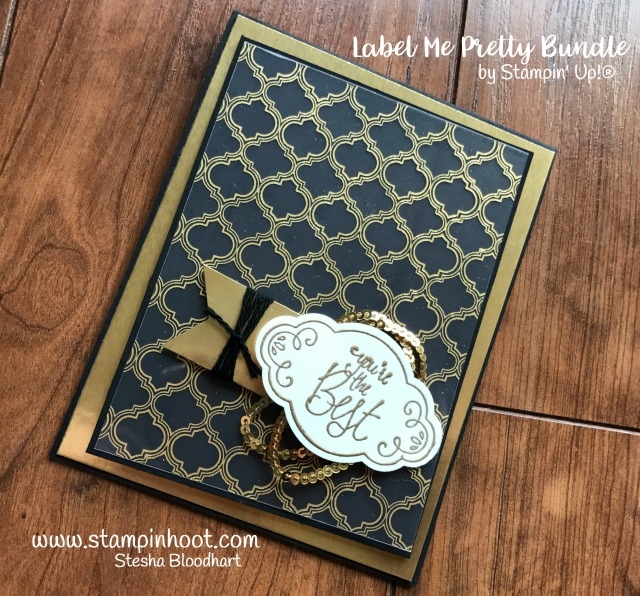
Stampin' Up! Label Me Pretty Bundle for Tic Tac Toe Challenge 001 #tttc001 by Stampin' Hoot! Stesha BloodhartWhether you are starting the blog hop here at my blog, Stephanie Fischer - The Crafty Thinker, or have come from the person before me, be sure to click on the person listed under me further down the page to continue your journey on this blog hop. 

I was inspired by the rich and elegant black and gold in this card and changed it up a little to create this card.  However, it should be said that creating cards whilst in the grip of the flu might not be a good idea! ... I kept losing the plot and stuffing up!
#cardmaking, Lovely Words, Embossing Paste, Pattern Party, Black & Gold card, #thecraftythinker, Stampin Up Australia Demonstrator, Stephanie Fischer, Sydney NSW
Gold embossed Embossing Paste makes for a very glamourous background

To create the decorative top layer of the card, I started out by cutting a piece of Post It Note with one of the Sweet & Sassy framelits to make a mask.  I then used one of the Pattern Party masks and Embossing Paste to make the dimensional background.  

This is where I lost the plot!  I completely forgot that I was intending to sprinkle the wet embossing paste with gold embossing powder (in all of the minute or two it took to spread the paste!) and I removed my mask and allowed the paste to dry.  Oh well, no problem, I thought, I'll just use some Versamark.  But, I forgot to re-mask the heart area before placing the mask back over the pattern and patting with the Versamark pad and sprinkling on the embossing powder! 

Oh well, I thought, no problem, I'll just brush off any embossing powder that's where I don't want it.  The theory was good but, no matter how much I brushed, I couldn't remove all traces of that pesky gold.  Eventually, I decided that I could live with the faint traces of gold pattern within the heart shape!

The gold centrepiece is cut with the Lovely Words Thinlits and Sweet & Sassy Framelits from Gold Foil Sheet.  I had remembered (a win!) to put some Multipurpose Adhesive Sheet onto the back of the gold card before I cut it, which made it really easy to stick to my card front.

#cardmaking, Lovely Words, Embossing Paste, Pattern Party, Black & Gold card, #thecraftythinker, Stampin Up Australia Demonstrator, Stephanie Fischer, Sydney NSW
The inside features the same stencilled pattern using Basic Gray ink fading  out
For the inside of the card, I used the same Pattern Party mask and some Basic Gray ink.  The decorative strip at the bottom is made from three little off-cuts (waste not, want not!).   As you can see, I made this card for my husband for Father's Day  last weekend (the greeting is from the Guy Greetings stamp set).

#cardmaking, Lovely Words, Embossing Paste, Pattern Party, Black & Gold card, #thecraftythinker, Stampin Up Australia Demonstrator, Stephanie Fischer, Sydney NSW
Here's a close up of the decorative strip made with offcuts rescued from the bin

So the big lesson I've learned here is to not try to be creative whilst feeling under the weather - best to curl up with a hot toddy and a good book!  However, hopefully, you can look past my mistakes and see the card's potential!

I hope you've enjoyed this card and I welcome your comments. 

Thanks for following our blog hop. Remember that currently you are at my blog - Stephanie Fischer - so click on the next name in the list to ensure that you don't miss out of seeing any of the blogs and the amazing inspiration they contain.

Thanks for visiting
'Til next time
Stephanie


Product List

Sunday, 3 September 2017

Santa's Merry Little Label

A little while ago, I had great fun with the embossing paste which resulted in a few backgrounds sitting waiting on my table to be used!

This is the last from that batch of backgrounds!  I had used Smoky Slate cardstock and coloured the embossing paste with Tranquil Tide ink before using it with one of the Pattern Party masks.
Pattern Party, Embossing Paste, Xmas, Cookie Cutter Christmas, Foil Snowflake, #thecraftythinker, Stampin Up Australia Demonstrator, Stephanie Fischer, Sydney NSW
The metallic Washi Tape and snowflake provide a little seasonal bling

To add a bit of seasonal bling and to give Santa something to stand on, I added a couple of strips of the Year of Cheer Washi Tape to the background piece and adhered one of the Foil Snowflakes (well, to be honest, it's 3/4 of a snowflake - waste not, want not!).  There's also a thin edge of Silver Foil Sheet behind the main panel.  Following my "waste not, want not" approach, I cut out the centre of this piece of foil to save for use elsewhere.

The stacked gifts are from the Ready For Christmas stamp set, and I adhered them with Mini Dimensionals.

The greeting is from the Merry Little labels stamp set, stamped in Tranquil Tide onto Whisper White cardstock and cut out with one of the Lots of Labels framelits.
Pattern Party, Embossing Paste, Xmas, Cookie Cutter Christmas, Foil Snowflake, #thecraftythinker, Stampin Up Australia Demonstrator, Stephanie Fischer, Sydney NSW
I'm not sure how good a grip Santa has!

I stamped the Santa image from the Cookie Cutter Christmas set and coloured his head and extremities.  Instead of using the matching Cookie Cutter Builder punch, I fussy cut his head, arms and legs and adhered them to the label so that it looked like he was holding up a placard.

Thank you for visiting.
'Til next time!
Stephanie


Product List - Click on a product image to visit my online store (Australian Residents only)

Friday, 25 August 2017

Ink It! Stamp It! Design Team Blog Hop - 3D

No automatic alt text available.

Welcome to the Ink It! Stamp It! Design Team Blog Hop - we hop every month so be sure to pop back and visit us again!  Today our theme is 3D - always a challenge for me!

You are currently at my page - Stephanie Fischer, The Crafty Thinker.  At the end of my post there is a full line of team members, please click on the name after mine in the list to continue the hop.
Pattern party masks, #inkitstampit, 3D card, Double Pop Up card, In The City, #thecraftythinker, Stampin' Up Australia Demonstrator, Stephanie Fischer, Sydney NSW
A simple exterior in Basic Gray and Crushed Curry

The front of the card is quite simple.  I used Smoky Slate Embossing Paste with the Pattern Party mask on Basic Gray card.  Then I simply added a few bits of ribbon, a bow and some Glitter Enamel Dots.

The inside of the card is another story altogether!
#inkitstampit, 3D card, Double Pop Up card, In The City, #thecraftythinker, Stampin' Up Australia Demonstrator, Stephanie Fischer, Sydney NSW
A double pop up card with traffic-laden streets!
 
The idea for this card came to me when I first saw the new Holiday Catalogue - specifically the Hometown Greetings edgelits.  However, since 3D is not in my comfort zone, I wanted to get started straight away.  So rather than wait until I could get those products, I used something I already had - the In The City stamp set.  I'll probably make another card with my original idea later.

I used Basic Gray cardstock for the roads and drew the lines with my Chalk Marker and a ruler.

I stamped two rows of buildings, coloured and fussy cut them in two strips.

I stamped, coloured and fussy cut the vehicles and attached them to the road with pieces of Window Sheet (attached to the back of the vehicle and under the road through a slit).
#inkitstampit, 3D card, Double Pop Up card, In The City, #thecraftythinker, Stampin' Up Australia Demonstrator, Stephanie Fischer, Sydney NSW
The side view gives a better idea of the dimension and the pop up mechanism

The base card is Basic Gray and the Double Pop Up mechanism is made with Soft Sky cardstock.  I added a strip of Emerald Green to hide the pop up mechanism.  I could have placed the first row of houses at that level but I wanted to maximise writing space.

Double Pop Up Mechanism:
#inkitstampit, 3D card, Double Pop Up card tutorial, In The City, #thecraftythinker, Stampin' Up Australia Demonstrator, Stephanie Fischer, Sydney NSW
Step 1

#inkitstampit, 3D card, Double Pop Up card tutorial, In The City, #thecraftythinker, Stampin' Up Australia Demonstrator, Stephanie Fischer, Sydney NSW
Step 2

#inkitstampit, 3D card, Double Pop Up card tutorial, In The City, #thecraftythinker, Stampin' Up Australia Demonstrator, Stephanie Fischer, Sydney NSW
Finished and opened up.  Adhere to inside of card.

I hope you've enjoyed this this technique and these cards and I welcome your comments.

Thank you so much for joining us today. We hope you'll join us again next month for our Holiday Catalogue projects! I'm Stephanie Fischer and to keep hopping around see the list below to see who is up next with another great project.

Thanks for visiting
'Til next time
Stephanie


Product List