Showing posts with label Sweet & Sassy framelits. Show all posts

Wednesday, 16 May 2018

Sweet & Sassy Petal Pair

This is a card that I saw myself making in a dream - something that happens from time to time.  Perhaps the creative part of my brain doesn't rest!
#thecraftythinker #embossing #stampinup  #cardmaking , Sweet & Sassy, Petal Pair, Embossing techniques, Stampin' Up Australia Demonstrator, Stephanie Fischer, Sydney NSW
A card designed by my subconscious using Sweet & Sassy framelits,
Petal Pair and Simple Stripes embossing folders

I used the Simple Stripes embossing folder with a piece of Early Espresso cardstock and then used my Embossing Buddy to remove any residues before swiping the middle lines with my Versamark pad.  I did use some scrap paper to mask off each side so that I wouldn't get Versamark everywhere.  Then I heat embossed with gold.

I'm not really a "hearts" sort of person but my subconscious had specifically selected the Sweet & Sassy heart shape and who am I to argue?!  So I cut the shape, applied Versamark to the edge with a sponge dauber and gold heat embossed before embossing with the Petal Pair embossing folder.

After embossing, I gently ran the Versamark pad over the top and gold heat embossed again.

At this point I realised that my subconscious hadn't quite finished the job so I added the layer of Powder Pink cardstock and matching ribbon!

The Sweet & Sassy framelits are retiring and are available until 31st May or while stocks last.

Thank you for visiting.
'Til next time!
Stephanie

Product List - all available in my online store

Wednesday, 14 February 2018

Sweet & Sassy Valentine

My son asked me to make a valentine card for him to give to his girlfriend - I hope she likes it because I really like her too!
#thecraftythinker, #valentinecard, #cardmaking, #stampinup, Valentine card, Sweet & Sassy dies, Falling Flowers, Painted with Love, Stampin' Up! Australia Demonstrator, Stephanie Fischer, Sydney NSW
A fresh and modern valentine card with bold, bright colours
The base card is Rich Razzleberry to which I added a layer of the glorious Painted With Love Special Designer Series Paper.  

The hearts are cut with the Sweet & Sassy framelits from Rich Razzleberry and Melon Mambo cardstock, Gold Foil Sheet and another piece of the Painted With Love paper.

The foliage is cut from Night of Navy scraps of cardstock using one of the Bouquet Bunch Framelit dies.
#thecraftythinker, #valentinecard, #cardmaking, #stampinup, Valentine card, Sweet & Sassy dies, Falling Flowers, Painted with Love, Stampin' Up! Australia Demonstrator, Stephanie Fischer, Sydney NSW
Cutting and layering the flower adds depth to the card
I stamped the flower from the Falling Flowers stamp set three times onto Melon Mambo cardstock with Basic Black ink and used a paintbrush and a little Rich Razzleberry ink to add some shading.

I then cut the centre parts from two of the flowers, adhering one part to the main flower to provide depth and the other one to the gold heart as a small flower in its own right.

There are some Faceted Gems in the centres of the flowers.

The greeting is from the Petal Palette stamp set.  It's stamped with Fresh Fig ink onto Whisper White cardstock which I cut with one of the Bunch of Banners framelits.

Your comments are always very welcome!

Thank you for visiting.
'Til next time!
Stephanie

Product List - Click on an image below to shop in my online store (Australian Residents only)

Sunday, 10 September 2017

Crazy Crafters Blog Hop with Special Guest Stesha Bloodhart

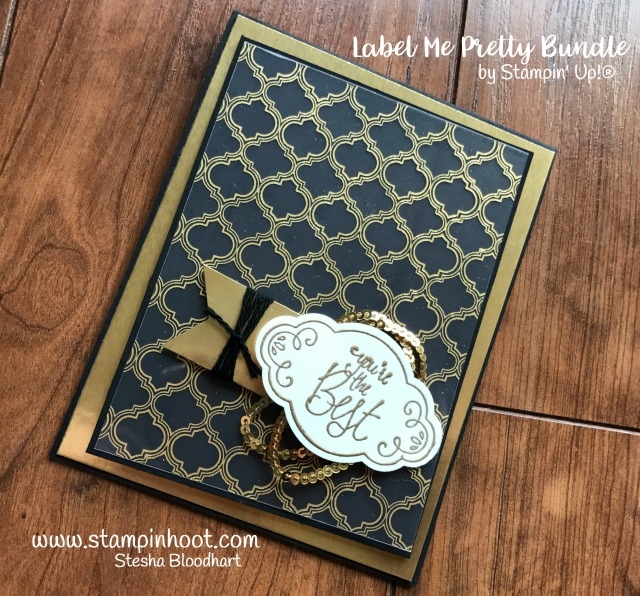
Image may contain: text  Welcome to the Crazy Crafters' Blog Hop with our Special Guest stamper, Stesha Bloodhart - we are thrilled to have Stesha join us this month and so excited to CASE (Copy And Selectively Edit) any project that has been created by her . 
 
Stampin' Up! Label Me Pretty Bundle for Tic Tac Toe Challenge 001 #tttc001 by Stampin' Hoot! Stesha BloodhartWhether you are starting the blog hop here at my blog, Stephanie Fischer - The Crafty Thinker, or have come from the person before me, be sure to click on the person listed under me further down the page to continue your journey on this blog hop. 

I was inspired by the rich and elegant black and gold in this card and changed it up a little to create this card.  However, it should be said that creating cards whilst in the grip of the flu might not be a good idea! ... I kept losing the plot and stuffing up!
#cardmaking, Lovely Words, Embossing Paste, Pattern Party, Black & Gold card, #thecraftythinker, Stampin Up Australia Demonstrator, Stephanie Fischer, Sydney NSW
Gold embossed Embossing Paste makes for a very glamourous background

To create the decorative top layer of the card, I started out by cutting a piece of Post It Note with one of the Sweet & Sassy framelits to make a mask.  I then used one of the Pattern Party masks and Embossing Paste to make the dimensional background.  

This is where I lost the plot!  I completely forgot that I was intending to sprinkle the wet embossing paste with gold embossing powder (in all of the minute or two it took to spread the paste!) and I removed my mask and allowed the paste to dry.  Oh well, no problem, I thought, I'll just use some Versamark.  But, I forgot to re-mask the heart area before placing the mask back over the pattern and patting with the Versamark pad and sprinkling on the embossing powder! 

Oh well, I thought, no problem, I'll just brush off any embossing powder that's where I don't want it.  The theory was good but, no matter how much I brushed, I couldn't remove all traces of that pesky gold.  Eventually, I decided that I could live with the faint traces of gold pattern within the heart shape!

The gold centrepiece is cut with the Lovely Words Thinlits and Sweet & Sassy Framelits from Gold Foil Sheet.  I had remembered (a win!) to put some Multipurpose Adhesive Sheet onto the back of the gold card before I cut it, which made it really easy to stick to my card front.

#cardmaking, Lovely Words, Embossing Paste, Pattern Party, Black & Gold card, #thecraftythinker, Stampin Up Australia Demonstrator, Stephanie Fischer, Sydney NSW
The inside features the same stencilled pattern using Basic Gray ink fading  out
For the inside of the card, I used the same Pattern Party mask and some Basic Gray ink.  The decorative strip at the bottom is made from three little off-cuts (waste not, want not!).   As you can see, I made this card for my husband for Father's Day  last weekend (the greeting is from the Guy Greetings stamp set).

#cardmaking, Lovely Words, Embossing Paste, Pattern Party, Black & Gold card, #thecraftythinker, Stampin Up Australia Demonstrator, Stephanie Fischer, Sydney NSW
Here's a close up of the decorative strip made with offcuts rescued from the bin

So the big lesson I've learned here is to not try to be creative whilst feeling under the weather - best to curl up with a hot toddy and a good book!  However, hopefully, you can look past my mistakes and see the card's potential!

I hope you've enjoyed this card and I welcome your comments. 

Thanks for following our blog hop. Remember that currently you are at my blog - Stephanie Fischer - so click on the next name in the list to ensure that you don't miss out of seeing any of the blogs and the amazing inspiration they contain.

Thanks for visiting
'Til next time
Stephanie


Product List

Friday, 28 April 2017

Copper Bloomin' Heart Anniversary

This card is entered into the Crazy Crafters Project Highlights for this week.  Click here to see all the amazing cards and vote for your favourites.

I actually made two 30th Anniversary Cards - the other one was requested by a friend and I'll show it to you on 7th May!

I'm not normally much of a "heart" person but this is the perfect occasion to use them.
Copper, Anniversary Card, Bloomin' Heart, Sweet & Sassy, #thecraftythinker, Stampin Up Australia Demonstrator, Stephanie Fischer, Sydney NSW
If you're wondering about those numbers... they're the only non-current or new
Stampin' Up product on the card - but just the perfect size for my needs!


The card base is made from Elegant Eggplant to which I added a layer of Copper Foil Sheet.  Since the middle of the sheet can't be seen and I love the copper foil too much to waste any, I always cut out the centre and just adhere a frame of the copper.  

The Very Vanilla layer is embossed with the Happy Heart embossing folder (which is retiring).  To this I loosely adhered a piece of Tip Top Taupe Mini Striped Ribbon.  To that I added a looped piece of the new Copper Trim ribbon which is held in place by the decorations.

I stamped the two banners and greetings onto Copper Foil Sheet with Basic Black ink and then waved a heat tool over it to ensure that it wouldn't smudge.  The top banner is from the new Happy Birthday Gorgeous stamp set and it fits perfectly with the Classic Label punch.

I used the Bloomin' Heart die to cut some Very Vanilla cardstock and adhered it to a scrap of Tip Top Taupe (a retiring In-Colour) cardstock before cutting it with one of the Sweet & Sassy framelits.  I then cut a larger heart from Copper Foil Sheet with the same die set and layered them together, adding a couple of little copper flowers.

Since this is a Pearl Anniversary, naturally, I had to add as many pearls as I could without going too overboard!
Copper, Anniversary Card, Bloomin' Heart, Sweet & Sassy, #thecraftythinker, Stampin Up Australia Demonstrator, Stephanie Fischer, Sydney NSW
The use of Stampin' Dimensionals and Foam Adhesive Strips gives... well - dimension!

Thank you for visiting.
'Til next time!
Stephanie

Product List - To make a purchase, click on one of the product images below (Australian Residents only)