Showing posts with label Pattern Party masks. Show all posts

Wednesday, 15 August 2018

Beautiful Promenade Copper & Merlot Stitched Season

#thecraftythinker  #stampinup  #cardmaking  #beautifulpromenade  #stitchedseasons , Beautiful Promenade, Stitched Seasons, Elegant card, Stampin' Up Australia Demonstrator, Stephanie Fischer, Sydney NSW
My inspirational scarf!
This card started off with a colour combination inspired by my favourite scarf (currently!).  There's something about the warm pink and copper combination that really appeals to me.

I thought about recreating those dots with Versamark and a sponge dauber but ultimately took the easier route of sponging versamark through one of the Pattern Party Decorative Masks, sprinkling with copper embossing powder and heat setting.
#thecraftythinker  #stampinup  #cardmaking  #beautifulpromenade  #stitchedseasons , Beautiful Promenade, Stitched Seasons, Elegant card, Stampin' Up Australia Demonstrator, Stephanie Fischer, Sydney NSW
The petal pink, merlot, copper combination adds extra elegance to the beautiful images and die cuts

I used one of the gorgeous limited-time only Stitched Seasons framelits to cut out a label shape and another to cut a slightly large one from Merry Merlot cardstock.

The base card is Merry Merlot and I embossed the Petal Pink layer with the beautiful, and aptly names, Subtle embossing folder.
#thecraftythinker  #stampinup  #cardmaking  #beautifulpromenade  #stitchedseasons , Beautiful Promenade, Stitched Seasons, Elegant card, Stampin' Up Australia Demonstrator, Stephanie Fischer, Sydney NSW
Another photo of the card from a different angle to try to capture the beautiful shimmer of the copper

I used versmark and copper embossing powder to heat emboss the gorgeous flower onto Merry Merlot cardstock.  This lovely image is from the Beautiful Promenade stamp set.  I then cut out the flower with the coordinating die in the Beautiful Layers Thinlits.  The dies and stamp set are available as a bundle with a saving of 10%.

I cut the leaves from Copper Foil Sheet using the Foliage Frame framelits.

The copper heat embossed greeting is from the Itty Bitty Greetings stamp set and, to maintain the theme of stitching, I cut it out with one of the Stitched Shapes framelits.

The Share What You Love Artisan pearls in the centre of the flower add the final bit of glamour to this multipurpose card.

If you like the Stitched Seasons dies - remember that they'll only be available until 31st August or while stocks last.

Thank you for visiting.
'Til next time!
Stephanie

Product List - All supplies used are available in my online store


Wednesday, 22 November 2017

Pattern Party Sleigh Christmas Card

This card came about because I wanted to test out the new sparkly embossing paste that will be available in the Occasions Catalogue (3 January to 31 May 2018).  I was curious to see if/how the result would differ from using the plain white embossing paste with Dazzling Diamonds added. 
#thecraftythinker, #christmascard, #cardmaking, #embossingpaste, Pattern Party, Embossing paste, Santa's Sleigh, Xmas card, Stampin' Up Australia Demonstrator, Stephanie Fischer, Sydney NSW
This Christmas card has some sneak peeks and some old favourites

The result?  It's just as sparkly - maybe a little finer and, best of all, I can save my Dazzling Diamonds for other purposes!

So I had the red and white pattern and my mind went blank (not an unusual state of affairs!).   When in doubt - add a sleigh full of gifts!
#thecraftythinker, #christmascard, #cardmaking, #embossingpaste, Pattern Party, Embossing paste, Santa's Sleigh, Xmas card, Stampin' Up Australia Demonstrator, Stephanie Fischer, Sydney NSW
A mix of old and new products in this Christmas card
Curious about the greenish embellishment?  The Tutti-frutti Sequins are self-adhesive and will also be available in the new Occasions Catalogue. I noticed that the blue ones are so pale as to be almost transluscent so I layered one on top of a Lemon Lime Twist one to get a more muted green better suited to my colour scheme.  In the centre is a Rhinestone Jewel that I coloured with Stampin' Blends alcohol markers.

Thank you for visiting.
'Til next time!
Stephanie


Product List - Click on a product image below to visit my online store (Australian Residents only)

Friday, 20 October 2017

Ink It! Stamp It! Design Team Blog Hop - Technique:

Welcome to the Ink It! Stamp It! Design Team Blog Hop - we hop every month so be sure to pop back and visit us again!  Today our theme is Technique. 

You are currently at my page - Stephanie Fischer, The Crafty Thinker.  At the end of my post there is a full line of team members.   This is a long post due to all the instructions, so do please scroll down to the bottom and click on the name after mine in the list to continue the hop.

If there's an actual name for this technique, I don't know what it is but I call it the Glitter Stencilling Technique.
#cardmaking, Xmas, #christmascard, Christmas card,Centre Step card, Fun Fold, Glitter Stencilling, #inkitstampit, #thecraftythinker, Stampin Up Australia Demonstrator, Stephanie Fischer
Stencilling with blue and white glitter using Pattern Party Decorative Masks

Warning:  If you can't cope with unconstrained mess - this technique is probably not for you!  No matter how hard I try to keep things clean and controlled; no matter how quickly I use the vacuum cleaner or step on old towels in the door of my craft room - the glitter spreads and pretty soon I'm finding it all over the house!

Instructions:
Step 1:  Apply Multipurpose Adhesive Sheet to one side of your chosen cardstock (I've used Whisper White).

Step 2: Cut your desired shape using punch, die or trimmer.  (I've used Layering Circle and Sweet and Sassy framelits)

Step 3: Remove the protective cover to reveal the adhesive.  Place sticky side up on a piece of scrap paper (to catch the glitter)  Tip:  Try not to touch the adhesive 

Step 4:  Apply a thin layer of soap to the back of your chosen stencil.  This will prevent the stencil from sticking too firmly to the adhesive.  Tip:  Time and care taken on this step will pay dividends!  I like to moisten a small bar of soap with my fingers until it produces a creamy lather and then carefully spread it onto the mask with my fingers.  If necessary, I remove any soap that finds its way to the front of the mask.

Step 5: Lay the mask, soap side down, onto the sticky shape.

Step 6:  Tip some glitter on top - be generous.  Tip:  Use very fine glitter (the finer the glitter, the more consistent the coverage). You'll need two colours of glitter.
#cardmaking, Xmas, #christmascard, Christmas card, Glitter Stencilling, #inkitstampit, #thecraftythinker, Stampin Up Australia Demonstrator, Stephanie Fischer
Glitter Stencilling step 6 - adding the first glitter

Step 7: Use clean, dry fingers to press the glitter down through the mask.  Use small circular motions to ensure complete coverage over the project.  Tip:  Take your time to "burnish" the glitter well.
#cardmaking, Xmas, #christmascard, Christmas card, Glitter Stencilling, #inkitstampit, #thecraftythinker, Stampin Up Australia Demonstrator, Stephanie Fischer
Glitter Stencilling Step 7, burnishing the first glitter colour

Step 8:  Tap off all the excess glitter and put it away then carefully remove the mask/stencil.  Tip:  I like to work in gently from the edges.  Avoid touching the adhesive.
#cardmaking, Xmas, #christmascard, Christmas card, Glitter Stencilling, #inkitstampit, #thecraftythinker, Stampin Up Australia Demonstrator, Stephanie Fischer
Glitter Stencilling Step 8 - the mask has been removed to reveal the rest of the adhesive

Step 9:  Place the project on a clean piece of scrap paper to catch the glitter and then pour the second colour of glitter on top of the project.  Tip:  You will probably be a little nervous the first time you do this but don't worry - the second glitter will stick to the newly revealed adhesive.
#cardmaking, Xmas, #christmascard, Christmas card, Glitter Stencilling, #inkitstampit, #thecraftythinker, Stampin Up Australia Demonstrator, Stephanie Fischer
Glitter Stencilling Step 9 - pouring the second colour of glitter on top of the first

Step 10:  Press and "burnish" (use those small circular movements) the glitter onto the project.

Step 11:  Tap off the excess glitter and put it away for next time.

Step 12:  Burnish or polish the project a little more with your finger to ensure that all the glitter is well adhered and enhance the shine.
#cardmaking, Xmas, #christmascard, Christmas card, Glitter Stencilling, #inkitstampit, #thecraftythinker, Stampin Up Australia Demonstrator, Stephanie Fischer
Glitter Stencilling
For the card below, I repeated the process with the same colours and a different mask to produce the patterned side strips.  
#cardmaking, Xmas, #christmascard, Christmas card, Centre Step card, Glitter Stencilling, #inkitstampit, #thecraftythinker, Stampin Up Australia Demonstrator, Stephanie Fischer
I added more glitter to the embossed panel by using the Fine Tip Glue Pen on the embossed stars
Here's the card I made with the red and gold circle.  
#cardmaking, Xmas, #christmascard, Christmas card, Centre Step Card, Fun Fold, Glitter Stencilling, #inkitstampit, #thecraftythinker, Stampin Up Australia Demonstrator, Stephanie Fischer
Christmas card using traditional colours in Glitter Stencilling and the Garden Trellis embossing folder

Same method with different colours.
#cardmaking, Xmas, #christmascard, Christmas card, Glitter Stencilling, #inkitstampit, #thecraftythinker, Stampin Up Australia Demonstrator, Stephanie Fischer
Glitter Stencilling Step 7, burnishing on the first colour of glitter through the stencil

#cardmaking, Xmas, #christmascard, Christmas card, Glitter Stencilling, #inkitstampit, #thecraftythinker, Stampin Up Australia Demonstrator, Stephanie Fischer
Glitter Stencilling Step 9, adding the second colour of glitter on top of the first
There's always some glitter on my desk afterwards - but I seem to have been extra messy this time! 
#cardmaking, Xmas, #christmascard, Christmas card, Glitter Stencilling, #inkitstampit, #thecraftythinker, Stampin Up Australia Demonstrator, Stephanie Fischer
The aftermath!  Not a technique for anyone unwilling to find a bit glitter all over the house.

#cardmaking, Xmas, #christmascard, Christmas card,Centre Step Card, Fun Fold, Glitter Stencilling, #inkitstampit, #thecraftythinker, Stampin Up Australia Demonstrator, Stephanie Fischer
The little bow on this Christmas Card is cut with a die from the Santa's Sleigh Thinlits

Both cards were finished with pine pieces cut in Tranquil Tide and Lemon Lime Twist using Christmas Staircase dies.  The labels are made with the Labels To Love and Hearts Come Home stamp sets.  They're cut with the Everyday Label Punch.

I hope you've enjoyed this this project and I welcome your comments. 

Thank you so much for joining us today. We hope you'll join us again next month for our Christmas projects! I'm Stephanie Fischer and to keep hopping around see the list below to see who is up next with another great project .

Thanks for visiting
'Til next time
Stephanie


Product List

Sunday, 10 September 2017

Crazy Crafters Blog Hop with Special Guest Stesha Bloodhart

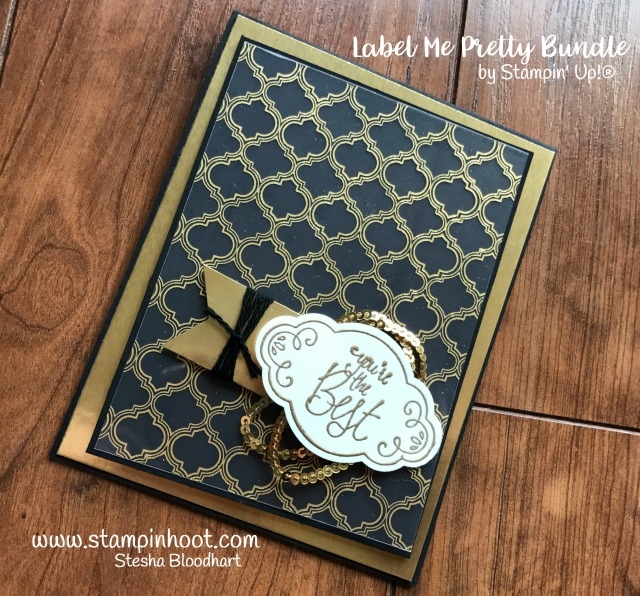
Image may contain: text  Welcome to the Crazy Crafters' Blog Hop with our Special Guest stamper, Stesha Bloodhart - we are thrilled to have Stesha join us this month and so excited to CASE (Copy And Selectively Edit) any project that has been created by her . 
 
Stampin' Up! Label Me Pretty Bundle for Tic Tac Toe Challenge 001 #tttc001 by Stampin' Hoot! Stesha BloodhartWhether you are starting the blog hop here at my blog, Stephanie Fischer - The Crafty Thinker, or have come from the person before me, be sure to click on the person listed under me further down the page to continue your journey on this blog hop. 

I was inspired by the rich and elegant black and gold in this card and changed it up a little to create this card.  However, it should be said that creating cards whilst in the grip of the flu might not be a good idea! ... I kept losing the plot and stuffing up!
#cardmaking, Lovely Words, Embossing Paste, Pattern Party, Black & Gold card, #thecraftythinker, Stampin Up Australia Demonstrator, Stephanie Fischer, Sydney NSW
Gold embossed Embossing Paste makes for a very glamourous background

To create the decorative top layer of the card, I started out by cutting a piece of Post It Note with one of the Sweet & Sassy framelits to make a mask.  I then used one of the Pattern Party masks and Embossing Paste to make the dimensional background.  

This is where I lost the plot!  I completely forgot that I was intending to sprinkle the wet embossing paste with gold embossing powder (in all of the minute or two it took to spread the paste!) and I removed my mask and allowed the paste to dry.  Oh well, no problem, I thought, I'll just use some Versamark.  But, I forgot to re-mask the heart area before placing the mask back over the pattern and patting with the Versamark pad and sprinkling on the embossing powder! 

Oh well, I thought, no problem, I'll just brush off any embossing powder that's where I don't want it.  The theory was good but, no matter how much I brushed, I couldn't remove all traces of that pesky gold.  Eventually, I decided that I could live with the faint traces of gold pattern within the heart shape!

The gold centrepiece is cut with the Lovely Words Thinlits and Sweet & Sassy Framelits from Gold Foil Sheet.  I had remembered (a win!) to put some Multipurpose Adhesive Sheet onto the back of the gold card before I cut it, which made it really easy to stick to my card front.

#cardmaking, Lovely Words, Embossing Paste, Pattern Party, Black & Gold card, #thecraftythinker, Stampin Up Australia Demonstrator, Stephanie Fischer, Sydney NSW
The inside features the same stencilled pattern using Basic Gray ink fading  out
For the inside of the card, I used the same Pattern Party mask and some Basic Gray ink.  The decorative strip at the bottom is made from three little off-cuts (waste not, want not!).   As you can see, I made this card for my husband for Father's Day  last weekend (the greeting is from the Guy Greetings stamp set).

#cardmaking, Lovely Words, Embossing Paste, Pattern Party, Black & Gold card, #thecraftythinker, Stampin Up Australia Demonstrator, Stephanie Fischer, Sydney NSW
Here's a close up of the decorative strip made with offcuts rescued from the bin

So the big lesson I've learned here is to not try to be creative whilst feeling under the weather - best to curl up with a hot toddy and a good book!  However, hopefully, you can look past my mistakes and see the card's potential!

I hope you've enjoyed this card and I welcome your comments. 

Thanks for following our blog hop. Remember that currently you are at my blog - Stephanie Fischer - so click on the next name in the list to ensure that you don't miss out of seeing any of the blogs and the amazing inspiration they contain.

Thanks for visiting
'Til next time
Stephanie


Product List