Showing posts with label Christmas cards. Show all posts

Monday, 23 December 2019

Shimmery Trio of Dashing Deer in Winter Woods

#thecraftythinker #stampinup #cardmaking #christmascard #winterwoods #dashingdeer , Dashing Deer, Winter Woods, Shimmery White embossing powder, Trio of Christmas cards, Stampin' Up Demonstrator, Stephanie Fischer, Sydney NSW
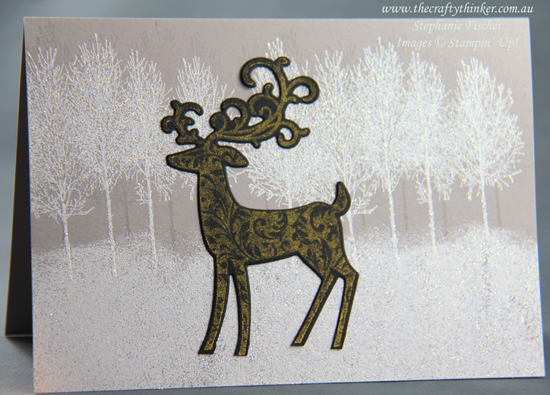
The Shimmery White embossing looks much prettier in person and I like it with the Gray Granite card
 I've decided to throw in some extra inspiration - a Christmas present if you will!

Three looks using the same basic ingredients and method.
#thecraftythinker #stampinup #cardmaking #christmascard #winterwoods #dashingdeer , Dashing Deer, Winter Woods, Shimmery White embossing powder, Trio of Christmas cards, Stampin' Up Demonstrator, Stephanie Fischer, Sydney NSW
Basically the same card, just stepped up a bit by creating the layer on the Thick Whisper White base card
Onto Gray Granite cardstock, the image from Winter Woods was stamped with Versamark, sprinkled with Shimmer White embossing powder and heat embossed.

I then applied versamark to the lower section direct from the pad and Shimmer White heat embossed.

Just for a bit more depth and interest, I stamped some more trees with Versamark and left them as a watermark.

Then I added the deer (they were leftovers from previous projects!).  The Dashing Deer was stamped with Golden Glitz metallic ink (I find using the Stamparatus helps as I can stamp twice to reinforce the shimmery colour) and then cut out with the coordinating Detailed Deer die.
#thecraftythinker #stampinup #cardmaking #christmascard #winterwoods #dashingdeer , Dashing Deer, Winter Woods, Shimmery White embossing powder, Trio of Christmas cards, Stampin' Up Demonstrator, Stephanie Fischer, Sydney NSW
Stepped up just a little more:  One more layer, a different tree image and shadows created with directional use of the Versamark pad
I used the birch image for this one.  To give the impressing of tree shadows, I swiped my Versamark pad diagonally and sparingly and then added extra Versamark to the foreground using horizontal strokes with the pad. Then heat embossed again with Shimmer White embossing powder.

I'll be relaxing on Christmas Day and I'm pretty sure you will be too!  So my next post will be on Friday 27th December.

MERRY CHRISTMAS!  HAPPY HOLIDAYS!

Thank you for visiting.
'Til next time!
Stephanie

Product List - All available for purchase from my online store


Thursday, 20 September 2018

Stampin' Dreams Blog Hop: Theme - Favourite Techniques - Make Your Own Stencil / Mask from dies

Image may contain: text

Welcome to the monthly Stampin' Dreams Blog Hop.  This month we are sharing our Favourite Techniques.  I love using lots of different techniques so it's hard for me to choose a favourite.  However, at the moment I'd have to say "making my own stencils from my die collection".  I like to make my dies work harder and provide extra value for money!

You are currently visiting Stephanie Fischer (The Crafty Thinker) from Australia.  I hope you enjoy my cards.
#thecraftythinker  #stampinup  #xmascard  #makeyourownstencil  #cardmaking  #blizzardthinlit  #SDBH , Stampin' Dreams Blog Hop, Christmas card, using dies to make stencils, Shimmer paint, Blizzard Thinlit, Christmas Traditions Punch Box, Stampin' Up Australia Demonstrator, Stephanie Fischer, Sydney NSW
A Christmas card featuring baubles made with home made stencils - make your dies work harder!

Although there's quite a lot going on in this Christmas card, my main focus is the decoration on the baubles which I achieved by sponging Shimmer Paint through a home  made stencil.
#thecraftythinker  #stampinup  #xmascard  #makeyourownstencil  #cardmaking  #blizzardthinlit  #SDBH , Stampin' Dreams Blog Hop, Christmas card, using dies to make stencils, Shimmer paint, Blizzard Thinlit, Stampin' Up Australia Demonstrator, Stephanie Fischer, Sydney NSW
Using home made stencils and Shimmer Paint to create baubles for Christmas cards

The first step is to cut the stencil from a piece of Window Sheet with the die of your choice.

TIPS:

  • You may have to run it through your Big Shot several times to get a clean cut, moving it around on the platform each time.  If you have a Precision Base Plate, you'll want to use it.
  • Cut the Window Sheet larger than you need and leave a generous edge all the way around your die.  This will allow you to also use that "negative space" piece for sponging or masking.
  • When using the Blizzard Thinlit, keep all the pieces.  The large piece becomes a stencil and all the smaller pieces that you remove become wonderful masks.

I cut some baubles using the Layering Ovals and Layering Circles dies.

I like to place a glue dot under each of the pieces to keep them from moving around.  I first handle them a bit between my fingers to make them a little less tacky.  The stencil that I made with the Blizzard Thinlit was large enough that I could group three of the oval shapes and stencil them together.

Place your stencil over the piece(s) to be decorated and fasten with a little bit of washi tape (or similar) at the top and bottom - being careful not to cover any of the area you wish to decorate.

I then placed some of the Vegas Gold Shimmer Paint onto a palette (I use one of my large acrylic blocks) and sponged over the stencil with gentle pouncing motions.

TIPS:

  • It's better to be sparing with the paint and do several layers if necessary.  If there's a lot of paint on the sponge, some is likely to find it's way under the stencil resulting in a less crisp image.
  • For a similar reason, pounce the sponge straight up and down to try to avoid getting paint under the stencil.
  • Shimmer Paint is water soluble and cleans up very easily.  I prefer to work directly on my cutting mat but you may wish to cover your work area with a sheet of scrap paper, some Stampin' Up Grid Paper or a non-stick craft mat.
Clean your stencil after use (I find all I need is a little water from the tap) and allow it to dry.  I prefer not to dry them with a towel to avoid catching little details and damaging the stencil.  With this little bit of care, you'll be able to use your stencil over and over again for a very long time.

WHY STOP THERE?
So we've used our stencil with the gorgeous Shimmer Paint, but why stop there?!  Use it with any of your favourite ink colours - simply tap the dry sponge onto the ink pad and then over the stencil.

Or, my particular favourite at Christmas time, use some glitter!

#thecraftythinker  #stampinup  #xmascard  #makeyourownstencil  #cardmaking  #blizzardthinlit  #SDBH , Stampin' Dreams Blog Hop, Christmas card, using dies to make stencils, stencil with glitter, Blizzard Thinlit, Stampin' Up Australia Demonstrator, Stephanie Fischer, Sydney NSW
A Christmas card made with home made stencils and some super fine glitter

Apply Multipurpose Sheet to the front of the cardstock before cutting your shape.

#thecraftythinker  #stampinup  #xmascard  #makeyourownstencil  #cardmaking  #blizzardthinlit  #SDBH , Stampin' Dreams Blog Hop, Christmas card, using dies to make stencils, stencil with glitter, Blizzard Thinlit, Stampin' Up Australia Demonstrator, Stephanie Fischer, Sydney NSW
Preparing to use my home made stencil with glitter
Peel off the protective layer.

Rub a little soap over the back of your stencil (I tend to dampen a small bar of soap with my fingers and then gently rub my soapy fingers over the stencil).  The soap assists with removal of the stencil from the adhesive.

Position the stencil, soap side down, onto the adhesive on the front of your shape.

Tip some super fine glitter on top and press it in with your fingers.

Tap off the excess glitter and burnish by gently rubbing your fingers over the glitter on the project.

Remove the stencil and tap again to remove any remaining excess glitter.

Tip a second colour of glitter onto the shape and press onto the project.  Tap off the excess and repeat the burnishing process.
TIP:
I like to have two sheets of paper, folded in half and then opened up to form a valley in the middle.  One for each colour of glitter.
Once I finish with a glitter, I use the sheet of paper to return the excess glitter to its container.

I hope this card has inspired you and brightened your day.  You are currently visiting Stephanie Fischer.  Please hop through all of the people on the list below to see all of our projects.  You don't want to miss any!

Thank you for visiting.
'Til next time!
Stephanie


Product List - All available in my online store

Sunday, 12 November 2017

Crazy Crafters Blog Hop with Special Guest Angela Meiritz-Reid

Image may contain: text 
Click image to visit Angela's blog
Welcome to the Crazy Crafters' Blog Hop with our Special Guest stamper, Angela Meiritz-Reid - we are thrilled to have Angela join us this month and so excited to CASE (Copy And Selectively Edit) any project that has been created by her. 
 
Whether you are starting the blog hop here at my blog, Stephanie Fischer - The Crafty Thinker, or have come from the person before me, be sure to click on the person listed under me further down the page to continue your journey on this blog hop

Being really short on time (I'm attending On Stage this weekend!), I had to make a quick and simple card.  I love this little piggy card of Angela's and wish I'd been able to do it justice.  It was SO quick that I even made two variants!
#thecraftythinker, #christmascard, #cardmaking, #xmascard, #rubberstamping, Christmas card, Quick & easy card, Stampin' Up Australia Demonstrator, Stephanie Fischer, Sydney NSW
Such a quick and simple Christmas card!
Both of my cards feature gorgeous paper from the Year of Cheer Designer Series pack and a silver heat embossed greeting banner from the Seasonal Bells stamp set cut out with the coordinating die in the Bunch of Banners Framelits.

The card above also has a snowflake image from the Cheers To The Year set silver heat embossed on Silver Foil Sheet cut with a Circle Punch.  That is layered onto Gold Foil Sheet cut with one of the scalloped Layering Circles dies.
#thecraftythinker, #christmascard, #cardmaking, #xmascard, #rubberstamping, Christmas card, Quick & easy card, Stampin' Up Australia Demonstrator, Stephanie Fischer, Sydney NSW
Another quick and simple Christmas card!
For the second card, I cut the scalloped circle from Real Red cardstock and the black circle was silver heat embossed with a coordinating image from the Cheers To The Year stamp set.   The Silver Foil snowflake was cut with one of the Seasonal Layers dies.

I'll be sure to share some On Stage experiences with you during the week!

Thanks for following our blog hop. Remember that currently you are at my blog - Stephanie Fischer - so click on the next name in the list to ensure that you don't miss out of seeing any of the blogs and the amazing inspiration they contain.

Thanks for visiting
'Til next time
Stephanie


Product List

Friday, 20 October 2017

Ink It! Stamp It! Design Team Blog Hop - Technique:

Welcome to the Ink It! Stamp It! Design Team Blog Hop - we hop every month so be sure to pop back and visit us again!  Today our theme is Technique. 

You are currently at my page - Stephanie Fischer, The Crafty Thinker.  At the end of my post there is a full line of team members.   This is a long post due to all the instructions, so do please scroll down to the bottom and click on the name after mine in the list to continue the hop.

If there's an actual name for this technique, I don't know what it is but I call it the Glitter Stencilling Technique.
#cardmaking, Xmas, #christmascard, Christmas card,Centre Step card, Fun Fold, Glitter Stencilling, #inkitstampit, #thecraftythinker, Stampin Up Australia Demonstrator, Stephanie Fischer
Stencilling with blue and white glitter using Pattern Party Decorative Masks

Warning:  If you can't cope with unconstrained mess - this technique is probably not for you!  No matter how hard I try to keep things clean and controlled; no matter how quickly I use the vacuum cleaner or step on old towels in the door of my craft room - the glitter spreads and pretty soon I'm finding it all over the house!

Instructions:
Step 1:  Apply Multipurpose Adhesive Sheet to one side of your chosen cardstock (I've used Whisper White).

Step 2: Cut your desired shape using punch, die or trimmer.  (I've used Layering Circle and Sweet and Sassy framelits)

Step 3: Remove the protective cover to reveal the adhesive.  Place sticky side up on a piece of scrap paper (to catch the glitter)  Tip:  Try not to touch the adhesive 

Step 4:  Apply a thin layer of soap to the back of your chosen stencil.  This will prevent the stencil from sticking too firmly to the adhesive.  Tip:  Time and care taken on this step will pay dividends!  I like to moisten a small bar of soap with my fingers until it produces a creamy lather and then carefully spread it onto the mask with my fingers.  If necessary, I remove any soap that finds its way to the front of the mask.

Step 5: Lay the mask, soap side down, onto the sticky shape.

Step 6:  Tip some glitter on top - be generous.  Tip:  Use very fine glitter (the finer the glitter, the more consistent the coverage). You'll need two colours of glitter.
#cardmaking, Xmas, #christmascard, Christmas card, Glitter Stencilling, #inkitstampit, #thecraftythinker, Stampin Up Australia Demonstrator, Stephanie Fischer
Glitter Stencilling step 6 - adding the first glitter

Step 7: Use clean, dry fingers to press the glitter down through the mask.  Use small circular motions to ensure complete coverage over the project.  Tip:  Take your time to "burnish" the glitter well.
#cardmaking, Xmas, #christmascard, Christmas card, Glitter Stencilling, #inkitstampit, #thecraftythinker, Stampin Up Australia Demonstrator, Stephanie Fischer
Glitter Stencilling Step 7, burnishing the first glitter colour

Step 8:  Tap off all the excess glitter and put it away then carefully remove the mask/stencil.  Tip:  I like to work in gently from the edges.  Avoid touching the adhesive.
#cardmaking, Xmas, #christmascard, Christmas card, Glitter Stencilling, #inkitstampit, #thecraftythinker, Stampin Up Australia Demonstrator, Stephanie Fischer
Glitter Stencilling Step 8 - the mask has been removed to reveal the rest of the adhesive

Step 9:  Place the project on a clean piece of scrap paper to catch the glitter and then pour the second colour of glitter on top of the project.  Tip:  You will probably be a little nervous the first time you do this but don't worry - the second glitter will stick to the newly revealed adhesive.
#cardmaking, Xmas, #christmascard, Christmas card, Glitter Stencilling, #inkitstampit, #thecraftythinker, Stampin Up Australia Demonstrator, Stephanie Fischer
Glitter Stencilling Step 9 - pouring the second colour of glitter on top of the first

Step 10:  Press and "burnish" (use those small circular movements) the glitter onto the project.

Step 11:  Tap off the excess glitter and put it away for next time.

Step 12:  Burnish or polish the project a little more with your finger to ensure that all the glitter is well adhered and enhance the shine.
#cardmaking, Xmas, #christmascard, Christmas card, Glitter Stencilling, #inkitstampit, #thecraftythinker, Stampin Up Australia Demonstrator, Stephanie Fischer
Glitter Stencilling
For the card below, I repeated the process with the same colours and a different mask to produce the patterned side strips.  
#cardmaking, Xmas, #christmascard, Christmas card, Centre Step card, Glitter Stencilling, #inkitstampit, #thecraftythinker, Stampin Up Australia Demonstrator, Stephanie Fischer
I added more glitter to the embossed panel by using the Fine Tip Glue Pen on the embossed stars
Here's the card I made with the red and gold circle.  
#cardmaking, Xmas, #christmascard, Christmas card, Centre Step Card, Fun Fold, Glitter Stencilling, #inkitstampit, #thecraftythinker, Stampin Up Australia Demonstrator, Stephanie Fischer
Christmas card using traditional colours in Glitter Stencilling and the Garden Trellis embossing folder

Same method with different colours.
#cardmaking, Xmas, #christmascard, Christmas card, Glitter Stencilling, #inkitstampit, #thecraftythinker, Stampin Up Australia Demonstrator, Stephanie Fischer
Glitter Stencilling Step 7, burnishing on the first colour of glitter through the stencil

#cardmaking, Xmas, #christmascard, Christmas card, Glitter Stencilling, #inkitstampit, #thecraftythinker, Stampin Up Australia Demonstrator, Stephanie Fischer
Glitter Stencilling Step 9, adding the second colour of glitter on top of the first
There's always some glitter on my desk afterwards - but I seem to have been extra messy this time! 
#cardmaking, Xmas, #christmascard, Christmas card, Glitter Stencilling, #inkitstampit, #thecraftythinker, Stampin Up Australia Demonstrator, Stephanie Fischer
The aftermath!  Not a technique for anyone unwilling to find a bit glitter all over the house.

#cardmaking, Xmas, #christmascard, Christmas card,Centre Step Card, Fun Fold, Glitter Stencilling, #inkitstampit, #thecraftythinker, Stampin Up Australia Demonstrator, Stephanie Fischer
The little bow on this Christmas Card is cut with a die from the Santa's Sleigh Thinlits

Both cards were finished with pine pieces cut in Tranquil Tide and Lemon Lime Twist using Christmas Staircase dies.  The labels are made with the Labels To Love and Hearts Come Home stamp sets.  They're cut with the Everyday Label Punch.

I hope you've enjoyed this this project and I welcome your comments. 

Thank you so much for joining us today. We hope you'll join us again next month for our Christmas projects! I'm Stephanie Fischer and to keep hopping around see the list below to see who is up next with another great project .

Thanks for visiting
'Til next time
Stephanie


Product List