Showing posts with label Beautiful Bauble. Show all posts

Sunday, 14 October 2018

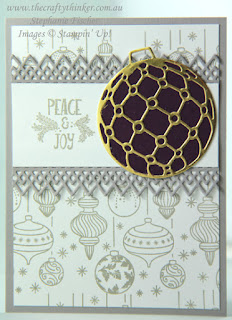
Beautiful Copper Christmas Baubles

This card took a little time to evolve!  I stamped the bauble with Bright Copper Shimmer Paint onto the Early Espresso several weeks ago and then it languished on my desk.
#thecraftythinker  #stampinup  #christmascard  #beautifulbaubles  #cardmaking , Christmas card, Beautiful Baubles Bundle, Xmas card, Stampin' Up Australia Demonstrator, Stephanie Fischer, Sydney NSW
Christmas card featuring the Beautiful Baubles Bundle from the Holiday Catalogue
The card speaks for itself really but I'll pass on a couple of tips.

Once I'd heat embossed and punched out the greeting, I edged the label with Bright Copper Shimmer Paint using a paintbrush.

Before I cut the Detailed Bauble from the copper sheet, I placed some Multipurpose Adhesive Sheet on the back - so it was really easy to adhere it to the Champagne Foil circle.

I just wish I'd noticed the little curl in the copper layer of my card before I took the photo!  Oh well, I'm off now to straighten it out!

Thank you for visiting.
'Til next time!
Stephanie

Product List - All available for purchase in my online store

Sunday, 23 September 2018

Crazy Crafters Blog Hop with Special Guest: Sarah Berry

Image may contain: text
Welcome to the Crazy Crafters' Blog Hop with our Special Guest stamper, Sarah Berry - we are thrilled to have Sarah join us this month and so excited to CASE (Copy And Selectively Edit) any project that has been created by her.

Whether you are starting the blog hop here at my blog, Stephanie Fischer - The Crafty Thinker, or have come from the person before me, be sure to click on the person listed under me further down the page to continue your journey through the blog hop.

To the left is Sarah's gorgeous card that I chose to CASE.  It was a very difficult choice - I found so many of her cards that I admire!  I love the neutral colours in this card that form the perfect backing to the pop of colour.  I also love the layout and simplicity and the background of repeating stamped images ... well, the list of what I like about it could go and on!

I decided to take the basic premise of Sarah's card and make a Christmas card using the Beautiful Baubles bundle (Beautiful Baubles stamp set and Detailed Baubles dies sold together at a saving of 10%).
#thecraftythinker  #stampinup  #christmascard  #cardmaking  #beautifulbaubles #crazycraftersbloghop , Christmas card, Crazy Crafters Blog Hop, Beautiful Baubles, Stampin Up Australia Demonstrator, Stephanie Fischer, Sydney NSW
A neutral coloured Christmas card with a pop of colour
Sarah used the lovely soft, warm neutral, Sahara Sand for her romantic card.  I chose the slightly cooler Granite Gray to go with the Christmas theme.

I was gratified by how quickly and easily the card came together.  I probably spent the most time tying the little knot in the Gold Cord and then keeping it in place with the application of some glue.  So I made another four in a variety of colours.  In order to keep them simple, easy to post and with minimised product cost, I omitted the Gold Cord and and Metallic Pearls and I'm still happy with the result.  I'll be making quite a few more of these as I need to make a lot of Christmas cards in a short space of time.
#thecraftythinker  #stampinup  #christmascard  #cardmaking  #beautifulbaubles #crazycraftersbloghop , Christmas card, Crazy Crafters Blog Hop, Beautiful Baubles, Stampin Up Australia Demonstrator, Stephanie Fischer, Sydney NSW
This design is brilliant for making multiple Christmas cards quickly and easily
#thecraftythinker  #stampinup  #christmascard  #cardmaking  #beautifulbaubles #crazycraftersbloghop , Christmas card, Crazy Crafters Blog Hop, Beautiful Baubles, Stampin Up Australia Demonstrator, Stephanie Fischer, Sydney NSW
A Blackberry Bliss version
#thecraftythinker  #stampinup  #christmascard  #cardmaking  #beautifulbaubles #crazycraftersbloghop , Christmas card, Crazy Crafters Blog Hop, Beautiful Baubles, Stampin Up Australia Demonstrator, Stephanie Fischer, Sydney NSW
With Real Red
                           
#thecraftythinker  #stampinup  #christmascard  #cardmaking  #beautifulbaubles #crazycraftersbloghop , Christmas card, Crazy Crafters Blog Hop, Beautiful Baubles, Stampin Up Australia Demonstrator, Stephanie Fischer, Sydney NSW
Night of Navy
#thecraftythinker  #stampinup  #christmascard  #cardmaking  #beautifulbaubles #crazycraftersbloghop , Christmas card, Crazy Crafters Blog Hop, Beautiful Baubles, Stampin Up Australia Demonstrator, Stephanie Fischer, Sydney NSW
Tranquil Tide

Thanks for following our blog hop.  Remember that currently you are at my blog - Stephanie Fischer - so click on the next name in the list to ensure that you don't miss out on seeing any of the blogs and the amazing inspiration that they contain.

Thanks for visiting.
'Til next time!
Stephanie


Product List - All available in my online store

Thursday, 20 September 2018

Stampin' Dreams Blog Hop: Theme - Favourite Techniques - Make Your Own Stencil / Mask from dies

Image may contain: text

Welcome to the monthly Stampin' Dreams Blog Hop.  This month we are sharing our Favourite Techniques.  I love using lots of different techniques so it's hard for me to choose a favourite.  However, at the moment I'd have to say "making my own stencils from my die collection".  I like to make my dies work harder and provide extra value for money!

You are currently visiting Stephanie Fischer (The Crafty Thinker) from Australia.  I hope you enjoy my cards.
#thecraftythinker  #stampinup  #xmascard  #makeyourownstencil  #cardmaking  #blizzardthinlit  #SDBH , Stampin' Dreams Blog Hop, Christmas card, using dies to make stencils, Shimmer paint, Blizzard Thinlit, Christmas Traditions Punch Box, Stampin' Up Australia Demonstrator, Stephanie Fischer, Sydney NSW
A Christmas card featuring baubles made with home made stencils - make your dies work harder!

Although there's quite a lot going on in this Christmas card, my main focus is the decoration on the baubles which I achieved by sponging Shimmer Paint through a home  made stencil.
#thecraftythinker  #stampinup  #xmascard  #makeyourownstencil  #cardmaking  #blizzardthinlit  #SDBH , Stampin' Dreams Blog Hop, Christmas card, using dies to make stencils, Shimmer paint, Blizzard Thinlit, Stampin' Up Australia Demonstrator, Stephanie Fischer, Sydney NSW
Using home made stencils and Shimmer Paint to create baubles for Christmas cards

The first step is to cut the stencil from a piece of Window Sheet with the die of your choice.

TIPS:

  • You may have to run it through your Big Shot several times to get a clean cut, moving it around on the platform each time.  If you have a Precision Base Plate, you'll want to use it.
  • Cut the Window Sheet larger than you need and leave a generous edge all the way around your die.  This will allow you to also use that "negative space" piece for sponging or masking.
  • When using the Blizzard Thinlit, keep all the pieces.  The large piece becomes a stencil and all the smaller pieces that you remove become wonderful masks.

I cut some baubles using the Layering Ovals and Layering Circles dies.

I like to place a glue dot under each of the pieces to keep them from moving around.  I first handle them a bit between my fingers to make them a little less tacky.  The stencil that I made with the Blizzard Thinlit was large enough that I could group three of the oval shapes and stencil them together.

Place your stencil over the piece(s) to be decorated and fasten with a little bit of washi tape (or similar) at the top and bottom - being careful not to cover any of the area you wish to decorate.

I then placed some of the Vegas Gold Shimmer Paint onto a palette (I use one of my large acrylic blocks) and sponged over the stencil with gentle pouncing motions.

TIPS:

  • It's better to be sparing with the paint and do several layers if necessary.  If there's a lot of paint on the sponge, some is likely to find it's way under the stencil resulting in a less crisp image.
  • For a similar reason, pounce the sponge straight up and down to try to avoid getting paint under the stencil.
  • Shimmer Paint is water soluble and cleans up very easily.  I prefer to work directly on my cutting mat but you may wish to cover your work area with a sheet of scrap paper, some Stampin' Up Grid Paper or a non-stick craft mat.
Clean your stencil after use (I find all I need is a little water from the tap) and allow it to dry.  I prefer not to dry them with a towel to avoid catching little details and damaging the stencil.  With this little bit of care, you'll be able to use your stencil over and over again for a very long time.

WHY STOP THERE?
So we've used our stencil with the gorgeous Shimmer Paint, but why stop there?!  Use it with any of your favourite ink colours - simply tap the dry sponge onto the ink pad and then over the stencil.

Or, my particular favourite at Christmas time, use some glitter!

#thecraftythinker  #stampinup  #xmascard  #makeyourownstencil  #cardmaking  #blizzardthinlit  #SDBH , Stampin' Dreams Blog Hop, Christmas card, using dies to make stencils, stencil with glitter, Blizzard Thinlit, Stampin' Up Australia Demonstrator, Stephanie Fischer, Sydney NSW
A Christmas card made with home made stencils and some super fine glitter

Apply Multipurpose Sheet to the front of the cardstock before cutting your shape.

#thecraftythinker  #stampinup  #xmascard  #makeyourownstencil  #cardmaking  #blizzardthinlit  #SDBH , Stampin' Dreams Blog Hop, Christmas card, using dies to make stencils, stencil with glitter, Blizzard Thinlit, Stampin' Up Australia Demonstrator, Stephanie Fischer, Sydney NSW
Preparing to use my home made stencil with glitter
Peel off the protective layer.

Rub a little soap over the back of your stencil (I tend to dampen a small bar of soap with my fingers and then gently rub my soapy fingers over the stencil).  The soap assists with removal of the stencil from the adhesive.

Position the stencil, soap side down, onto the adhesive on the front of your shape.

Tip some super fine glitter on top and press it in with your fingers.

Tap off the excess glitter and burnish by gently rubbing your fingers over the glitter on the project.

Remove the stencil and tap again to remove any remaining excess glitter.

Tip a second colour of glitter onto the shape and press onto the project.  Tap off the excess and repeat the burnishing process.
TIP:
I like to have two sheets of paper, folded in half and then opened up to form a valley in the middle.  One for each colour of glitter.
Once I finish with a glitter, I use the sheet of paper to return the excess glitter to its container.

I hope this card has inspired you and brightened your day.  You are currently visiting Stephanie Fischer.  Please hop through all of the people on the list below to see all of our projects.  You don't want to miss any!

Thank you for visiting.
'Til next time!
Stephanie


Product List - All available in my online store