Showing posts with label Santa's Sleigh. Show all posts

Friday, 1 December 2017

Golden Reindeer

This week I've been sharing my "this leads to that" creative process and this card represents the end of the chain.
#thecraftythinker, #stampinup, #christmascard, #cardmaking, Christmas Card, Santa's Sleigh, Reindeer, using negative spaces, Stampin' Up Australia Demonstrator, Stephanie Fischer
Finding a good home for the negative piece of cardstock leftover when die cutting
On Wednesday I shared a card for which I cut a reindeer from Early Espresso cardstock - well this is what happened to the negative piece - a little bit of gold turns negative to positive!
#thecraftythinker, #stampinup, #christmascard, #cardmaking, Christmas Card, Santa's Sleigh, Reindeer, using negative spaces, Stampin' Up Australia Demonstrator, Stephanie Fischer
It's always good to have a bit of gold at Christmas!
I simply laid the Early Espresso piece on top of a piece of Gold Foil Sheet and placed it onto my card.  I gold heat embossed the label from Seasonal Bells and cut it out with the coordinating die in the Bunch of Banners Framelits.

I also took the opportunity to use up a piece of the Year of Cheer Specialty Designer Series Paper.  I'm not sure where I was going with the diagonal cut at the time but I used it in this card by simply gluing it to the Early Espresso base card.
#thecraftythinker, #stampinup, #christmascard, #cardmaking, Christmas Card, Santa's Sleigh, Reindeer, using negative spaces, Stampin' Up Australia Demonstrator, Stephanie Fischer
Saving cardstock by using both the positive and negative images when die cutting
Here are the two reindeers reunited!

Thank you for visiting.
'Til next time!
Stephanie


Product List - All supplies available in my online store, click an image below to visit (Australian Residents only)

Wednesday, 29 November 2017

Reindeer in a Wintry Forest

On Sunday's card I cut a window from a Smoky Slate layer with the largest of the Lots of Labels dies and I promised to share what happened to the piece from the centre...... here it is!
#thecraftythinker, #stampinup, #christmascard, #cardmaking, Christmas Card, Reindeer, Snowy scene with die cuts, Stampin' Up Australia Demonstrator, Stephanie Fischer, Sydney NSW
An easy to make snowy scene using dies
The base card is Early Espresso and I added a layer of Soft Sky.  I cut some Smoky Slate and Basic Gray oddments with dies from the Seasonal Layers Thinlits and Bouquet Bunch Framelits and adhered all but one to the label shape.

I tore a scrap of Whisper White cardstock into a snowy, hilly terrain and trimmed the end with the largest Lots of Labels die.
TIP:  To make it easier to tear the hill shape, "draw" the tear line with a small wet paintbrush.  Leave it for a short time to soak into the card and then gently tear.

With the white piece glued on top of the bottom part of the label, I then adhered the last tree shape on top of the white.

I cut the reindeer from the Santa's Sleigh dies with Early Espresso cardstock and trimmed off the antlers and tail.  I then cut the top part of the reindeer with Crumb Cake cardstock and adhered this behind the Early Espresso so that the Crumb Cake antlers and tail show.  I then glued the reindeer to the card.

I stamped the banner from Seasonal Bells with Archival Black ink and cut it out with the coordinating die in the Bunch of Banners set.

On Friday I'll share what happened to the negative space left over from cutting out the Early Espresso reindeer!

Thank you for visiting.
Til next time!
Stephanie


Product List - To purchase supplies, visit my online store by click on a product image below (Australian Residents only)

Wednesday, 22 November 2017

Pattern Party Sleigh Christmas Card

This card came about because I wanted to test out the new sparkly embossing paste that will be available in the Occasions Catalogue (3 January to 31 May 2018).  I was curious to see if/how the result would differ from using the plain white embossing paste with Dazzling Diamonds added. 
#thecraftythinker, #christmascard, #cardmaking, #embossingpaste, Pattern Party, Embossing paste, Santa's Sleigh, Xmas card, Stampin' Up Australia Demonstrator, Stephanie Fischer, Sydney NSW
This Christmas card has some sneak peeks and some old favourites

The result?  It's just as sparkly - maybe a little finer and, best of all, I can save my Dazzling Diamonds for other purposes!

So I had the red and white pattern and my mind went blank (not an unusual state of affairs!).   When in doubt - add a sleigh full of gifts!
#thecraftythinker, #christmascard, #cardmaking, #embossingpaste, Pattern Party, Embossing paste, Santa's Sleigh, Xmas card, Stampin' Up Australia Demonstrator, Stephanie Fischer, Sydney NSW
A mix of old and new products in this Christmas card
Curious about the greenish embellishment?  The Tutti-frutti Sequins are self-adhesive and will also be available in the new Occasions Catalogue. I noticed that the blue ones are so pale as to be almost transluscent so I layered one on top of a Lemon Lime Twist one to get a more muted green better suited to my colour scheme.  In the centre is a Rhinestone Jewel that I coloured with Stampin' Blends alcohol markers.

Thank you for visiting.
'Til next time!
Stephanie


Product List - Click on a product image below to visit my online store (Australian Residents only)

Friday, 29 September 2017

Foil Frenzy Sleigh

These cards came about because I had one of the sleigh elements left over from making these earring gift cards.
#christmascard, #cardmaking, #stampinup, Santa's Sleigh, Foil Frenzy, Christmas Card, Xmas, #thecraftythinker, Stampin' Up Australia Demonstrator, Stephanie Fischer, Sydney NSW
The Whisper White Classic Weave Ribbon needed something more, so I added some gold Washi Tape

The Foil Frenzy matches the opulence of the metallic sleigh without going too over the top!

#christmascard, #cardmaking, #stampinup, Santa's Sleigh, Foil Frenzy, Christmas Card, Xmas, #thecraftythinker, Stampin' Up Australia Demonstrator, Stephanie Fischer, Sydney NSW
A Soft Sky base card and Classic Weave Ribbon  finish off this simple card
Adhering some Multipurpose Adhesive Sheet to the back of the foil sheets before die cutting with that detailed sleigh thinlit makes it sooo easy to stick to the under layer of the sleigh!

Thank you for visiting.
'Til next time!
Stephanie

Product List  - Click on a product image below to visit my online store (Australian Residents only)


Monday, 25 September 2017

Santa's Sleigh Gate Fold Earring Gift Card

Yesterday, when  I CASEd a card by the talented Sarah Fleming for the Crazy Crafters Blog Hop, I turned the card into a gate fold with a pair of earrings inside as a surprise.  I promised I would share a tutorial today .... so here it is!  

This is a CASE of the card I shared yesterday.  The dimensions are slightly different, as yesterday's card was square. I've also included below some pictures of another earring holder card that I made with red and gold with different dimensions again.

The base card is a gate fold made with Basic Black cardstock cut to 9" x 5.5" and folded at 2.75" and 6.25".  This time I cut a piece of the gorgeous Merry Music Specialty Designer Series Paper for the front and used Silver Foil Sheet for the top layer of the sleigh and for the oval layer.  The sponging on the Merry Christmas banner is done with Smoky Slate ink and I used a piece of Black Shimmer Ribbon for the closure.  The final touch was some randomly positioned Rhinestone Jewels.
#cardmaking, #stampinup, #christmascard, earring holder card, gift card, Xmas, Christmas card, Santas Sleigh, #thecraftythinker, Stampin' Up Australia Demonstrator, Stephanie Fischer, Sydney NSW
Black, white and silver is always so elegant - even at Christmas!
TIP:
Placing Multipurpose Adhesive Sheet on the back of the Silver Foil Sheet before die cutting makes simple work of adhering the detailed die cut!

The inside of the card is decorated with some more of the Merry Music paper.  The large greeting is from the Merry Little Labels stamp set and the silver heat embossed sentiment is from the Hang Your Stocking stamp set.
#cardmaking, #stampinup, #christmascard, earring holder card, gift card, Xmas, Christmas card, Santas Sleigh, #thecraftythinker, Stampin' Up Australia Demonstrator, Stephanie Fischer, Sydney NSW
The earrings are made with Year of Cheer Embellishments
To make the earring tag, I cut a piece of Basic Black cardstock to about 3" wide and used one of the Lots of Labels framelits to cut just one end by placing the top cutting plate only over one end of the die. 
www.thecraftythinker.com.au, Cutting a tag with Lots of Labels dies, #cardmaking, #thecraftythinker, Stampin' Up Australia Demonstralia, Stephanie Fischer, Sydney NSW
Die cutting one end of a tag with a label framelit

I then heat embossed the greeting and scored across the tag in the place that would best suit the length of the earrings.  Once I'd folded on the score line, I used a piercing tool to make two small holes on the score line from which to hang the earrings.  I then trimmed off any excess from the top of the tag, leaving myself about a 1/2" flap.  

www.thecraftythinker.com.au, Cutting a tag with Lots of Labels dies, #cardmaking, #thecraftythinker, Stampin' Up Australia Demonstralia, Stephanie Fischer, Sydney NSW
Tag with one end only cut with a Lots of Labels die


The next step is to make the slot for the earring holder tag.  Having stamped the greeting at the top of the card piece (cut to 5 3/8" x 4 3/8"), I drew a light pencil line to show me where I wanted to cut the slot using the tag as a guide.  I then used my Stampin' Trimmer to cut the slot, making it a teeny bit larger than the tag to make it easier to feed the tag through the slot from the front.   
#cardmaking, #stampinup, #christmascard, earring holder card, gift card, Xmas, Christmas card, Santas Sleigh, #thecraftythinker, Stampin' Up Australia Demonstrator, Stephanie Fischer, Sydney NSW
Making a slot for the Earring Holder Tag
Place glue (I used strips here to make it easier to photograph the positioning of the adhesive) on the under side of the tag at the back.  
#cardmaking, #stampinup, #christmascard, earring holder card, gift card, Xmas, Christmas card, Santas Sleigh, #thecraftythinker, Stampin' Up Australia Demonstrator, Stephanie Fischer, Sydney NSW
Adhesive positioning for the tag
Check that the tag is positioned correctly at the front (straight and with the little holes accessible) and then press down to adhere.
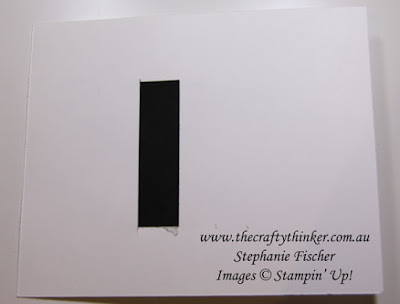
#cardmaking, #stampinup, #christmascard, earring holder card, gift card, Xmas, Christmas card, Santas Sleigh, #thecraftythinker, Stampin' Up Australia Demonstrator, Stephanie Fischer, Sydney NSW
The back of the earring tag glued into position


The finished size of this red and gold version  is 5" x 4".

#cardmaking, #stampinup, #christmascard, earring holder card, gift card, Xmas, Christmas card, Santas Sleigh, #thecraftythinker, Stampin' Up Australia Demonstrator, Stephanie Fischer, Sydney NSW
Gate Fold Earring Holder card decorated with Be Merry Designer Series Paper

I used Whisper White Classic Weave ribbon for the closure.
.#cardmaking, #stampinup, #christmascard, earring holder card, gift card, Xmas, Christmas card, Santas Sleigh, #thecraftythinker, Stampin' Up Australia Demonstrator, Stephanie Fischer, Sydney NSW
I made the earrings with Year of Cheer Embellishments

#cardmaking, #stampinup, #christmascard, earring holder card, gift card, Xmas, Christmas card, Santas Sleigh, #thecraftythinker, Stampin' Up Australia Demonstrator, Stephanie Fischer, Sydney NSW
There's plenty of space under the tag to write a personal message


Thank you for visiting.  I welcome your comments.
'Til next time!
Stephanie

Product List - To purchase a product, click on an image below to visit my online store (Australian Residents only)