Showing posts with label Pansy Punch. Show all posts

Monday, 12 March 2018

Pleated Delightful Daisy with a Pansy

I love to learn new techniques and there's nothing more fun than exploring a new technique with a good friend!

My friend, Judy, arrived armed with her measurements and trial runs having made the decision that we would make some cards with pleated paper.  We had a wonderful morning choosing our papers, making the pleats and then figuring out what to do with them!
#thecraftythinker, #fancyfold, #stampinup, #cardmaking, pleated card, Pansy Punch, Stampin' Up! Australia Demonstrator, Stephanie Fischer, Sydney NSW
A cheerful, multipurpose card
So this is the first of the two cards I made with pleats.  I kept the greeting generic so that I could use the card for most purposes.  It's a cheerful card, so could become a Get Well card or a birthday card.

Thank you for visiting.
'Til next time!
Stephanie

Product List - To shop in my online store, click on an image below (Australian Residents only)

Friday, 9 February 2018

Petal Passion Pansy

The Petal Passion Memories & More Card Pack holds a generous amount of beautiful cards - so I decided it was time to use some more of them!  This one is coloured with Stampin' Blends alcohol markers and then trimmed with one of the Lots of Labels Framelits.
#thecraftythinker, #stampinup, #cardmaking, Petal Passion Memories & More, Stampin' Blends, Stampin' Up! Australia Demonstrator, Stephanie Fischer, Sydney NSW
I cut one of the little Enamel Shapes stars in half to better fit the centre of the flower.

I trimmed a little scrap of Whisper White cardstock with another of the Lots of Labels dies, edged it with Pink Pirouette ink and stamped the greeting from the Bunch of Blossoms stamp set in Rose Red ink.

The base card is Pink Pirouette and there's a layer of Rose Red cardstock embossed with the Simple Stripes Embossing Folder.

The flower is made from two layers of Pink Pirouette card cut with the Pansy Punch, shaped a little with a ball tool and lightly sponged with Rose Red ink.

The finishing touches are the Metal Rimmed Pearls, Enamel Shapes and the little piece of Old Olive ribbon.

Thank you for visiting.
'Til next time!
Stephanie

Product List - Click on an image below to shop in my online store (Australian Residents only)

Sunday, 28 January 2018

Crazy Crafters Blog Hop with Special Guest Rose Coleman

Image may contain: text 
IMG_1647
Click this image to visit Rose's blog
Welcome to the Crazy Crafters' Blog Hop with our Special Guest stamper, Rose Coleman - we are thrilled to have Rose join us this month and so excited to CASE (Copy And Selectively Edit) any project that has been created by her. 
 
Whether you are starting the blog hop here at my blog, Stephanie Fischer - The Crafty Thinker, or have come from the person before me, be sure to click on the person listed under me further down the page to continue your journey on this blog hop.

I liked so many of Rose's cards that it took me some time to work through a short list and then select the card to the left to CASE.   I chose it because I liked the simplicity of the design and thought I'd be able to use one of my Brusho backgrounds.
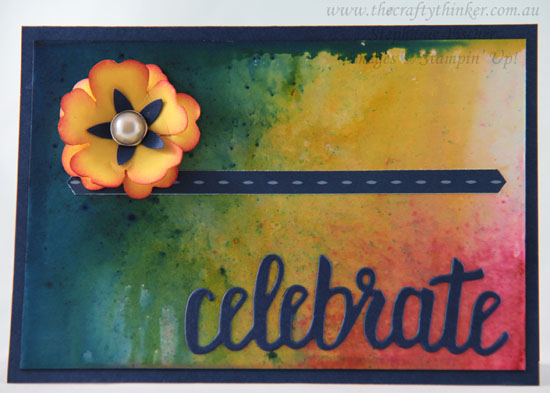
#thecraftythiner, #cardmaking, #brusho, Brusho background, Saleabration, Celebrate You dies, Stampin' Up! Australia Demonstrator, Sydney NSW
Brusho background.  The Celebrate You thinlit dies are FREE with a qualifying order during Sale-A-Bration


The bold colours and contrasts make for quite a dramatic effect!

For this particular Brusho background, I spritzed Glossy White cardstock with LOTS of water until there was a layer of water all over the card.  I then sprinkled on some blue, red and yellow Brusho crystals and watched the magic of the blending!

I cut the word with one of the Celebrate You Thinlit dies that are FREE during Sale-A-Bration with a product order of $180.  For more information on all the great deals and offers available until 31st March, visit my Specials & Promotions page.

Thanks for following our blog hop. Remember that currently you are at my blog - Stephanie Fischer - so click on the next name in the list to ensure that you don't miss out of seeing any of the blogs and the amazing inspiration they contain.

Thanks for visiting
'Til next time
Stephanie


Product List - click an image to visit my online store (Australian Residents only)


Friday, 8 September 2017

Layered Daisy Leaves

This card is entered into the Crazy Crafters Team Highlights this week.  Click here to see the entire line up and vote for your favourites.

I recently made some cards using the Tarnished Foil Technique (they can be seen here, here and here).  The first steps for that technique involved embossing a piece of foil sheet and then swiping across it with some Basic Black ink.  

I really liked the look of the black against the metallic and so I made this background using just the new Champagne Foil Sheet and some black ink with the Layered Leaves embossing folder.
Sponged embossed background, Floral card, Layered Leaves embossing folder, Daisy, #thecraftythinker, Stampin Up Australia Demonstrator, Stephanie Fischer, Sydney NSW
Berry Burst really adds a touch of drama to any card!
Since it was the background that I wanted to showcase, I tried to keep the rest of the card as simple as I could and just added a little ribbon and some flowers and foliage.
Sponged embossed background, Floral card, Layered Leaves embossing folder, Daisy, #thecraftythinker, Stampin Up Australia Demonstrator, Stephanie Fischer, Sydney NSW
Layered Leaves embossing folder, Champagne Foil Sheet and Black ink make for an elegant background

The leaves are punched from Basic Black cardstock using the new Leaf punch and I then sponged a little Whisper White Craft Ink onto them to highlight them a bit.

The flowers are all cut from Berry Burst cardstock (to match the base card) using the Daisy punch, Pansy punch and dies from the Seasonal Layers thinlits.  I sponged a little Fresh Fig ink onto the flowers, added dimension with a bone folder and ball tool  and adhered them to the card with glue dots.  The centres are Metal Rimmed Pearls and Basic Pearl Jewels.
Sponged embossed background, Floral card, Layered Leaves embossing folder, Daisy, #thecraftythinker, Stampin Up Australia Demonstrator, Stephanie Fischer, Sydney NSW
What do you do when you accidentally smudge the greeting? ... Smudge the rest to make it look intentional!

Thank you for your visit.
'Til next time!
Stephanie

Product List - To purchase supplies in my online store, click on a product image below (Australian Residents only)