Showing posts with label #2020annualcatalogue. Show all posts

Monday, 29 June 2020

Game On - Royal Flush


#thecraftythinker #stampinup #cardmaking #gameon #masculinecard , Game On, Masculine card, Tasteful Labels Dies, Stampin' Up Demonstrator, Stephanie Fischer, Sydney NSW
A masculine card created with the Game On stamp set and Tasteful Labels Dies

Here's another card that I made with the Game On stamp set.  I decided to use a backdrop of In Good Taste Designer Series Paper to provide a suggestion of a table top.

Having stamped the image with Basic Gray ink, I used a Real Red Stampin' Write Marker to add the red colour to the playing cards then cut out the image with one of the Tasteful Labels Dies.

To create the black label layer, I simply cut a label, cut it in half and adhered it underneath.

Thank you for visiting.
'Til next time!
Stephanie

Product List  - All available for purchase in my online store
class="separator" style="clear: both; text-align: left;">

Monday, 22 June 2020

Boho Indigo Stamped Vase Card

#thecraftythinker #stampinup #cardmaking #bohoindigomedley #2020annualcatalogue , Boho Indigo Medley, Stampin' Up! Demonstrator Stephanie Fischer, Sydney NSW
A simple card created with the Boho Indigo Product Medley

As promised, here's another very quick and simple card made with the gorgeous Boho Indigo Product Medley.

The base card is made from Misty Moonlight cardstock with a layer of the gorgeous Boho Indigo paper.

This time, I stamped the vase onto a piece of Very Vanilla cardstock with Misty Moonlight ink.  Then I added the gold heat embossed foliage and cut out the piece with one of the Stitched So Sweetly dies.  I added a layer of Gold Foil Sheet before adhering to the card front (remember to cut out the centre of the gold foil to make it go further!).

I stamped the flowers and cut them out with the coordinating die included in the set and also used one of the dies to cut some more foliage from one of the papers.

Lastly, I added a little bow made from the Forever Greenery Trim.

I love these products, so I'm sure I'll be sharing more Boho Indigo project soon!

Thank you for visiting.
'Til next time!
Stephanie

Product List  - All products used are available for purchase in my online store

Thursday, 18 June 2020

Stampin' Dreams Blog Hop: Favourite Designer Series Paper - In Good Taste


Welcome to the monthly Stampin' Dreams Blog Hop.  This month we are sharing projects made with our favourite Designer Series Paper and, oh my goodness, it was sooo hard to choose!  Stampin' Up! have really outdone themselves with loads of stunning papers in the new 2020 Annual Catalogue! 

You are currently visiting Stephanie Fischer (The Crafty Thinker) from Australia.  I hope you enjoy my cards and then click on "Click here to enter" and click through the little images to see all of the other great projects in the hop!

How to choose a favourite Designer Series Paper when this catalogue is chock full of gorgeous paper?!!!  In truth, I couldn't.  I love them all for different reasons:  some are masculine-leaning elegance (World of Good), some are soft and feminine elegance (Peony Garden), some are great all-purpose choices (Forever Greenery, Flowers For Every Season).  Then there's bright, bold and shimmery (Artistry Blooms) as well as playful and bright (Playing With Patterns, Playful Pets). 

However, today I've chosen to use the masculine-inclined In Good Taste Designer Series Paper because to me it represents great value and is so versatile.
#thecraftythinker #cardmaking #stampinup #SDBH #masculinecard #ingoodtastedsp , Masculine Card, In Good Taste DSP, Stampin Dreams Blog Hop, Stampin Up Demonstrator, Stephanie Fischer, Sydney NSW
Samples or off-cuts of the In Good Taste Designer Series Paper make a good masculine card

I hate wasting the little leftover bits of paper, don't you?!  This sampler of some of the lovely paper in the pack is also a great way to use up odds and ends!

The greeting from the Good Morning Magnolia stamp set, stamped in Early Espresso ink and cut out with one of the Tasteful Labels Dies, is popped up on Stampin' Dimensionals.  

#thecraftythinker #stampinup #SDBH #prizedpeonybundle #ingoodtastedsp #cardmaking , Prized Peony Bundle, In Good Taste DSP, Stampin Dreams Blog Hop, SDBH, Stampin' Up Demonstrator, Stephanie Fischer, Sydney NSW
In Good Taste DSP makes a good backdrop for the Prized Peony Bundle

Although I consider this paper pack to be "masculine-inclined", it does also lend itself to feminine or gender neutral projects like the one above.  

For this card, I stamped with Sahara Sand ink onto Whisper White cardstock and then coloured the image with Stampin' Blends alcohol markers.  I cut the image out with the coordinating Peony Die (there's a 10% saving when buying the Prized Peony bundle of dies and stamps) and then coloured around the flower with a Light Smoky Slate Stampin' Blend.

I hope the cards you've seen here on my blog today have inspired you, brightened your day and introduced you to some beautiful new papers!  

You are currently visiting Stephanie Fischer.  Please click on "click here to enter" below and click on each of the little images to hop through all of the people on the list to see all our projects.  You don't want to miss any!

Thank you for visiting.
'Til next time!
Stephanie

You are invited to the Inlinkz link party!

Click here to enter
Product List - All available for purchase from my online store

Monday, 15 June 2020

Peony 60th Birthday Card

#thecraftythinker #stampinup #cardmaking #peonydies #alteringadiecut , Peony Dies, 60th birthday card, Altering a Die Cut, Tasteful Labels, Stampin' Up! Demonstrator Stephanie Fischer, Sydney NSW
An elegant 60th birthday card featuring the gorgeous new Peony dies, Tasteful Labels and the perfectly sized Playful Alphabet dies (which included numbers!)

I'm so excited to have received my order of goodies from the new Annual Catalogue.  It was REALLY difficult to choose what to use first because I LOVE it all!

Anyway, eventually I decided to use some of the fabulous Peony Garden suite to make a 60th card for a friend who is a keen gardener.  The entire suite of products is gorgeous but I've only used a little bit in this card:  The Peony Dies, Gray Granite Shimmer Ribbon, Elegant Faceted Gems and Peony Garden Designer Series Paper.  The sentiment I used is from the Here's A Card stamp set

I've CASED (Copy And Selectively Edit) the layout of the card from one of the sample cards on page 82 of the Stampin' Up 2020-2021 Annual Catalogue.

#thecraftythinker #stampinup #cardmaking #peonydies #alteringadiecut , Peony Dies, 60th birthday card, Altering a Die Cut, Tasteful Labels, Stampin' Up! Demonstrator Stephanie Fischer, Sydney NSW
The Peony die cuts, edges sponged.  I used the ball end on the Take Your Pick Took on the back of the flowers to give the flower extra texture and depth

The peony is really simple to cut and construct using the five die cuts pictured above.  I cut them from Gray Granite card and sponged the edges with Blushing Bride ink followed by some Champagne Mist Shimmer Paint.  I cut the flower centre from Gold Foil Sheet.

The flower is incredibly quick and easy to assemble! 
  • First do any colouring and shaping (eg with the ball tool) then slot the pieces together and add a little glue at the bottom to hold them in place. 
  • Start with the largest piece and work down to the smallest piece.  
  • Holding the largest piece, slide the bottom of the second largest piece through the slot from the front.  Turn the pieces over to the back and you'll be able to line up the shaped bottom edge very easily and glue it into position.
  • Repeat this process, sliding the bottom edge of the third largest piece through the slot in the second largest piece, from the front.  Turn over, perfectly line up the bottom edges and glue.
  • Repeat the process with the final piece.
  • Slide the flower centre into position and attach with adhesive.  I used a glue dot.
Six of the dies are required for the leaves:  I cut the main leaf shapes from Basic Gray cardstock and the highight edges from Gold Foil Sheet.  They are also quick and easy to assemble - just glue the highlights to the corresponding edges of the leaf shapes.

To give the numbers dimension, I attached some of the new Foam Adhesive Sheet to the back of the Gold Foil Sheet and then die cut the numbers as usual.  The dies cut through the foam with no problem but I ran it through the machine twice just to be sure!

#thecraftythinker #stampinup #cardmaking #peonydies #alteringadiecut , Peony Dies, 60th birthday card, Altering a Die Cut, Tasteful Labels, Stampin' Up! Demonstrator Stephanie Fischer, Sydney NSW
I used the new Adhesive Foam Sheets to create depth on the numbers

Curious about how I made that shape and size die cut with the Tasteful Labels dies?
Despite the large number of die sets I've managed to collect over the years, sometimes I just don't have exactly the right size or shape - so I alter what I have!   Make them shorter or longer or change the shape of the ends .....  Keep scrolling down for a photo tutorial.

Thank you for visiting.
'Til next time!
Stephanie 

Altering a die cut

For this card I took a rectangular die with a flag cut end, made it longer and gave it a flag cut on both ends.

#thecraftythinker #stampinup #alteringadiecut #extendingadiecuttutorial #cardmaking #diecuttingtutorial , Altering a Die Cut, Tasteful Labels, Stampin' Up! Demonstrator Stephanie Fischer, Sydney NSW
The actual die
#thecraftythinker #stampinup #alteringadiecut #extendingadiecuttutorial #cardmaking #diecuttingtutorial , Altering a Die Cut, Tasteful Labels, Stampin' Up! Demonstrator Stephanie Fischer, Sydney NSW
The extended and altered die cut

Step 1  Position one end of the die where you want to cut it.  If you're cutting out a ready-stamped sentiment, ensure that the die is sitting straight in relation to the stamping. TIP:  I like to tape it into position with some Washi tape so that it doesn't move.

Step 2  Place the top cutting plate so that it covers only part of the die so that the final part of the die does not cut.  Run through the cutting machine.
#thecraftythinker #stampinup #alteringadiecut #extendingadiecuttutorial #cardmaking #diecuttingtutorial , Altering a Die Cut, Tasteful Labels, Stampin' Up! Demonstrator Stephanie Fischer, Sydney NSW
Steps 1 and 2 of extending & altering this die cut

#thecraftythinker #stampinup #alteringadiecut #extendingadiecuttutorial #cardmaking #diecuttingtutorial , Altering a Die Cut, Tasteful Labels, Stampin' Up! Demonstrator Stephanie Fischer, Sydney NSW
You'll end up with something like this
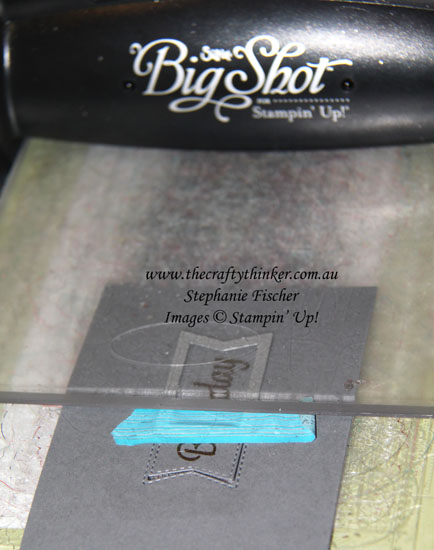
Step 3  Reverse the piece on the cutting machine platform and position the die correctly for the other end of the cut.  TIP:  Gently wiggle the die until you feel the blade slip into the cuts you've already made - this will ensure continuity of pattern and a smooth finish.  TIP:  A piece of washi tape is a handy way to make sure the die stays correctly positioned.

Step 4:  Position the top cutting plate, as before, so that only the first part of the die is covered by the plate.  TIP:  Ensure that you include enough for the cutting to meet.
#thecraftythinker #stampinup #alteringadiecut #extendingadiecuttutorial #cardmaking #diecuttingtutorial , Altering a Die Cut, Tasteful Labels, Stampin' Up! Demonstrator Stephanie Fischer, Sydney NSW
Steps 3 and 4 of extending and altering a die cut

#thecraftythinker #stampinup #alteringadiecut #extendingadiecuttutorial #cardmaking #diecuttingtutorial , Altering a Die Cut, Tasteful Labels, Stampin' Up! Demonstrator Stephanie Fischer, Sydney NSW
Close up of the positioning of the cutting plate for the second cut
In this instance I positioned the die so that it would cut a banner end at both ends

Want to extend the label but keep the same shape?
Follow the steps above but change the positioning of the die for the second pass through the machine.
#thecraftythinker #stampinup #alteringadiecut #extendingadiecuttutorial #cardmaking #diecuttingtutorial , Altering a Die Cut, Tasteful Labels, Stampin' Up! Demonstrator Stephanie Fischer, Sydney NSW
Positioning the die for the second cut so that the original shape of the die is maintained


#thecraftythinker #stampinup #alteringadiecut #extendingadiecuttutorial #cardmaking #diecuttingtutorial , Altering a Die Cut, Tasteful Labels, Stampin' Up! Demonstrator Stephanie Fischer, Sydney NSW
The extended die cut