Showing posts with label Butterfly Basics. Show all posts

Sunday, 13 August 2017

Crazy Crafters Blog Hop with Special Guest Martha Inchley

Image may contain: text 
http://www.inchofcreativity.com/2017/04/display-6.html
Click image to visit Martha's Blog
Welcome to the Crazy Crafters' Blog Hop with our Special Guest stamper, Martha Inchley - we are thrilled to have Martha join us this month and so excited to CASE (Copy And Selectively Edit) any project that has been created by her.  As a member of the Artisan Design Team, Martha is the source of much inspiration!
 
Whether you are starting the blog hop here at my blog, Stephanie Fischer - The Crafty Thinker, or have come from the person before me, be sure to click on the person listed under me further down the page to continue your journey on this blog hop.

I have turned the design onto its side and replaced the bow with some shells.
#crazycraftersbloghop, So Many Shells, Color Theory, Masculine card, #thecraftythinker, Stampin' Up Australia Demonstrator, Stephanie Fischer, Sydney NSW
So Many Shells with Color Theory paper
My plan was to make life easy for myself and use the Color Theory paper to reproduce the strips of paper in Martha's card.  In my mind the ocean effect would be enhanced by using the Ruffled 3D embossing folder.  In reality, it looked like a confused mess!  Faced with the choice between starting again or finding a way to rehabilitate the existing mess, I used my Stampin' Trimmer to remove the white stripes and glued the remaining strips to my Dapper Denim base card.

I'll admit that I struggle a bit with two-step stamps (we all have our own strengths and this is not one of mine!) but I was quite happy with the results.  For the largest shell I used a mixture of Calypso Coral and Early Espresso.  The two scallop shells are Powder Pink and Soft Suede.  For the spiral shell I used Crumb Cake and Soft Suede and the Sea Urchin is Flirty Flamingo and Soft Suede.
#crazycraftersbloghop, So Many Shells, Color Theory, Masculine card, #thecraftythinker, Stampin' Up Australia Demonstrator, Stephanie Fischer, Sydney NSW
A masculine card despite the flash of pink in the shells

I stamped the greeting with Soft Suede ink onto a piece of the Color Theory paper and hand cut the banner end.
#crazycraftersbloghop, So Many Shells, Color Theory, Masculine card, #thecraftythinker, Stampin' Up Australia Demonstrator, Stephanie Fischer, Sydney NSW
I made some more shells for the inside of the card

I used similar shells to decorate inside the card except for this large shell I combined Powder Pink and Soft Suede. 

I hope you've enjoyed this card and I welcome your comments. 

Thanks for following our blog hop. Remember that currently you are at my blog - Stephanie Fischer - so click on the next name in the list to ensure that you don't miss out of seeing any of the blogs and the amazing inspiration they contain.

Thanks for visiting
'Til next time
Stephanie


Product List

Friday, 17 March 2017

Butterfly Inlay

This card is entered into the Crazy Crafters' Project Highlights this week.  Click here to see all the other great cards and vote for your favourites.

Butterfly Basics, Glimmer paper, Paper piecing, #thecraftythinker, Stampin Up Australia Demonstrator, Stephanie Fischer, Sydney NSW
A glittery inlaid butterfly - suitable for many occasions

The assortment pack of Glimmer Paper is so generous (and FREE during Sale-A-Bration!) that I've been trying to think up ways to use more of it!

To inlay the butterfly, I cut it out three times - once from the Night of Navy panel, once in Island Indigo Glimmer Paper and finally in the Sweet Sugarplum Glimmer Paper.

I layered the Night of Navy panel onto the Whisper White, glued the Island Indigo butterfly into position and then added the pieces of Sweet Sugarplum and Night of Navy.  Easy but a little time-consuming!

Tip:  Try to keep the butterfly pieces in position after cutting, to make it quicker and easier to identify the pieces you need.

Butterfly Basics, Glimmer paper, Paper piecing, #thecraftythinker, Stampin Up Australia Demonstrator, Stephanie Fischer, Sydney NSW
The butterfly image inside the card is from the Butterfly Basic stamp set

I kept the layout of the card simple to offset the over-the-top nature of all the glimmer paper!

Sale-A-Bration is coming to an end, so be sure to take advantage of the amazing deals and special products before the end of this month.

Thank you for visiting.
'Til next time!
Stephanie

Product List - To visit my online store, click on a product image below (Australian Residents only)

Sunday, 30 October 2016

You've Got This Sympathy Card


Sometimes inspiration comes from some fabric, a photo, painting, advertisement or shop display and occasionally it's a mystery.  There's no mystery with this card, though.  This beautiful card by Kylie Bertucci really inspired me, although I can only aspire to her complete mastery of the Clean And Simple style (CAS) that eludes me.
Stampin Up, #thecraftythinker, Sympathy Card, You've Got This, Butterfly Basics, Stephanie Fischer, Stampin Up Australia Demonstrator, Sydney, NSW
A combination of stamps from the You've Got This, Butterfly Basics and Wild About Flowers sets
Stampin Up, #thecraftythinker, Sympathy Card, You've Got This, Butterfly Basics, Stephanie Fischer, Stampin Up Australia Demonstrator, Sydney, NSW
The sentiment is from the Flourishing Phrases set
I used Crumb Cake ink for the watercolouring and added a tiny touch of Daffodil Delight to the centres of the flowers.

Thank you for visiting.
'Til next time!
Stephanie

Product List - To visit my online store, click on a product image below (Australian Residents only)

Sunday, 17 April 2016

Crazy Crafters April 17th Blog Hop - CASE-ing Brian King


Suite Sayings, Party with Cake, Stampin' Up!, Brian King, Birthday Card
Click on the image to link to Brian's blog
Welcome to the Crazy Crafters Blog Hop with our Special Guest stamper, Brian King - we are thrilled to have Brian join us this month and so excited to CASE (Copy And Selectively Edit) any project that has been created by him.  We hope you find great inspiration from the projects.
Whether you are starting the blog hop here at my blog, Stephanie Fischer - The Crafty Thinker, or have come from the person before me, be sure to click on the person listed under me further down the page to continue your journey on this blog hop.

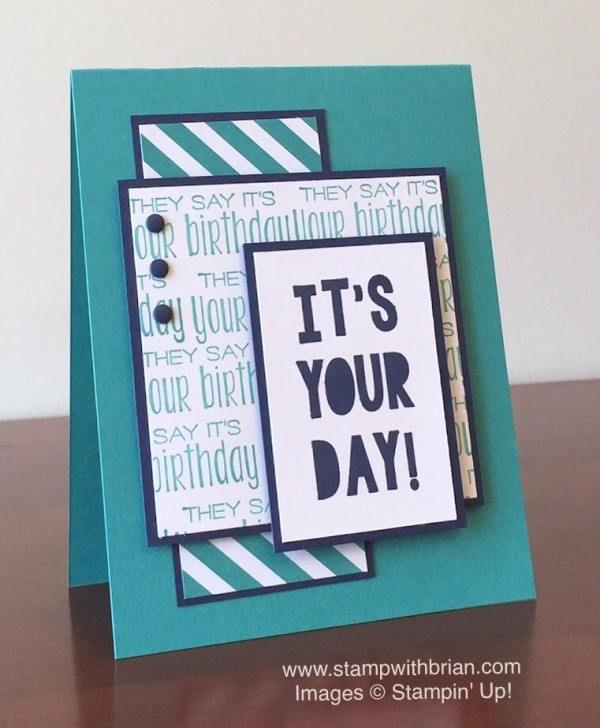
This is the card by Brian that I have chosen to CASE. The layering really appeals to me and I like the simplicity of the colour scheme.

SU, You've Got This, Watercolouring, Crazy Crafters Blog Hop, CASE Brian King
It's a girly version!
The first thing I did was to stamp and watercolour part of the beautiful floral image from You've Got This (I omitted the stem and leaves).  I stamped it with Blushing Bride ink onto Blushing Bride cardstock and then watercoloured it with Blushing Bride, Rose Red and Cherry Cobbler inks.  Although I used several ink colours, the basic method I used was the same as I use for monochrome watercolouring.  The links to my video tutorials can be found on my Video Tutorial page (see the tabs above)

I decided to make my card and mats for the layers in Cherry Cobbler cardstock.  I cut a 12" square piece of Cherry Cobbler to 6" x 5.25" and folded it in half.  Then I cut a Blushing Bride layer 1/8" smaller.

I decided on the sizes for the rest of the layers by first trimming the flower to as narrow a strip as possible and then creating balanced layers from that measurement.  All the mats are 1/8" larger than the patterned pieces.

Once I'd trimmed the painted flower layer to size, I added a greeting from Butterfly Basics, stamped with Basic Black ink.
SU, You've Got This, Watercolouring, Crazy Crafters Blog Hop, CASE Brian King
Close up of the watercoloured panel

Brian took a lot of trouble to stamp the middle layer of his card but I decided to take the opportunity to use some beautiful Designer Series Paper and chose a couple of patterns from the Birthday Bouquet DSP.

The candy dots I used are Cherry Cobbler from the Regals set.

Knowing that Brian is fond of dimension, I used LOTS of dimensionals to adhere the layers to the card!
SU, You've Got This, Watercolouring, Crazy Crafters Blog Hop, CASE Brian King
Lots of dimensionals to honour Brian!

Sizes for the layers:

Bottom layer:   Mat    2" x 53/8"                           DSP  17/8" x 51/4"
Middle layer:    Mat   41/2"x 43/8"                        DSP   43/8x 41/4"
Top layer:         Mat   25/8" x 37/8                       DSP   21/2" x 33/4

To purchase from my online store, click on one of the product images below.

I hope you've enjoyed this card and I welcome your comments. 
Thanks for taking part in our blog hop. Remember that currently you are at my blog - Stephanie Fischer - so click on the next name in the list to ensure that you don't miss out of seeing any of the blogs and the amazing inspiration they contain.

'Til next time.
Stephanie

Product List

Sunday, 28 February 2016

Best Thoughts - yes.... another Monochrome!

SU, #thecraftythinker, Monochrome watercolour, Best Thoughts, handmade card
I really wish I hadn't used the black on the greeting
SU, #thecraftythinker, Monochrome watercolour, Best Thoughts, handmade card
Well, my love affair with the monochrome continues!  There is something in this card that's making me really kick myself though!  Can you spot it?

I like to use a Stamp-a-ma-jig to help me position elements in my cards - especially wording (although sometimes I use it just to test if a combination or placement is going to work).  I generally use black ink for this (except if I'm using black card stock!) so that it shows clearly.

I didn't pay attention and used the black ink on my card instead of the Pacific Point that I had intended!

Other things went a bit awry too!  I originally had the painted panel mounted on some DSP but didn't like it.  So I just trimmed around the panel and layered it into this simple design.  The decorative panel now has quite a bit of thickness to it and so it sits quite proud - I quite like that.

It was only after I'd taken some photographs that I realised that I had forgotten to add back in the detail of the stamens to the flower.  Fortunately, that was easily corrected with a few lines and dots with a Pacific Point marker and white gel pen.

I think that's the end of my confession!

I gave the butterfly's wings a thorough coat of clear Wink of Stella and then decided to add a touch here and there on the flower.

I used Island Indigo cardstock and Pacific Point ink for the decorative panel.  This was layered with Soft Sky and more Island Indigo cardstock.

I found the Island Indigo card much more difficult to work with than the Perfect Plum I used in this project.  I'm not entirely sure why.  One thing that has occurred to me is that the Elegant Eggplant ink is very well pigmented and worked perfectly with the Perfect Plum cardstock to provide the necessary depth of shadow.  Perhaps I should have tried the Island Indigo ink.  I tested out Night of Navy as well as the Pacific Point and preferred the latter.

SU, #thecraftythinker, Monochrome watercolour tutorial, Best Thoughts, handmade card
This photo shows my colour tests and gives an idea of how I work.
As you can see, I used a fairly fine brush for this card.  I knew I wouldn't need a lot of white ink, so I just put some on an acrylic block (as you can see - I still overestimated!).  I put a few drops of reinker into the lid of the Pacific Point ink pad and used that as my palette.  I can control the depth of colour I apply by taking the ink directly from the pool of ink or from the "swished" ink.  

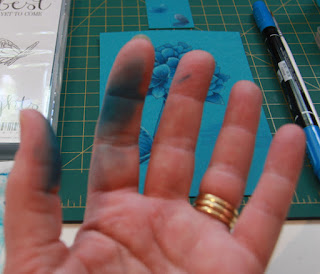
I was careful to use as little water as possible to maintain the integrity of the cardstock (unlike watercolour paper or Shimmery White Cardstock, this cardstock is not created to withstand the stress of water).  I had my absorbent paper on hand to remove excess water but ... try as I might to stay clean - I really like to judge how much water is in my brush by feeling it with my fingers.  
SU, #thecraftythinker, Monochrome watercolour tutorial, Best Thoughts, handmade card
It takes a while to come clean!  Meantime, I wear my creative mark with pride!
SU, #thecraftythinker, Monochrome watercolour tutorial, Best Thoughts, handmade card
Almost finished!

As you can see from the photo above, I added the sentiment at the very end - once I'd decided how to finish the card and trimmed the piece as necessary.

You can also see that I added a Pacific Point marker to my tools because it helped me overcome the difficulty I was having getting strong enough darks.  I used the pen end of the marker and feathered in strokes of ink where necessary.  If necessary, I then blended it out with my brush and a little bit of ink.

I hope you like the card and the descriptions may prove useful to you.  I'm still awaiting the arrival of the piece I've ordered to connect my phone to a tripod - then I'll try to do a video.

'Til next time
Stephanie

Tips & tricks
  • I stamped the image on the Island Indigo cardstock using Island Indigo ink.
  • I minimised the water as much as possible - in places I was using a "dry brush" technique.
  • I worked in a scattered way around the piece, allowing areas to dry before working on an adjacent area.
  • As areas dried, I could see the true tones and whether it needed another layer of colour
  • I used the marker to add the deepest tones.
  • I tried to keep the strongest contrasts in tone at the front of the flower.
  • The white gel pen that I used for the tips of the stamens (you can tell I'm no botanist!) was a bit too bright, so I dabbed the white dots with the writing end of the Pacific Point marker to tone them down a bit.
Click on an image below to order a product from my store
Product List