Showing posts with label Teeny Tiny Sentiments. Show all posts

Wednesday, 27 July 2016

Sweet Sugarplum Cupcake

This card came together very quickly.  The circular frames were already sitting on my desk - remnants from another card and I hadn't yet used the cupcake stamp set so it seemed time to do so.
Stampin Up, #thecraftythinker, Sweet Cupcake, Circles & squares, Stampin Up Australia Demonstrator
The cupcake panel is popped up on dimensionals

I used the Sweet Sugarplum  because it goes so well with the Rich Razzleberry and I wanted to use up those leftover circles.  The Blooms & Bliss Designer Series Paper offers the perfect choices to go with those colours.

Stampin Up, #thecraftythinker, Sweet Cupcake, Circles & squares, Stampin Up Australia Demonstrator
I stamped a second lot of icing, hand cut it and popped it up on dimensionals

I added some Clear Wink of Stella to the icing.

To fit my birthday greeting on a very small square, I used the Teeny Tiny Sentiments set and realigned the sentiment.  I covered over the word "birthday" inked the stamp, removed the cover and then stamped the word "happy".  Then I cleaned the stamp and repeated the process for the word "birthday", using my Stamp-A-Ma-Jig to line up the words.

I couldn't help adding a little watercolour shading with Crumb cake to the cupcake image.

Thank you for your visit
'Til next time
Stephanie

Product List - To shop in my online store - click a product image below (Australian Residents only)

Saturday, 13 February 2016

Guy Greetings Side Step Card

SU, Guy Greetings, Side Step Card, Masculine card, That Thing You Did
A masculine side step card
After demonstrating how to made a side step card in my class the other day, I came home with a Perfect Plum side step card to finish and decided to make it masculine.  (I've added the instructions below).

The car is sitting on a watercolour background that was very simple to do.  I started with a piece of shimmery white cardstock cut to size.  Then, with a large , wet brush, I picked up some Tip Top Taupe Ink and painted it, horizontally, across the cardstock.  While it was still very wet, I picked up some Soft Suede and ran it across the card fairly randomly and then I added some Early Espresso where I guessed the car shadow might be.

I sprinkled the still wet watercolour with some small pieces of rock salt and left it to dry.

The rock salt draws out moisture and some of the pigment with it.  When dry, I brushed off the salt and was left with some little marks where the salt had been sitting.  I was hoping to achieve a pebbly or unsmooth looking surface and I'm not unhappy with the result.
SU, Guy Greetings, Side Step Card, Masculine card, That Thing You Did
Rock salt on wet watercolour leaves lighter speckles
I stamped the car image from Guy Greetings with Archival Black Ink and coloured it with Many Marvellous Markers in Perfect Plum, Smoky Slate and Basic Gray.

With Blackberry Bliss ink, I stamped a greeting from That Thing You Did and cut it out with a Lots of Labels die, adjusting the length of the label using this method.  I sponged the edge with Smoky Slate ink and placed it onto the card with dimensionals.

The Happy Birthday greeting is from Teeny Tiny Sentiments and I stamped it with Blackberry Bliss ink.

I stamped the tools from Guy Greetings with Basic Gray ink and coloured them with a Smoky Slate marker - adding an extra layer of ink to the edges for some depth.

I added layers of Blackberry Bliss cardstock, embossing the very front strip with the Zig Zag embossing folder.

'Til next time
Stephanie

Addendum:

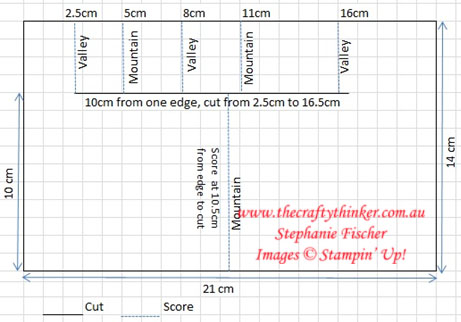
Side Step Card (Metric) - Tutorial

·        Cut your cardstock to 14 cm x 21 cm
 Make a cut 10 cm  in from one of the long sides from 2.5 cm to 16.5 cm
Working along the long side of the card (with the card positioned as in the diagram), score from the edge to the cut at 2.5 cm, 5 cm, 8 cm, 11 cm & 16 cm
Score from the cut to the bottom edge at 10.5 cm

Hint:  You may want to lightly pencil in the cutting and scoring lines to make it easier

·         Fold as shown in diagram
www.thecraftythinker.com.au, Side Step Card Tutorial Metric, fun Fold
Side Step Card diagram


Tuesday, 9 February 2016

Sunburst die off-cut with Rose Wonder Centre

#SU, Botanical Builder Framelits, Large Numbers, Bloomin' Love
I love the combination of yellow and grey
I promised I'd show you what I did with the off-cuts of the Sunburst Thinlit Die from this card - and here's the first of them.

I carefully put a little bit of Multipurpose Liquid Glue on the back of the sunburst pieces and placed it down onto a pre-cut piece of decorative paper (in this case from the Neutrals Designer Series Paper Stack).  

When the glue was dry, I trimmed the edges and placed the panel on a layer of Basic Gray cardstock which I then adhered to my So Saffron card.

I had a Rose Wonder flower left from a previous project and decided to put it on this card!  Then I stamped and cut some leaves using Smoky Slate card, Basic Grey ink and the Botanical Builder framelits.  

Someone that I know and respect is retiring shortly, so I added a greeting from Teeny Tiny Sentiments and the banner from Bloomin' Love with I cut out with a die from the Large Numbers Framelits. 

#SU, Botanical Builder Framelits, Large Numbers, Bloomin' Love, Wink of Stella
A bit of Wink of Stella finishes the card
On Friday I'll be showing you what I did with the remaining Basic Black off-cut!

'Til then
Stephanie


Built for Free Using: My Stampin Blog

