Showing posts with label Guy Greetings. Show all posts

Sunday, 11 February 2018

Crazy Crafters Blog Hop with Special Guest: Allison Okamitsu

Image may contain: text
Click to visit Allison's page
Welcome to the Crazy Crafters' Blog Hop with our Special Guest stamper, Allison Okamitsu - we are thrilled to have Allison join us again this month and so excited to CASE (Copy And Selectively Edit) any project that has been created by her.  We last hopped with Allison a couple of years ago and what a pleasure that was!  So it's incredibly exciting to have another opportunity to CASE the work of such an incredibly talented lady!

If by some chance you're not familiar with Allison's work - it's worth clicking on the thumbnail of her card to the left to visit her site so that you can see more of her beautiful work and be amazed by her incredible accomplishments!

Whether you are starting the blog hop here at my blog, Stephanie Fischer - The Crafty Thinker, or have come from the person before me, be sure to click on the person listed under me further down the page to continue your journey through the blog hop.
#thecraftythinker, #stampinup, #brusho, #cardmaking, Epic Celebrations, Sneakers, Teenager card, Brusho background, Stampin' Up! Australia Demonstrator, Stephanie Fischer, Sydney NSW
My CASE of Allison Okamitsu's card - suitable for a teenager
This is my CASE of Allison's beautiful, bright and cheery card.  It's a little bit more subdued and I had a teenager in mind.

The base card is Night of Navy followed by a layer of Sweet Sugarplum paper from the Petal Garden Designer Series Pack.  While we're on the subject of papers - I cut a couple of little strips from a piece of the True Gentleman Designer Series Paper and put them either side of my Brusho background.

The Brusho background was a bit of an experiment.  I sprinkled Red, Blue and Yellow Brusho Crystals onto a folded baby wipe and spritzed with water.  Then I sort of swiped it randomly over some Watercolor Paper (at the same time I also experimented on a piece of Glossy White cardstock and I'll show you that piece soon).

I stamped the shoe image with Basic Black ink onto a piece of the background that I had trimmed off and then used a small brush with some Smoky Slate and Whisper White Craft Ink to finish the colouring and shading.  I fussy cut the shoes (but I drew the line at trying to cut out the laces!) and adhered them to the oval panel cut with one of the Stitched Shapes Framelits.

The oval panel is cut from Smoky Slate cardstock and sponged with Pool Party ink.  I then sponged a border with Whisper White Craft Ink.

The greeting from Guy Greetings is White heat embossed onto Night of Navy cardstock and cut with one of the dies from the Bunch of Banners Framelit set.

Behind the focal panel is a piece of the luscious Night of Navy Corduroy Ribbon.

Thanks for following our blog hop.  Remember that currently you are at my blog - Stephanie Fischer - so click on the next name in the list to ensure that you don't miss out on seeing any of the blogs and the amazing inspiration that they contain.

Thanks for visiting.
'Til next time!
Stephanie


Product List - Click on a product image below to visit my online store (Australian Residents only)

Friday, 21 July 2017

Ink it! Stamp it! Blog Hop #3: Technique - Retiform

No automatic alt text available. 

Welcome to the Ink It! Stamp It! Design Team Blog Hop - we hop every month so be sure to pop back and visit us again!  Today our theme is Technique and I have chosen the Retiform technique to make a feminine and a masculine card.

You are currently at my page - Stephanie Fischer, The Crafty Thinker.  At the end of my post there is a full line of team members, please click on the name after mine in the list to continue the hop.
Retiform Technique, #inkitstampit, Beautiful You, Butterfly Basics, #thecraftythinker, Stampin Up Australia Demonstrator, Stephanie Fischer, Sydney NSW
Feminine version of a Retiform card featuring Beautiful You , Flourishing Phrases, Daisy Delight and Butterfly Basics

Retiform is one of those techniques that I love but seem to rarely use - in fact I think my last retiform card predated my blogging!  It's so easy and effective though that it seemed a good time to drag it out of the archives!

Method:  It's basically just masking and sponging!
  1. You may want to plan ahead of time the pattern you want to create with your sponging.
  2. Hold a piece of clean paper (I just use printer paper) in the position required. 
  3. Lightly sponge your chosen colour from the masking paper onto the cardstock. (ie place your inky sponge down onto the masking paper and gently slide the sponge onto the project)
  4. Remove the masking paper and place it back onto the project, lining it up on the crisp edge of ink you've just created.
  5. Repeat step 3
  6. Move the masking paper to the next position you want to create a line and hold in place.
  7. Repeat step 3
  8. Repeat step 4
When you have finished creating your pattern of lines, it's time to add some stamped images.

Tips: 
- This technique works really well with images that are larger than the space available so that they  look cropped.
- I'm a big fan of the monochrome so I like to use only one ink pad but this is not necessary.
  1. Choose the area where you plan to stamp.
  2. Protect all the adjacent areas of your project by carefully placing masking paper along relevant lines that you've created.
  3. Stamp your chosen image.
  4. Repeat steps 1 to 3
Masculine Card, Retiform Technique, #inkitstampit, Country Livin', Guy Greetings, #thecraftythinker, Stampin Up Australia Demonstrator, Stephanie Fischer, Sydney NSW
Using Soft Suede ink produces a lovely sepia effect in this Retiform card

For this masculine version, I basically repeated the same steps except that I started off by using a circular mask.  In order to sponge inside the circle and also to stamp inside the circle, I used the paper from which I had cut the circle to mask the rest of my project.

I used the same colour ink (Soft Suede) to watercolour the central image.  Whilst I combined several stamp sets, the overall theme is transport. The grass in the central image is from the High Tide stamp set.

I hope you've enjoyed this this technique and these cards and I welcome your comments. 

Thank you so much for joining us today. We hope you'll join us again next month for our 3D projects! I'm Stephanie Fischer and to keep hopping around see the list below to see who is up next with another great technique.

Thanks for visiting
'Til next time
Stephanie


Product List

Friday, 10 June 2016

Cubist Guy Greetings

The inspiration for this card came from the inky mess on my Grid Paper after I'd finished sponging around the edges of some cards!

Stampin Up Australia, #thecraftythinker, Guy Greetings, Swirly Scribbles Stamp, Masculine Card, Stampin Up Australia demonstrator
There is a bit of a cubist feel to this card

I first stamped the car from Guy Greetings using Basic Black ink.  Once I was sure it was completely dry, I gave it a coat of glue using the Fine-Tip Glue Pen and left that to dry overnight.

I used a square of cardstock to mask and sponge to create the slightly cubist look to the card.  The colours I used are Mint Macaron and Island Indigo for the sky and Tip Top Taupe with a hint of the Mint Macaron and Island Indigo for the "ground".  

I stamped the banner greeting from Guy Greetings in Island Indigo ink on Whisper White cardstock and cut it out by hand.  I then stamped the "you" from Work of Art in Island Indigo on Whisper White Cardstock and cut it out with one of the Tags & Labels framelits.  I sponged the edges with Mint Macaron ink, added the banner and a black sequin from the Assorted Metallic Sequins and adhered it to the card.

I felt the foreground was calling for some Swirly Scribbles but I only wanted to use ink for this card.  I do feel that there should have been a stamp to match the lovely Swirly Scribbles "lines" - so I made one!  It would have been much easier if I'd had some foam of the appropriate thickness but I only had thin sheets.  I glued two sheets together and cut the Swirly Scribbles shape twice and glued those together (I wasn't sure that the thinlit could cope with 4 layers at the same time).  I then applied some Multipurpose Liquid Glue to the bottom and left it to dry.  Once dry, it was tacky enought to stick to an acrylic block but still easy to remove.  I stamped my Swirly Scribbles with Night of Navy ink - stamping twice without reinking to obtain variation in tone.

Stampin Up Australia, #thecraftythinker, Guy Greetings, Swirly Scribbles Stamp, Masculine Card, Stampin Up Australia demonstrator
I keep my home-made Swirly Scribbles stamp in the Swirly Birds stamp set
Thank you for visiting.  This card is entered into the Crazy Crafters Project Highlights this week.  Click here to see the other great projects and vote for your favourites.

'Til next time

Stephanie

Product List - To shop in my online store, click on one of the product images below (Australian Residents only)

Saturday, 13 February 2016

Guy Greetings Side Step Card

SU, Guy Greetings, Side Step Card, Masculine card, That Thing You Did
A masculine side step card
After demonstrating how to made a side step card in my class the other day, I came home with a Perfect Plum side step card to finish and decided to make it masculine.  (I've added the instructions below).

The car is sitting on a watercolour background that was very simple to do.  I started with a piece of shimmery white cardstock cut to size.  Then, with a large , wet brush, I picked up some Tip Top Taupe Ink and painted it, horizontally, across the cardstock.  While it was still very wet, I picked up some Soft Suede and ran it across the card fairly randomly and then I added some Early Espresso where I guessed the car shadow might be.

I sprinkled the still wet watercolour with some small pieces of rock salt and left it to dry.

The rock salt draws out moisture and some of the pigment with it.  When dry, I brushed off the salt and was left with some little marks where the salt had been sitting.  I was hoping to achieve a pebbly or unsmooth looking surface and I'm not unhappy with the result.
SU, Guy Greetings, Side Step Card, Masculine card, That Thing You Did
Rock salt on wet watercolour leaves lighter speckles
I stamped the car image from Guy Greetings with Archival Black Ink and coloured it with Many Marvellous Markers in Perfect Plum, Smoky Slate and Basic Gray.

With Blackberry Bliss ink, I stamped a greeting from That Thing You Did and cut it out with a Lots of Labels die, adjusting the length of the label using this method.  I sponged the edge with Smoky Slate ink and placed it onto the card with dimensionals.

The Happy Birthday greeting is from Teeny Tiny Sentiments and I stamped it with Blackberry Bliss ink.

I stamped the tools from Guy Greetings with Basic Gray ink and coloured them with a Smoky Slate marker - adding an extra layer of ink to the edges for some depth.

I added layers of Blackberry Bliss cardstock, embossing the very front strip with the Zig Zag embossing folder.

'Til next time
Stephanie

Addendum:

Side Step Card (Metric) - Tutorial

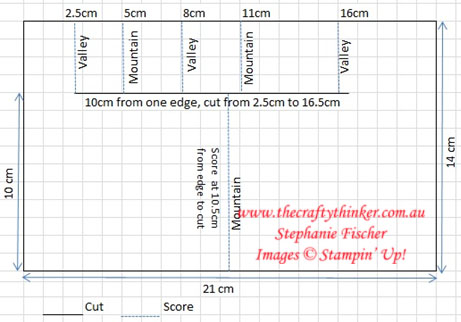
·        Cut your cardstock to 14 cm x 21 cm
 Make a cut 10 cm  in from one of the long sides from 2.5 cm to 16.5 cm
Working along the long side of the card (with the card positioned as in the diagram), score from the edge to the cut at 2.5 cm, 5 cm, 8 cm, 11 cm & 16 cm
Score from the cut to the bottom edge at 10.5 cm

Hint:  You may want to lightly pencil in the cutting and scoring lines to make it easier

·         Fold as shown in diagram

www.thecraftythinker.com.au, Side Step Card Tutorial Metric, fun Fold
Side Step Card diagram


Tuesday, 19 January 2016

Acrylic Block Stamping - Watercolour backgrounds

In my classes we'll be stamping a watercolour background with an acrylic block.  This is one of the samples I've made for that class.
SU, Acrylic block stamping, Triple banner punch, Card making classes
We'll also be thinking about layering during these classes
Serene Silhouettes stamp set & Botanical Gardens DSP

One of the joys (and sometimes frustrations) of this technique is that it comes out different every time!  I find it useful to have handy a tissue (to mop up excess ink/water) and a paintbrush that I can use to "help" the ink behave well.  I also have a heat tool close by so that when I'm ready, I can quickly dry the piece and stop any further blending of the ink.

It's great fun to try different inks and "loading patterns" and see what happens.  To preserve the integrity of my ink pads, I prefer to add the ink from lightest to darkest.  If I'm using 3 (or more) colours, I use a tissue to wipe away ink from the area where I want to add the next ink.

It's also worth testing different cardstock/papers to see which gives you the effect you want.  I tried out watercolour paper, Whisper White cardstock and Shimmery White cardstock and found the Shimmery White was the one that I kept going back to this time.

It's hard to stop at just one with this technique!  Here are some variations I made:

SU, Acrylic block stamping, Triple banner punch, Card making classes
Serene Silhouettes stamp set, Bohemian Designer Series Paper

SU, Acrylic block stamping, Card making classes
Wetlands stamp set, Wildflower Fields DSP (A FREE Sale-A-Bration product)

SU, Acrylic block stamping, Card making classes
Guy Greetings stamp set, Bohemian DSP

SU, Acrylic block stamping, Card making classes
Guy Greetings stamp set, Perfectly Artistic DSP (Free Sale-A-Bration product - limited time only)
For more information about my classes - click here.

'Til next time
Stephanie
Built for Free Using: My Stampin Blog

Tuesday, 2 June 2015

Splitcoaststampers Creative Crew Challenges - June 2015

I can't believe another month has gone by already and here we are in the middle of the year!  The challenges and gallery are up and running for June, so pop over and take a look at all the inspirational creations or, better yet, play along!  These are my entries for the four June challenges.

CCREW0615DF, SUO, Color Focus: 
Stampin' Up! new products, 2015-2016 catalogue, Watercolouring
Hostess stamp set - Best Thoughts
With the focus on the In Colours, I just had to choose Watermelon Wonder - I think it's the pefect pink!  It's not too bright and not too pastel and has a lovely warmth to it.  Perfect!  I've layered the Watermelon Wonder cardstock onto Cherry Cobbler and I like them very much together.  I stamped onto Whisper White cardstock with black Stazon so that I could watercolour the images with ink: all of the new In Colours (Watermelon Wonder, Delightful Dijon, Mint Macaron, Tip Top Taupe, Cucumber Crush) and a touch of Cherry Cobbler to add depth to the flower.  The butterfly wing is popped up with a dimensional, although it doesn't really show in the photo.  The bow uses the new Dotted Lace Trim in Watermelon Wonder.  The flower is from the stamp set Best Thoughts which is available to hostesses (worth holding a party for, I think!).  On this occasion I've used a sentiment from a different stamp set -
A Dozen Thoughts.


CCREW0615CF, SUO, Catalog Focus:
Stampin' Up! new products, 2015-2016 catalogue, WatercolouringI found it really quite difficult to focus on just one new item in the new Catalogue - I love so many of them!  So I cheated a little bit and featured several!  Probably my most favourite at the moment is the stamp set You've Got This (although I think there might be some more favourites once all my new products arrive - I'm fickle like that!).  I stamped the flower onto Whisper White with Stazon and coloured it with Delightful Dijon.  I used a touch of Rich Razzleberry in the centre of the flower, cut it out and gave it a little more glam with a touch of Dazzling Diamonds. 

The cardstock colours are: Blackberry Bliss, Delightful Dijon, Bermuda Bay and Island Indigo.  There's also a touch of Very Vanilla in the banner.  All the colours are drawn from one of my other new favourites - Bohemian DSP.

I punched the top of the DSP framelet with the Scallop Tag Topper and fed a Blackberry Bliss and Very Vanilla banner through it and behind the flower.  I used the new Triple Banner Punch for the banner - oh how it simplifies things!  The sentiment is from Wetlands and is heat-embossed in white.

The final flourish is the Delightful Dijon Blossom Accent which I topped with a Pearl Basic Jewel.

CCREW0615SF, SUO, Scrapbook & More Focus:
Stampin' Up!, Gorgeous Grunge, Everything EleanorWhilst the weather is turning a bit chilly here in Sydney (June being the first month of Winter), elsewhere in the world the focus is turning to weddings! I'll admit this was my favourite of the four challenges because it gave me the perfect opportunity to make a First Anniversary gift for my special friends Rebekah & Luke.  We were so happy to be able to attend their beautiful wedding in England last year and I really enjoyed "revisiting" it for this challenge.

I decorated a fairly plain and simple frame with the Gorgeous Grunge and Everything Eleanor stamp sets.  The leaves were made with the Bird Builder Punch and the flowers with the Petite Petals Stamp set and punch, Itty Bitty Accents punch and two sizes of Scallop Circle punches.  The really tiny little flowers were cut with the new Tree Builder Punch.  Centres for the smaller flowers are pearls or candy dots.  The centres of the three larger flowers are Dazzling Diamonds.  The three larger flowers were inspired by Miriam Spiess's Miriamthiums - but I'm afraid I need more practice!  You'll find Miriam's tutorial and beautiful flowers here.

The sentiments are from the Project Life Remember This stamp set and the ovals at the top of the frame are cut with the Scallop Oval and Large Oval punches. 

Colours used are black, Whisper White, Slate Grey, Basic Grey and Tangerine Tango.

CCREW0615HF, SUO, Holiday Focus:
Fathers' Day is celebrated here in September rather than June, so I shall be very prepared when September comes around - as long as I remember that I've already made the card!
Stampin' Up! new products, 2015-2016 catalogue, Bohemian DSP

It turns out that this card was easier to make than photograph!  I used my favourite Bohemian DSP with Blackberry Bliss, Rich Razzleberry and Delightful Dijon cardstock.  I stamped images and sentiments from the Guy Greetings stamp set using Blackberry Bliss ink on Very Vanilla card.  I anchored the banners with Bermuda Bay and Island Indigo candy dots on candy dot brad bases.  To fill in a bare corner on the front of the card I made a little feature with the new Bohemian Borders stamp set which I coloured with Bermuda Bay and Delightful Dijon Stampin' Write markers and added a little Crystal Effects to the centre to create a little jewel.

The fold is a Pop Up Book Card and Deb Valder has an excellent tutorial here.

I hope you've enjoyed these cards and I do encourage you to play along with the challenges and also to visit the gallery at Splitcoaststampers. 

Monday, 23 February 2015

Guy Greetings Peak A Boo card

One of our dearest family friends celebrates his 80th birthday this week so I wanted to make something a bit special for him and was inspired by a tutorial I received from Splitcoaststampers recently.
Admittedly, "Peak-A-Boo" doesn't seem like it would have much masculine gravitas attached to it but, hopefully, this card will dispel such thoughts! 

The Chocolate Chip base colour and Guy Greetings images manage to retain their masculine edge despite the added bling and glitter!

Unfortunately, the Designer Series Paper I used has been retired as it remains one of my favourites.  Also retired is the edge punch, which I shall soon replace with the Finishing Touches Edgelets dies. The bling and glitters have been knocking around in my craft room for quite a few years now but everything else I used is currently available.  I used Heat & Stick powder to adhere the glitter to the card.
I just love this clever card fold and can't get enough of opening and closing the card to see the images change!  Thanks to Norma Lee at Splitcoaststampers for her great tutorial.

'Til next time
Stephanie
Built for Free Using: My Stampin Blog

Sunday, 1 February 2015

Masculine Valentine Cards

Guy Greetings Valentine Masculine
Stampin' Up! Guy Greetings
It feels like only yesterday that it was Christmas and already we're thinking about Valentine cards!

February is a very loved up month in this household - we celebrate not only Valentine's Day but also our wedding anniversary.  It's a wonderful opportunity for me to use my card-making in order to express my love and appreciation for my wonderful (and very patient!) husband.  It makes a refreshing change for him from the more usual "Have you done...?", "Did you buy ...?" etc !  So I'll be featuring two cards in this post: a valentine card and an anniversary card.

I always find masculine Valentine cards particularly difficult to do - I want to make the love clear but not in a girly way!  So I was very excited when I saw the Guy Greetings stamp set in the latest catalogue.  It's so versatile that I can see it featuring in many of my cards in the future!

So how did I do it?
At the base is a card made from an A5 piece of Basic Grey cardstock.  That is layered with a piece of Crumb Cake cardstock edged with Baked Brown Sugar ink.  The next layer is from the Adventure Bound Designer Series Paper Stack, also edged with Baked Brown Sugar.  The Crumb Cake Seam Binding Ribbon is adhered to this layer with the ends tucked underneath.

I cut two hearts from Cajun Craze cardstock.  I used the heart die from the Snowflake Card Thinlets set because I don't yet have the Sweetheart punch.  The edges were inked with Baked Brown Sugar and I placed an Antique Brad in the centre of each.  I adhered them to the card with dimensionals.

The figure from Guy Greetings was stamped onto to Very Vanilla Cardstock with Baked Brown Sugar and then I coloured him using Island Indigo, Baked Brown Sugar, Blushing Bride and an Aqua Painter.

I die cut the painted figure using the long, narrow die from the Chalk Talk Framelets set.  The little point at the end was eventually hidden.  I then cut mats to a suitable size from Cajun Craze and Crumb Cake, round cornered them and inked the edges with Baked Brown Sugar.

I stamped a sentiment from Guy Greetings onto Very Vanilla, cut it with a Deco Labels framelet and edged it with Baked Brown Sugar.  I stuck this on top of the ribbon using Dimensionals.
Partially heat embossed anchor

The anchor was stamped in black onto Very Vanilla.  After using my Stampin' Buddy, I used a Versamark Pen here and there and heat embossed with silver embossing powder.  I then coloured it using Cajun Craze, Baked Brown sugar and a tiny bit of black.  I fussy cut the anchor and glued it to the frame above the sentiment.

I cut the pointy bits from the back of two Antique Brads then adhered them to the ribbon.


Anniversary Card
Masculine Valentine or anniversary Card
I layered Smoky Slate onto a Real Red card base.  I used one of the dies from the Chalk Talk framelet set to cut a hole in a layer of Basic Grey which I then embossed with the Happy Heart embossing folder (being careful to keep the hearts going in the direction I wanted).  

The sentiment was stamped onto the Smoky Slate layer so that it would be centred in the cut out in the top layer.  I then adhered the top layer using dimensionals.

I adhered a row of hearts (cut from the Stacked with Love series) using dimensionals at the top of each heart.  Two overlapping hearts were stuck onto the ribbon and I cut some little Real Red hearts using the Owl Punch and scattered them.

With the addition of a bow and a little bling it seemed to express a serious amount of love without losing too much of a masculine edge.

The sentiments were from Guy Greetings and also Simply Wonderful (which is from the Saleabration Catalogue)

 Take a look at my Saleabration page to see what it's all about and how you could score some free stuff!

Until next time ...
Stephanie