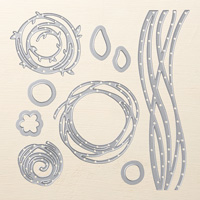
Showing posts with label Tags & Labels Framelits. Show all posts

Friday, 10 June 2016

Cubist Guy Greetings

The inspiration for this card came from the inky mess on my Grid Paper after I'd finished sponging around the edges of some cards!

Stampin Up Australia, #thecraftythinker, Guy Greetings, Swirly Scribbles Stamp, Masculine Card, Stampin Up Australia demonstrator
There is a bit of a cubist feel to this card

I first stamped the car from Guy Greetings using Basic Black ink.  Once I was sure it was completely dry, I gave it a coat of glue using the Fine-Tip Glue Pen and left that to dry overnight.

I used a square of cardstock to mask and sponge to create the slightly cubist look to the card.  The colours I used are Mint Macaron and Island Indigo for the sky and Tip Top Taupe with a hint of the Mint Macaron and Island Indigo for the "ground".  

I stamped the banner greeting from Guy Greetings in Island Indigo ink on Whisper White cardstock and cut it out by hand.  I then stamped the "you" from Work of Art in Island Indigo on Whisper White Cardstock and cut it out with one of the Tags & Labels framelits.  I sponged the edges with Mint Macaron ink, added the banner and a black sequin from the Assorted Metallic Sequins and adhered it to the card.

I felt the foreground was calling for some Swirly Scribbles but I only wanted to use ink for this card.  I do feel that there should have been a stamp to match the lovely Swirly Scribbles "lines" - so I made one!  It would have been much easier if I'd had some foam of the appropriate thickness but I only had thin sheets.  I glued two sheets together and cut the Swirly Scribbles shape twice and glued those together (I wasn't sure that the thinlit could cope with 4 layers at the same time).  I then applied some Multipurpose Liquid Glue to the bottom and left it to dry.  Once dry, it was tacky enought to stick to an acrylic block but still easy to remove.  I stamped my Swirly Scribbles with Night of Navy ink - stamping twice without reinking to obtain variation in tone.

Stampin Up Australia, #thecraftythinker, Guy Greetings, Swirly Scribbles Stamp, Masculine Card, Stampin Up Australia demonstrator
I keep my home-made Swirly Scribbles stamp in the Swirly Birds stamp set
Thank you for visiting.  This card is entered into the Crazy Crafters Project Highlights this week.  Click here to see the other great projects and vote for your favourites.

'Til next time

Stephanie

Product List - To shop in my online store, click on one of the product images below (Australian Residents only)

Sunday, 18 October 2015

Crazy Crafters Blog Hop October 2015 - Fun Fold


Welcome to the Crazy Crafters Blog Hop for October. This month we are excited to show off some amazing fun folds. We hope you find great inspiration from the projects.

You may just be starting the blog hop here at my blog - Stephanie Fischer, The Crafty Thinker - or you may have come from the person before me in the list. If you get off track at any time, the full lineup below will help you to move along from blog to blog so that you see all of the projects. At the moment you are visiting Stephanie Fischer, The Crafty Thinker.

I'm a bit in love with easel cards at the moment!  They're so easy but effective and they make a nice display for the lucky recipient of the card.  There are many good tutorials available for easel cards and I don't really know to whom I should give credit for this great fun fold but, whoever you are, thank you!

The colours in this easel card are Smoky Slate, Elegant Eggplant and Wisteria Wonder.   
 
SU, Easel Card, Tags & Labels framelits, snowflakes, Pillow Top Card
Flurry of Wishes Easel Card
 For the snowflakes I used the Flurry of Wishes stamp set (from the Holiday Catalogue), stamping with Versamark onto Silver Foil and heat embossing with Silver Embossing Powder before punching out with the matching Snow Flurry Punch.  I then used Dimensionals to adhere them to the card and placed a Rhinestone Jewel in the centre of each one.
SU, Easel Card, Tags & Labels framelits, snowflakes, Pillow Top Card
Closed position

The greeting is from the Lots of Joy stamp set (in the Annual Catalogue), which I stamped onto Smoky Slate card and cut out with the Tags & Labels Framelits.  I added a layer of Elegant Eggplant cut with a larger Tags & Labels framelit and placed it onto the card front with dimensionals.

To create the Elegant Eggplant label that supports the easel, I cut a rectangle and then made decorative ends using the Tags & Labels framelits and the method I described in this blog post.   
SU, making a symmetrical label with Tags & Labels framelits
Symmetrical label from Tags & Labels framelits
I'd like to thank Sheri Pearson at Inkspirations for the inspiration and technique tutorial for the pillow top panel.  Click here to see her tutorial.   

SU, Easel Card, Tags & Labels framelits, snowflakes, Pillow Top Card
Pillow top background inspired by Sheri at Inkspirations
Following Sheri's tutorial, I scored the pattern onto the Wisteria Wonder cardstock.  Then I folded each score line and inked both sides of the fold with Wisteria Wonder ink.

I layered this decorative panel on to Elegant Eggplant before adding it to my Smoky Slate Easel front.  Once all my elements were in place, I added a dab of Dazzling Details to each intersection of the lines.  I was rushing a bit and didn't do a very neat job but it doesn't seem to matter as much as I feared it would.  I'll do better next time!

I hope you've enjoyed this card and welcome your comments.

Thanks for taking part in our blog hop. Remember that currently you are at my blog - Stephanie Fischer - so check the blog hop line up list to see who is next in the list and click on their name as you don't want to miss out on seeing any of the blogs and the amazing inspiration they contain.


Built for Free Using: My Stampin Blog

Tuesday, 8 September 2015

You've Got This in pastel

I was very excited when Kylie Bertucci announced the launching of the Global Design Project challenge site.  The team of people involved are all SO talented that I'm sure it'll soon be a great source of inspiration to all of us.
http://www.global-design-project.com/p/about-designers.html

This first colour challenge has really reinforced for me the creative and growth value of doing challenges.  These are definitely not colours that I use much - either together or individually - but I like the result so much, I think I'll be using them again!

SU, Baby Wipe Stamping Technique, Changing the size of a die cut,#GDP001
You've Got This with sentiment from Birthday Blossoms
I stamped the front flower with the new Basic Black Archival ink, masked it, stamped another flower, masked that and stamped the third flower.  Then I masked that flower too before stamping the background using the baby wipe stamping technique with the three inks; Smoky Slate, Pink Pirouette and So Saffron.

I watercoloured the flowers, using Pink Pirouette for the flowers, to which I added a little Smoky Slate for the flowers at the back.  The flower centres are So Saffron with some Smoky Slate shadows and the stems and leaves are So Saffron and Smoky Slate.

I added a little bit of Smoky Slate shading around the bunch of flowers.

The painted panel is layered onto Smoky Slate and Pink Pirouette card stock.

The sentiment is from Birthday Blossoms.  I cut it with the smallest of the rectangular Tags & Labels framelets and extended the length using the method I describe in this post.  Then I edged it with So Saffron.

Thank you for looking at my card and I would welcome any comments.

Til next time

Stephanie

Built for Free Using: My Stampin Blog

Monday, 3 August 2015

Creative Crew August Challenge - Saying "Goodbye" to Summer - Colour

Colour Focus

Well, all good things must come to an end and I'm sad to say that this is my last month on the Creative Crew team.  It's been such an honour to be part of this team and also very enjoyable - I'm going to miss it but wish the new team all the best - I know they'll come up with lots of beautiful inspiration for us all.

CCREW0815DF
Can this be "Goodbye" to Summer??  

What can I say - any theme based on seasons is going to end up topsy turvy in one part of the planet or another!  But I rather enjoyed putting my numbingly cold winter hands to work with some lovely warming colours!  I feel warmer just looking at this card!

SU, Birthday Blossoms, make a symetrical label with tags & labels
Heat Embossing with an embossing folder
The top layer uses the emboss resist and stamping with an embossing folder techniques.

I used versamark to ink up the Lovely Lace embossing folder, placed a piece of Whisper White card stock on top and pressed it evenly with my hands.  Then sprinkled with gold embossing powder and applied heat with a heat gun.

Then I used sponge daubers to apply ink: Cherry Cobbler at the bottom, Watermelon Wonder in the middle and Crushed Curry at the top.  I took a bit of care to blend the colours and wiped the ink off the embossing with a tissue and added a few Candy Dots in Cherry Cobbler and Crushed Curry.

I stamped a flower from Birthday Blossoms in Versamark onto the Crushed Curry card stock and heat embossed with gold embossing powder.  Then I sponged carefully and lightly with Cherry Cobbler and Watermelon Wonder - fading out towards the ends of the petals.  Then I cut out the flower. 

The little flower is punched from Crushed Curry card stock with an Itty Bitty Accents punch, the centre and edges are sponged with Watermelon Wonder and then I put a Cherry Cobbler Candy Dot in the middle.

The Sentiment is from Birthday Blossoms and I stamped it onto Whisper White using Cherry Cobbler ink. I sponged Crushed Curry ink into the banner by just using an edge of a sponge dauber.

I used the Tags and Labels Framelits to cut the sentiment into a symetrical label using the method I describe in this post.  I sponged the edge quite generously with Crushed Curry ink and then added a thinner edge of Cherry Cobbler.  Then I made a slightly larger label with Crushed Curry card stock and layered them together before sticking them to the card with dimensionals.

The card is made from Watermelon Wonder card stock layered with Cherry Cobbler and Crushed Curry.

Do join in the fun - whatever season you're currently experiencing!  I look forward to seeing your creations at Splitcoaststampers.

Thanks for looking.
Stephanie


Built for Free Using: My Stampin Blog

Thursday, 2 July 2015

Splitcoaststampers Creative Crew Challenges - July 2015 - Part 1


LIFE'S A PICNIC


With the Northern Hemisphere heading into Summer, the focus this month is on the sights, smells, colours, places, food and family that Summer brings: Summer birthdays, graduations, family reunions, a day at the beach or just a backyard BBQ with family and friends!

Play along with the Creative Crew to get those creative juices flowing!
See the Creative Crew Gallery here for further inspiration.


SU Double Porthole Fun Fold, Fancy Fold, Fun Fold
Double Porthole card
CCREW0715CF, CreativeCrew, SUO - Catalog Focus
Anything foodie related, a stamp set, punches, you name it!

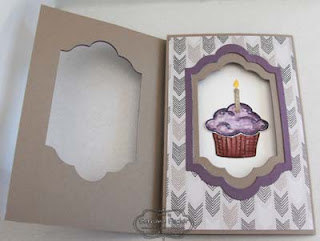
Sprinkles of Life really is turning into one of my "go to" stamp sets - I love it because it's so versatile!  Here I've stamped and coloured the image using Chocolate Chip, Perfect Plum and Elegant Eggplant.  The candle is Tip Top Taupe with a Daffodil Delight and Crushed Curry flame.  I added Dazzling Details to the icing. 

I really don't know what this fold should be called but I call it a double porthole.  The base cardstock is Tip Top Taupe with three designs from the Go Wild DSP stack.

How I did it:
  1. I started with a 6" x 12" piece of Tip Top Taupe which I scored at 4" and 8" (neatly dividing it into three).  
  2. I folded both sides in towards the centre, overlapping them with the left side on top.
  3. I adhered a piece of DSP to the top flap.
  4. I unfolded the card, used the second largest Lots of Labels framelit and carefully positioned it on top of the top flap and ran in through the Bigshot so that only the top layer was cut.
  5. Using Perfect Plum cardstock I cut a frame using the largest and second largest of the Lots of Labels framelits and adhered it to the front of the card.
  6. I refolded the card and lightly drew around the inside of the cut with a pencil to help me centre the die cut in the second flap.  
  7. I wanted to leave a frame of Tip Top Taupe showing around the inside edge when the card is closed.
  8. I opened out the card again and centred the third largest die in the set and ran it through the Bigshot.
  9. I cut a piece of DSP to size, held it in position on top of flap 2 (with the smaller die cut), folded the top flap over and lightly drew around the inside of the cut shape again.
  10. Then I placed the DSP in the Bigshot with the second largest die in position directly lined up with the pencil marks) and ran it through. 
  11. Then I adhered the DSP to the second flap, being careful to line it up with the die cut in the front flap.  So now I had decorated my second flap but still kept the Tip Top Taupe frame that I wanted. 
  12. I cut another Perfect Plum frame by repeating step 5 and adhered it to this second layer.
  13. I centred a piece of Whisper White to the inside of the card and then cut a third piece of DSP to size.  I didn't want any of this DSP to show when the card is closed, so I repeated steps 9 & 10 and then adhered this DSP to the Whisper White.
  14. I then added a Perfect Plum frame by repeating step 5.
  15. I then closed the card before I adhered the cupcake, to help me position it where I wanted within the frame I had just created for it.
  16. I placed a piece of Whisper White on the back of the card to provide somewhere to write a message.
    SU Double Porthole Fun Fold, Fancy Fold, Fun Fold
    Sprinkles of life & Go Wild DSP

    The sentiment is from Endless Birthday Wishes.  I stamped it in black onto a 1" strip of thick Whisper White and then trimmed just the ends with one of the Tags & Labels Framelits (I've included instructions for this below).  Then I edged the resulting label with Tip Top Taupe and attached a couple of Perfect Plum Candy Dots (even they sound foodie!).  I repeated the process with normal Whisper White cardstock (without the sentiment and candy dots!) but just a tad longer.  I adhered the longer layer with snail and then added the top layer with dimensionals.
  

SU Double Porthole Fun Fold, Fancy Fold, Fun Fold
Sprinkles of life, custom made label


Making a symetrical label with the Tags & Labels Framlits:
  1. I stamped my sentiment on a 1" strip of cardstock.  
  2. I then fed one end of the strip through the framelit so that only the end of the strip was under the cutting blade (making sure it was straight).  I cranked just that end through the Bigshot to avoid leaving any impressions on the rest of the strip.
  3. I then repeated the process on the other end of the strip.
Partial die-cutting, SU
Custom made
label, Step 3

Partial die-cutting, SU
Custom made
label, Step 2


Partial die-cutting, SU
Custom made label - to simply extend the length
of the die cut, stop at this step


CCREW0715DF, CreativeCrew, SUO - DSP/Colour Focus
Cucumber  Crush, Hello Honey and Watermelon Wonder - for more inspiration use the Cherry On Top DSP Stack!

OK, I'm going to be brutally honest here - I really don't like Cucumber Crush; either on its own or in combination.  So..... I've really struggled with this challenge. I'm not thrilled with my results but I'm happy that I managed to produce something.  I suppose the flowers, wall and leaf give it a very loose outdoors connection, then we have to make a leap to picnic!
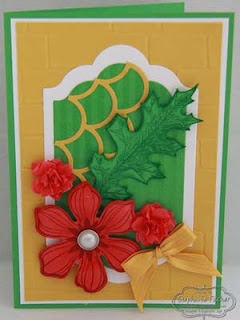
SU Colour Me Irristable, Striped Scallop Thinlit, Cucumber Crush
Beautiful Bunch, Striped Scallop Thinlit
The base card is Cucumber Crush layered with Whisper White and Delightful Dijon (which was embossed with the Brick Wall embossing folder.  The two layers from Lots of Labels Framelits are Whisper White overlaid with the Cucumber Crush Colour Me Irresistable card.

The leaf is stamped in Garden Green onto Cucumber Crush using the Vintage Leaves stamp set and cut with the matching Leaflets Framelit.  I also added a little bit of Delightful Dijon cut with the Striped Scallop Thinlit.

The large flower is stamped with Cherry Cobbler ink onto Watermelon Wonder cardstock with the Beautiful Bunch stamp set and cut with the matching Fun Flower Punch.  I added the largest of the Metal Rimmed Pearls to the centre.

The two smaller flowers are cut from the Watermelon Wonder Cotton Paper with the Petite Petals Punch and then scrunched up around a really small brad.

I wanted to add a bow but didn't want to use the Dotted Lace Trim, so I used the now retired Stitched Satin Ribbon in Crushed Curry which seemed to do the trick.

The remaining two July Challenges follow in Part 2.


Built for Free Using: My Stampin Blog

Saturday, 20 June 2015

Crazy Crafters Blog Hop - June 2015


Welcome to the Crazy Crafters blog hop for June. This month we are excited to show off our favourite Stampin’ Up! products from the just released 2015 – 2016 Annual Catalogue. We hope you find great inspiration from the projects. Get your wish list ready! 

You may just be starting the blog hop here at my blog - Stephanie Fischer - or may have come from the person before me in the list below. If you get off track at any time, the full line-up below will help you move along from blog to blog so you see all the projects. At the moment you are visiting Stephanie Fischer, The Crafty Thinker. 

It's no secret that I have LOTS of favourites in the new Catalogue but perhaps my most favourite is the Watercolour Wings stamp set.  Why?  Because it's so versatile and that's what I look for in my purchases!  It combines beautifully with Butterfly Basics and both of the matching die sets - Butterflies Thinlits and the new Bold Butterfly Framelits.  In fact I love this set so much that I made two projects for this blog hop!

SU, Latch card, fun fold, Stampin Up, Butterfly Basics, Heat Embossing
Bleach technique, sponging. Best Thoughts & Watercolour Wings stamp sets
The first is a simple latch card - thank you to Dina Kowal at Splitcoaststampers for the great tutorial.  I heat embossed the flower image from Best Thoughts and "reverse coloured" by painting with bleach, using more bleach in some areas than others to for shading and highlights.  I stamped the Watercolour Wings butterflies twice, cutting one with the plain die and one with the matching filligree die.  I then glued the two layers together at the centre and adhered them onto the floral base, popping up the wings on dimensionals. 
SU, Latch card, fun fold, Stampin Up, Butterfly Basics, Heat Embossing
Inside
The colours I used are Island Indigo, Bermuda Bay and Pool Party.  I stamped the butterflies in these colours onto Soft Sky cardstock.  The butterfly bodies are Soft Suede.  I decorated the latch edge of the card with the Boho Chic embossing folder - using just the end and carefully embossing twice in order to cover the entire length of the card (the only way I could fit it all through the big shot as my card is quite large).

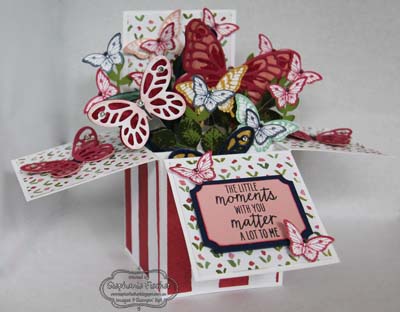
SU, Kinda Eclectic, Butterfly Basics, English Garden DSP PaperThe second is a card in a box.  I made it with the new thick Whisper White card stock (so it's VERY sturdy!) which I decorated with English Garden DSP and filled with a variety of butterflies and foliage.   

The sentiment from Watercolour Wings is stamped onto Blushing Bride card and cut out with the Tags & Labels Framelits. I stuck that onto a slightly larger Night of Navy layer.  

Foliage is from Kinda Eclectic (hand cut) and the Bird Builder Punch.  

All the colours are drawn from the English Garden DSP.
 
I hope you've enjoyed these projects, I would really welcome your comments.

Thanks for taking part in our blog hop, there are so many amazing ideas and inspiration you don't want to miss. Remember that currently you are at my blog - Stephanie Fischer, so check the blog hop line up list to see who is next in the list as you don't want to miss out on seeing any of the blogs and the amazing inspiration they contain.

Built for Free Using: My Stampin Blog

Saturday, 6 June 2015

Hey Girl - Sweet 16

SU, Hey Girl, Watercolouring stamped image, 16th birthday card, teenage girl card
Hey, Girl


Guess who realised today that it's her niece's 16th birthday?!!  Ooops! So this was a very quickly made card!
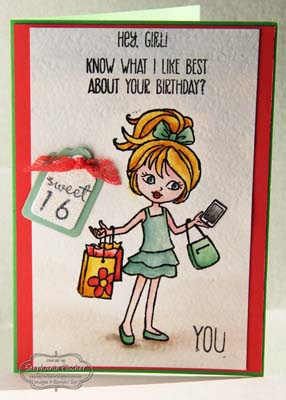
The Hey, Girl stamp set is very versatile.  The shopping bags, handbag and smart phone were perfect for this occasion but our sweet girl could be clutching a balloon (or several balloons), some flowers or a dog lead (yes, there's a little dog too!).   Or she could just be standing there with her arms out as if to say "Da-da, here I am!".

The numbers are from the Back to Basics Alphabet set and the word "sweet" comes from the Project Life Remember This stamp set.  It's half of the sentiment that says "Sweet moments".  This little sentiment is die cut with the Tags & Labels Framelits; Watercolour paper layered onto Mint Macaron. I punched two little holes and fed through the little piece of ribbon cut from the Dotted Lace Trim in Watermelon Wonder.  I used the 2-way glue pen over the stamped watercolour paper and added some Dazzling Diamonds.

Stamped in Stazon on watercolour paper and coloured with inks and an aquapainter - Mint Macaron, Delightful Dijon, Watermelon Wonder and Cucumber Crush.  There's a touch of Basic Grey in the phone.  Her skin is Blushing Bride and Calypso Coral with Watermelon Wonder lips.  The background is a soft wash of Marina Mist and Tip Top Taupe.

The base card is Cucumber Crush layered with Watermelon Wonder and the watercolour paper.