Showing posts with label Watercolour Wings. Show all posts

Tuesday, 1 March 2016

Watercolour Wings Joy Fold card

The Joy Fold is one of my favourites and I haven't made one for a long time - until now.

There are many great tutorials available on You Tube, so I won't go into too much construction detail.  Suffice it to say that I used Bermuda Bay cardstock for the card, layered with Pool party.

SU, watercolour wings, joy fold, fun fold, botanical builder, First sight
I should use the Watercolour Wings stamp set more often - it's a beauty!
I stamped all of the Pool Party panels for the larger part of the card with the beautiful flourish from the First Sight stamp set.  I used Basic Grey ink for the front panel and the large inner piece and Bermuda Bay (stamped off) for the inner left side to surround the greeting.  The greeting is from the Birthday Blossoms stamp set.

I layered a piece of plain Whisper White cardstock to the inside of the small section of card.  This is where I'll write my message.

I stamped the large triple stamp butterfly from Watercolour Wings onto the small piece of Whisper White card for the front.  The colours I used are Basic Grey and Bermuda Bay.  I used markers around the edge of the butterfly and added a shadow with a Smoky Slate marker.

Then I masked the butterfly before stamping the background with the same flourish - but this time inked with Smoky Slate and touches of Bermuda Bay and Basic Grey.  I stamped off first so that pattern wouldn't overwhelm the butterfly.

For the closure, I added a flower made using the Botanical Builder Framelit set and added another small flower to balance the composition.  I gave the flowers Basic Black candy dot centres.
SU, watercolour wings, joy fold, fun fold, botanical builder, First sight
The opened card

Thank you for visiting.

'Til next time
Stephanie

To purchase any items - simply click on one of the images below
Product List

Sunday, 13 December 2015

Bloomin' Love - Occasions Catalogue Sneak Peek

Time for a sneak peek at one of the many really great items in the new Occasions Catalogue - available 5 January 2016.

This is the Bloomin' Love stamp set and the Bloomin' Heart thinlits dies which are available as a bundle at a saving of 15%.
SU, Large Numbers Framelits, Bloomin' Love Bundle
Bloomin' Love Bundle with the First Sight stamp set
NEW PRODUCTS FEATURED: (available from 5th January 2016)
  • Bloomin' Love Bundle                     140818
  • First Sight stamp set                      140688
  • Wink of Stella Clear Brush              141897
  • Large Numbers Framelits                140622
This is in fact a gift card - I didn't take a picture but inside there is a pop up gift card holder.  It's amazingly sparkly and over-the-top but I think just right for a Christmas gift card present for my lovely niece.

The main card is made from Blushing Bride cardstock to which I've added a layer of Cherry Cobbler.  I stamped an image in black ink from another new stamp set called First Sight and then I mirror stamped it on the other side.  Once the ink was dry I added a little sparkle with the Wink of Stella Clear brush (also in the new Occasions Catalogue).

I used the Bloomin' Heart thinlit die to cut the large heart from Dazzling Diamonds Glimmer Paper.  I stamped the flowers from the Bloomin' Love stamp set onto Whisper White cardstock with Watermelon Wonder ink and cut them out with the small dies from the Bloomin Heart Thinlits and stuck them onto the larger heart.

I stamped the banner from the Bloomin' Love stamp set in Cherry Cobbler ink onto Blushing Bride cardstock and added a sentiment from Watercolor Wings (currently available in the Annual Catalogue).  Then I cut out the banner with the matching die from the Large Numbers Framelits die set and stuck it onto the heart.

The finishing touches were the sequins from the Brights Sequin Assortment and I placed a small Rhinestone Jewel (both currently available in the Annual Catalogue) in the centre of each.

Stay tuned for more sneak peeks!
Stephanie
uilt for Free Using: My Stampin Blog

Saturday, 20 June 2015

Crazy Crafters Blog Hop - June 2015


Welcome to the Crazy Crafters blog hop for June. This month we are excited to show off our favourite Stampin’ Up! products from the just released 2015 – 2016 Annual Catalogue. We hope you find great inspiration from the projects. Get your wish list ready! 

You may just be starting the blog hop here at my blog - Stephanie Fischer - or may have come from the person before me in the list below. If you get off track at any time, the full line-up below will help you move along from blog to blog so you see all the projects. At the moment you are visiting Stephanie Fischer, The Crafty Thinker. 

It's no secret that I have LOTS of favourites in the new Catalogue but perhaps my most favourite is the Watercolour Wings stamp set.  Why?  Because it's so versatile and that's what I look for in my purchases!  It combines beautifully with Butterfly Basics and both of the matching die sets - Butterflies Thinlits and the new Bold Butterfly Framelits.  In fact I love this set so much that I made two projects for this blog hop!

SU, Latch card, fun fold, Stampin Up, Butterfly Basics, Heat Embossing
Bleach technique, sponging. Best Thoughts & Watercolour Wings stamp sets
The first is a simple latch card - thank you to Dina Kowal at Splitcoaststampers for the great tutorial.  I heat embossed the flower image from Best Thoughts and "reverse coloured" by painting with bleach, using more bleach in some areas than others to for shading and highlights.  I stamped the Watercolour Wings butterflies twice, cutting one with the plain die and one with the matching filligree die.  I then glued the two layers together at the centre and adhered them onto the floral base, popping up the wings on dimensionals. 
SU, Latch card, fun fold, Stampin Up, Butterfly Basics, Heat Embossing
Inside
The colours I used are Island Indigo, Bermuda Bay and Pool Party.  I stamped the butterflies in these colours onto Soft Sky cardstock.  The butterfly bodies are Soft Suede.  I decorated the latch edge of the card with the Boho Chic embossing folder - using just the end and carefully embossing twice in order to cover the entire length of the card (the only way I could fit it all through the big shot as my card is quite large).

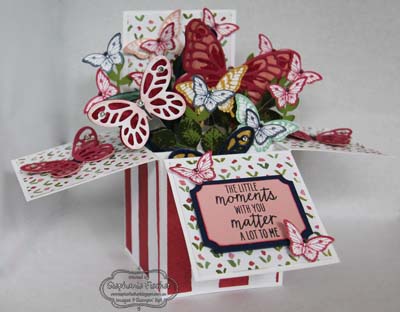
SU, Kinda Eclectic, Butterfly Basics, English Garden DSP PaperThe second is a card in a box.  I made it with the new thick Whisper White card stock (so it's VERY sturdy!) which I decorated with English Garden DSP and filled with a variety of butterflies and foliage.   

The sentiment from Watercolour Wings is stamped onto Blushing Bride card and cut out with the Tags & Labels Framelits. I stuck that onto a slightly larger Night of Navy layer.  

Foliage is from Kinda Eclectic (hand cut) and the Bird Builder Punch.  

All the colours are drawn from the English Garden DSP.
 
I hope you've enjoyed these projects, I would really welcome your comments.

Thanks for taking part in our blog hop, there are so many amazing ideas and inspiration you don't want to miss. Remember that currently you are at my blog - Stephanie Fischer, so check the blog hop line up list to see who is next in the list as you don't want to miss out on seeing any of the blogs and the amazing inspiration they contain.

Built for Free Using: My Stampin Blog

Friday, 5 June 2015

Several Shades of Grey!

There are so many beautiful stamp sets and papers in the new catalogue that I'm like a kid in a candy shop at the moment!

Yesterday I had some time to play and decided to try the Timeless Elegance DSP.  I just love it!  It's so gorgeous it really does all the heavy lifting for you, making it really quick and easy to create a beautiful card!  How good is that?!

In just a short space of time, with the addition of of the Watercolour Wonder and Awesomely Artistic stamp sets I made these three cards.

By just letting the beautiful prints on the DSP do all the talking, I could have made even more!

I used the Out of the Box technique to cut out the stamped panel with the new Lots of Labels Framelits.  I stamped the dragonfly with versamark onto Very Vanilla card, applied heat & stick powder and then dazzling diamonds.  I highlighted around the wings with an aquapainter and basic grey ink.
SU, foliage, Lots of Labels, Project Life Cards & Labels, Bitty Banners
Awesomely Artistic stamp set

I watercoloured the Awesomely Artistic foliage with Sahara Sand and Basic Grey inks.  The die cuts were edged with Basic Grey ink.  I stamped the frame and the word "Friend" from the Awesomely Artistic set and cut it out with the matching framelit from the Project Life Cards & Labels Framelit set.

Happy Birthday is from the Sprinkles of Life set.  Since it's photopolymer I was able to bend it to fit the Bitty Banner Framelet.

I layered the Timeless Elegance DSP onto Basic Black cardstock and then onto the Sahara Sand card base.


SU, Butterfly, Project Life Cards & Labels
Watercolour Wonder Stamp Set
 The sentiment on the striped card is from Birthday Blossoms.  I hand cut the Very Vanilla layer to points and layered it onto Sahara Sand cardstock cut with another of the Project Life Cards & Labels Framelits.  Then I applied two of the smallest of the metal rimmed pearl embellishments.  I stamped the Watercolour Wings butterfly with Sahara Sand, Basic Grey and Black.

The Timeless Elegance DSP is layered onto Basic Black and then onto the Sahara Sand card base.  Both the butterfly and the sentiment are popped up on dimensionals.


SU, Butterfly, Dazzling Diamonds
Watercolour Wonder Stamp Set
For the last card, the Timeless Elegance DSP is edged with black ink and layered onto the Basic Grey card.

The sentiment is from That Thing You Did and I stamped it in black directly onto the DSP.

The Watercolour Wings butterfly is stamped in black and Basic Grey.  I then picked out parts of it with the 2-way glue pen and applied Dazzling Diamonds glitter.  The wings are popped up on dimensionals.


In the next few weeks I'll post more pictures of what I make with some of the new products.
Built for Free Using: My Stampin Blog