Showing posts with label hand made birthday card. Show all posts

Friday, 14 July 2017

Oh So Eclectic Birthday

In my youth I was very fond of the colour orange.  In fact, I can still remember the blouse that I just had to have when I was about 8 or 9 years old .... and the department store "discussion" with my mother as she tried to steer me towards something (anything) else!  It was bright orange satin with a long rounded collar - quite something!  

Apparently my mother didn't forget either.  A few years later I came home for the school holidays to find she had redecorated my room - with a bright orange feature wall facing my bed!  After that, I was less enamoured of the colour!  So here I am, trying to use orange!  Well, to be accurate - Tangerine Tango.

www.thecraftythinker.com.au, Eclectic Layers, Layered Leaves, #thecraftythinker, Stampin Up Australia Demonstrator, Stephanie Fischer, Sydney NSW
This was my finished card before added something else!

This was another of my "build as you go" cards!  I made a mask with one of the Eclectic Layers dies and wanted to test it out.  I cut some flowers from Daffodil Delight off-cuts with another of the dies and coloured some Embossing Paste with a drop of Tangerine Tango ink refill.

Once the paste was dry, I watercoloured Wild Wasabi onto the stems and some Peekaboo Peach onto the petals, concentrating the colour at the base.

Then I waited a couple of days for inspiration to strike!  When it didn't, I cut a layer from Night of Navy cardstock and embossed it with the Layered Leaves 3D Dynamic embossing folder and added it to a Tangerine Tango card base.  I used the Lots of Labels dies to cut some Crushed Curry and Night of Navy labels and White heat embossed a greeting from Birthday Blooms.

I coloured some Whisper White Classic Weave ribbon with Tangerine Tango ink, cut some more elements with the Eclectic Layers dies and added a bow of Crushed Curry Mini Chevron ribbon.
www.thecraftythinker.com.au, Eclectic Layers, Layered Leaves, #thecraftythinker, Stampin Up Australia Demonstrator, Stephanie Fischer, Sydney NSW
After taking the previous photo, I decided to try adding another piece of the diamond cut orange card.

I couldn't decide whether I liked the card better with or without the extra little piece of orange decoration on the right side.  What do you think? 
www.thecraftythinker.com.au, Eclectic Layers, Layered Leaves, #thecraftythinker, Stampin Up Australia Demonstrator, Stephanie Fischer, Sydney NSW
Close up of the flowers showing the dimension provided by the embossing paste.
This card is entered into the Crazy Crafters' Project Highlights.  Click here to see all the beautiful entries and vote for your favourites.

Thank you for visiting.
'Til next time!
Stephanie

Product List - All supplies used are available in my online store - just click on Shop Now or one of the product images below (Australian Residents only)

Monday, 22 August 2016

Thoughtful Branches Birthday

My team members and I had a crafting session the other day (well, OK, it also involved a lot of cake and tea!).  One of them cut a tree from Watermelon Wonder cardstock with the Thoughtful Branches dies and did it so neatly that I couldn't pass up the opportunity to use that negative space.

Stampin Up, #thecraftythinker, Thoughtful Branches, Build a Birthday, Stampin Up Australia Demonstrator
Such a quick and easy card with the Thoughtful Branches dies

So I cut another tree from a scrap of Early Espresso cardstock, fit it into the space and layered it onto a piece of Whisper White cardstock, adding a birthday greeting and some Flirty Flamingo Ruched Ribbon.  

The card base is made from Flirty Flamingo cardstock with a layer of Flirty Flamingo patterned paper.

Exceptionally quick and easy!

If you like the Thoughtful Branches sets and don't yet have it - act quickly!  It's only available during August.

Thanks for visiting!
'Til next time
Stephanie

Product List - To shop in my online store - click on a product image below (Australian Residents only)

Wednesday, 15 June 2016

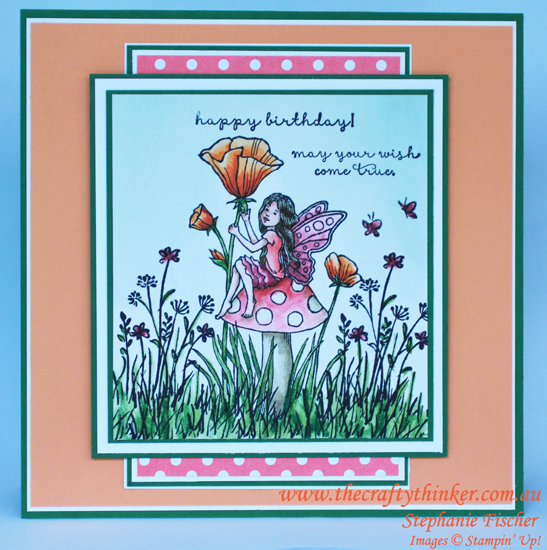
Fairy In The Meadow


This was a card that I needed to finish, photograph and get into the mail really quickly!  How unfortunate that it all happened during a huge rainstorm and the lighting was terrible!  I'm not very happy with the quality of my photographs but it was the best I could do at the time.  I hope it doesn't detract from the charm of this stamp set!
Stampin Up, #thecraftythinker, Fairy Celebration, In The Meadow, Watercolouring, Stampin Up Australia Demonstrator
Mushroom or toadstool?

The fairy sitting on her mushroom is from the Fairy Celebration stamp set which I combined with a few images from the In The Meadow stamp set before watercolouring. 

I stamped onto Shimmery White cardstock with Basic Black Archival ink because both can withstand water very well.  

I then used a mop brush to wet the background areas before adding some Soft Sky ink to create a gentle sky background and let it dry completely.

Then I used a fine round brush to paint the rest of the scene using Peekaboo Peach, Flirty Flamingo, Rose Red, Sweet Sugarplum, Blushing Bride, Pink Pirouette, Sahara Sand, Soft Suede, Wild Wasabi and Garden Green inks.

The greetings are also from Fairy Celebration, stamped with Basic Black ink.

The 6" square Garden Green card is layered with Whisper White, Peekaboo Peach, Garden Green and In-Colour DSP stack cardstock and paper.

Stampin Up, #thecraftythinker, Fairy Celebration, In The Meadow, Watercolouring, Stampin Up Australia Demonstrato
The inside is decorated with the Touches of Texture stamp set

I cut a 5.5" square of whisper white cardstock for the inside of the card and decorated the corners using the Touches of Texture stamp set.  I stamped the larger flower first with Basic Black ink and then masked it before stamping with the texture image in Wild Wasabi and Garden Green inks.  I then watercoloured the flower with Peekaboo Peach and Flirty Flamingo inks before adding a very light touch of Wild Wasabi to parts of the centre.

Thank you for visiting.
'Til next time!

Stephanie

Product List - To shop in my online store, click on a product image below (Australian Residents only)


Friday, 5 February 2016

Peaceful country scene with dog - The Wilderness Awaits

Today I made a birthday card for a friend of mine who loves dogs.  It gave me the opportunity to ink up an image I hadn't previously used in the The Wilderness Awaits stamp set.
SU, Sheltering Tree, Watercolouring, handmade card, combining stamp sets
The dog is from The Wilderness Awaits stamp set
He seems to be a good hunting dog, so I thought I'd better add some trees.  It's always a joy to use Lovely As A Tree (one of my all time favourite stamp sets!) and I added Sheltering Tree.  I decided to add some autumnal colours to the trees.


I have entered this card into Kylie's Crazy Crafter Team Projects this week - click on the image to see all of the amazing projects entered this week and vote for your favourite.


Without getting too bogged down in detail, this is an overview of my plan.
  1. Stamped the dog with black ink and masked it.
  2. Stamped Lovely as a Tree in Basic Grey ink (to put them in the distance a bit)
  3. Sponged the sky with Soft Sky and then the top part with some Marina Mist.
  4. Sponged the grass with Pear Pizzazz.
  5. Stamped Sheltering tree trunk in black (to make it dark to bring it forward)
  6. Stamped the grass from In The Meadow in Pear Pizzazz in the foreground
  7. Stamped the same grass over the rest of the grass area in Pear Pizzazz but stamping off first.
  8. Stamped the grass under the dog and tree and in the foreground with Mossy Meadow
  9. Used the small leaves image from Sheltering tree to add leaves to the small trees in Pear Pizzazz, Crushed Curry and Cajun Craze.
  10. Stamped the tree leaves image from Sheltering Tree on the big tree in Pear Pizzazz,  Added some Crushed Curry and Cajun Craze with the small leaves image.
  11. Went over the right side of the big tree trunk with an aqua pen and a little Cajun Craze.
  12. Added some watercolour Pear Pizzazz to all the trees
  13. Unmasked the dog
  14. Added some watercolour Mossy Meadow under the dog and trees.
  15. Watercoloured the dog with Delightful Dijon
  16. Added Cajun Craze to the dog, working in layers a bit at a time to create highlights and shadows.
  17. Sponged a little bit of Mossy Meadow to the lower edge of the panel.
  18. Stamped the sentiment from Sheltering Tree to the shadows.
The painted panel is layered onto Basic Black cardstock and then onto the Cajun Craze card.

Thanks for stopping by to look.
'Til next time
Stephanie
Built for Free Using: My Stampin Blog