Monday, 23 October 2017

Santa Paws Combo

This is a Christmas card for a pet-loving friend!  
#thecraftythinker, #stampinup, #christmascard, #cardmaking, #xmascard, Santa Paws, Christmas Card, Stampin' Up Australia Demonstrator, Stephanie Fischer, Sydney NSW
Santa Paws Christmas Card coloured with Stampin' Blends alcohol markers

I stamped the images with Memento Tuxedo Black ink and coloured them with my new favourite toy - my Stampin' Blends alcohol markers.  

These great markers will be available from 1 November either as packs of two (light and dark shade), individually or the complete collection.  While stocks last, there will also be the option to purchase a project kit and exclusive stamp both featuring lovely line drawings ready to be coloured.  There are 12 Stampin' Up shades - light and dark shade - two skin tones and a colour lifter ... so that's 27 markers in the collection.
#thecraftythinker, #stampinup, #christmascard, #cardmaking, #xmascard, Santa Paws, Christmas Card, Stampin' Up Australia Demonstrator, Stephanie Fischer, Sydney NSW
Pearlescent sequins from the Metallic Sequins Assortment

I was at first intimidated by the thought of colouring the larger image but, once I started, I realised that the alcohol markers would make quick (and very enjoyable!) work of it.

I trimmed the end of the sentiment with one of the Lots of Labels framelits and I couldn't resist adding some sequins for a bit of bling!

If you live in Australia and would like more information about the Stampin' Blends, please contact me.

Thank you for visiting.
'Til next time!
Stephanie 

Product List - Click on a product image to visit my online store (Australian Residents only)

Sunday, 22 October 2017

Crazy Crafters Blog Hop with Guest Stamper Jenny Hall

 Image may contain: text
Badges & BannersWelcome to the Crazy Crafters' Blog Hop with our Special Guest stamper, Jenny Hall - we are thrilled to have Jenny join us this month and so excited to CASE (Copy And Selectively Edit) any project that has been created by her . 
 
Whether you are starting the blog hop here at my blog, Stephanie Fischer - The Crafty Thinker, or have come from the person before me, be sure to click on the person listed under me further down the page to continue your journey on this blog hop.

Stamp Ink Paper's Tic Tac Toe Challenge card by Jenny Hall at www.jennystampsup.com for scrapbooking, cardmaking, video tutorials and more! As I looked through Jenny's blog for a card to CASE, my oohs and aaahs must have been audible!  I was like a kid in a candy shop - I just couldn't decide so I've combined elements from two cards!  Click on the images to learn more about Jenny's cards.

I've combined the layers and Swirly Snowflake Edgelits from one card with the circle and banner ideas from the other to make a Christmas card in elegant but non-traditional colours.
#thecraftythinker, Christmas Card, Swirly Snowflakes, Seasonal Bells, Stampin' Up Australia Demonstrator, Stephanie Fischer, #cardmaking, #christmascard
Christmas card using Swirly Snowflakes dies and Seasonal Bells stamp set

Much as I love it, I sort of regret using the Year of Chear Specialty Designer Series Paper on this card because I lost the gorgeous simplicity and clean lines.  On the other hand - I think it's OK to be a bit over the top with Christmas cards!

I used the Thick Whisper White cardstock for the base card since the DSP is gold and white but I do think I would prefer the combination of Early Espresso and Very Vanilla.
#thecraftythinker, Christmas Card, Swirly Snowflakes, Seasonal Bells, Stampin' Up Australia Demonstrator, Stephanie Fischer, #cardmaking, #christmascard
The centre of that snowflake is crying out for some bling - which I added later!

I applied some Multipurpose Adhesive Sheet to the back of the Gold Foil cardstock before I cut the snowflake, which made it much easier to stick to the Early Espresso circle (which was cut with one of the Stitched Shapes framelits).

My last critique of my card is that I forgot to put some bling in the centre of the gold snowflake until after I'd taken the photos and was looking at them when writing this post (too late to correct the situation and take more photos!).  

Ah well - I've disappointed myself but it'll spur me on to do better next time I hope!

Thanks for following our blog hop. Remember that currently you are at my blog - Stephanie Fischer - so click on the next name in the list to ensure that you don't miss out of seeing any of the blogs and the amazing inspiration they contain.

Thanks for visiting
'Til next time
Stephanie


Product List

Friday, 20 October 2017

Ink It! Stamp It! Design Team Blog Hop - Technique:

Welcome to the Ink It! Stamp It! Design Team Blog Hop - we hop every month so be sure to pop back and visit us again!  Today our theme is Technique. 

You are currently at my page - Stephanie Fischer, The Crafty Thinker.  At the end of my post there is a full line of team members.   This is a long post due to all the instructions, so do please scroll down to the bottom and click on the name after mine in the list to continue the hop.

If there's an actual name for this technique, I don't know what it is but I call it the Glitter Stencilling Technique.
#cardmaking, Xmas, #christmascard, Christmas card,Centre Step card, Fun Fold, Glitter Stencilling, #inkitstampit, #thecraftythinker, Stampin Up Australia Demonstrator, Stephanie Fischer
Stencilling with blue and white glitter using Pattern Party Decorative Masks

Warning:  If you can't cope with unconstrained mess - this technique is probably not for you!  No matter how hard I try to keep things clean and controlled; no matter how quickly I use the vacuum cleaner or step on old towels in the door of my craft room - the glitter spreads and pretty soon I'm finding it all over the house!

Instructions:
Step 1:  Apply Multipurpose Adhesive Sheet to one side of your chosen cardstock (I've used Whisper White).

Step 2: Cut your desired shape using punch, die or trimmer.  (I've used Layering Circle and Sweet and Sassy framelits)

Step 3: Remove the protective cover to reveal the adhesive.  Place sticky side up on a piece of scrap paper (to catch the glitter)  Tip:  Try not to touch the adhesive 

Step 4:  Apply a thin layer of soap to the back of your chosen stencil.  This will prevent the stencil from sticking too firmly to the adhesive.  Tip:  Time and care taken on this step will pay dividends!  I like to moisten a small bar of soap with my fingers until it produces a creamy lather and then carefully spread it onto the mask with my fingers.  If necessary, I remove any soap that finds its way to the front of the mask.

Step 5: Lay the mask, soap side down, onto the sticky shape.

Step 6:  Tip some glitter on top - be generous.  Tip:  Use very fine glitter (the finer the glitter, the more consistent the coverage). You'll need two colours of glitter.
#cardmaking, Xmas, #christmascard, Christmas card, Glitter Stencilling, #inkitstampit, #thecraftythinker, Stampin Up Australia Demonstrator, Stephanie Fischer
Glitter Stencilling step 6 - adding the first glitter

Step 7: Use clean, dry fingers to press the glitter down through the mask.  Use small circular motions to ensure complete coverage over the project.  Tip:  Take your time to "burnish" the glitter well.
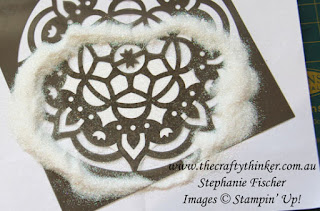
#cardmaking, Xmas, #christmascard, Christmas card, Glitter Stencilling, #inkitstampit, #thecraftythinker, Stampin Up Australia Demonstrator, Stephanie Fischer
Glitter Stencilling Step 7, burnishing the first glitter colour

Step 8:  Tap off all the excess glitter and put it away then carefully remove the mask/stencil.  Tip:  I like to work in gently from the edges.  Avoid touching the adhesive.
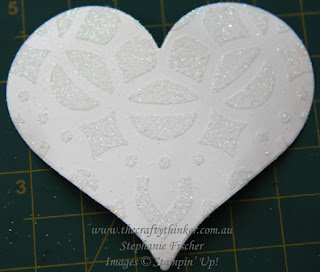
#cardmaking, Xmas, #christmascard, Christmas card, Glitter Stencilling, #inkitstampit, #thecraftythinker, Stampin Up Australia Demonstrator, Stephanie Fischer
Glitter Stencilling Step 8 - the mask has been removed to reveal the rest of the adhesive

Step 9:  Place the project on a clean piece of scrap paper to catch the glitter and then pour the second colour of glitter on top of the project.  Tip:  You will probably be a little nervous the first time you do this but don't worry - the second glitter will stick to the newly revealed adhesive.
#cardmaking, Xmas, #christmascard, Christmas card, Glitter Stencilling, #inkitstampit, #thecraftythinker, Stampin Up Australia Demonstrator, Stephanie Fischer
Glitter Stencilling Step 9 - pouring the second colour of glitter on top of the first

Step 10:  Press and "burnish" (use those small circular movements) the glitter onto the project.

Step 11:  Tap off the excess glitter and put it away for next time.

Step 12:  Burnish or polish the project a little more with your finger to ensure that all the glitter is well adhered and enhance the shine.
#cardmaking, Xmas, #christmascard, Christmas card, Glitter Stencilling, #inkitstampit, #thecraftythinker, Stampin Up Australia Demonstrator, Stephanie Fischer
Glitter Stencilling
For the card below, I repeated the process with the same colours and a different mask to produce the patterned side strips.  
#cardmaking, Xmas, #christmascard, Christmas card, Centre Step card, Glitter Stencilling, #inkitstampit, #thecraftythinker, Stampin Up Australia Demonstrator, Stephanie Fischer
I added more glitter to the embossed panel by using the Fine Tip Glue Pen on the embossed stars
Here's the card I made with the red and gold circle.  
#cardmaking, Xmas, #christmascard, Christmas card, Centre Step Card, Fun Fold, Glitter Stencilling, #inkitstampit, #thecraftythinker, Stampin Up Australia Demonstrator, Stephanie Fischer
Christmas card using traditional colours in Glitter Stencilling and the Garden Trellis embossing folder

Same method with different colours.
#cardmaking, Xmas, #christmascard, Christmas card, Glitter Stencilling, #inkitstampit, #thecraftythinker, Stampin Up Australia Demonstrator, Stephanie Fischer
Glitter Stencilling Step 7, burnishing on the first colour of glitter through the stencil

#cardmaking, Xmas, #christmascard, Christmas card, Glitter Stencilling, #inkitstampit, #thecraftythinker, Stampin Up Australia Demonstrator, Stephanie Fischer
Glitter Stencilling Step 9, adding the second colour of glitter on top of the first
There's always some glitter on my desk afterwards - but I seem to have been extra messy this time! 
#cardmaking, Xmas, #christmascard, Christmas card, Glitter Stencilling, #inkitstampit, #thecraftythinker, Stampin Up Australia Demonstrator, Stephanie Fischer
The aftermath!  Not a technique for anyone unwilling to find a bit glitter all over the house.

#cardmaking, Xmas, #christmascard, Christmas card,Centre Step Card, Fun Fold, Glitter Stencilling, #inkitstampit, #thecraftythinker, Stampin Up Australia Demonstrator, Stephanie Fischer
The little bow on this Christmas Card is cut with a die from the Santa's Sleigh Thinlits

Both cards were finished with pine pieces cut in Tranquil Tide and Lemon Lime Twist using Christmas Staircase dies.  The labels are made with the Labels To Love and Hearts Come Home stamp sets.  They're cut with the Everyday Label Punch.

I hope you've enjoyed this this project and I welcome your comments. 

Thank you so much for joining us today. We hope you'll join us again next month for our Christmas projects! I'm Stephanie Fischer and to keep hopping around see the list below to see who is up next with another great project .

Thanks for visiting
'Til next time
Stephanie


Product List

Thursday, 19 October 2017

Stampin' Dreams Blog Hop - Black & White + One

Welcome to the monthly Stampin' Dreams Blog Hop. This month's theme is Black & White + One. You are currently visiting Stephanie Fischer - The Crafty Thinker from Australia. I hope you enjoy my card.
all purpose card, #cardmaking, #rubberstamping, #handmadecard, Floral Statements, #thecraftythinker, Stampin' Up Australia Demonstrator, Stephanie Fischer, Sydney NSW
This Floral Statements image is so versatile!

This is such a simple card that there's not really much to say!  That wonderful image is stamped in Basic Black ink onto Whisper White cardstock and then lightly watercoloured with Melon Mambo and Black.
all purpose card, #cardmaking, #rubberstamping, #handmadecard, Floral Statements, #thecraftythinker, Stampin' Up Australia Demonstrator, Stephanie Fischer, Sydney NSW
My colour scheme today
I hope this project may have inspired you & brightened your day.  Your comments will be very welcome - I always appreciate feedback.

You are currently visiting Stephanie Fischer.  Please see the list below & hop through all of the people on the list to see all our projects. You don't want to miss any!

Thank you for visiting.
'Til next time!
Stephanie


Product List

Wednesday, 18 October 2017

International Highlights - Change of Life Circumstances - Engagement Card


THEME: Change of Life Circumstances.
Things happen in life that can be pretty major. Let our friends and family know that we are thinking of them during changes in their life - such as an Engagement.

My card is #19 in the gallery

There are no Engagements on the horizon at the moment amongst my family or friends - but I'll be ready when it happens!
www.thecraftythinker.com.au, Congratulations card, Eclectic Layers, Hello Color, Stampin Up Australia Demonstrator, Stephanie Fischer, #thecraftythinker, #cardmaking, #stampinup
Designed as an Engagement card but suitable for any congratulatory card


For this card, I stamped the left side of the Whisper White layer with the lovely striped image from the Hello Color stamp set and coloured it with Stampin' Write Markers.  I then used Pool Party and Bermuda Bay inks to stamp the rest of the layer with the textured image from the Touches of Texture stamp set.

For the flowers, I used the Eclectic Layers Thinlits with Powder Pink, Rose Red and Lemon Lime Twist cardstock.  I very lightly sponged Bermuda Bay ink over the Lemon Lime Twist to tone it down a little and also add some shading.

Using the Banners For You stamp set, I stamped the banner with Crumb Cake ink and the greeting with Rose Red ink.

Thank you for visiting.  Please do click the link above to take a look at the rest of the gallery of great cards and vote for your favourites.

'Til next time!
Stephanie

Product List - To visit my online store, click on a product image below (Australian Residents only)