Friday 30 September 2016

Floral Boutique 60th Surprise Card


A lovely friend is having a special birthday this week - so I wanted to make a special card to match and, for special, I find it hard to go past the beautiful Floral Boutique suite!

Stampin Up, #thecraftythinker, Easel Card with Pop Up balloons, Floral Boutique, 60th birthday card, Fun Fold, Stampin Up Australia demonstrator
I chose papers that would contrast with the numbers and banners

 SURPRISE!!  It's an easel card with pop ups!
Stampin Up, #thecraftythinker, Easel Card with Pop Up balloons, Floral Boutique, 60th birthday card, Fun Fold, Stampin Up Australia demonstrator
When the easel is folded into position, the numbers and balloons stand up by themselves

The base card is Night of Navy cut to 12" x 6" then scored and folded at 6" and 9".  The decorative panels on the front are:
Silver Foil:  5 7/8" x 2 7/8" 
Whisper White:  5 5/8" x 2 5/8"
Floral Boutique paper: 5 1/2" x 2 1/2"

The dimensions for the decorative panel on the inside of the card that props up the easel are:
Silver Foil: 5 7/8" x 2"
Whisper White:  5 5/8" x 1 7/8"
Floral Boutique paper:  5 1/2" x 1 3/4"
Stampin Up, #thecraftythinker, Easel Card with Pop Up balloons, Floral Boutique, 60th birthday card, Fun Fold, Stampin Up Australia demonstrator
I adhered a square of Whisper White to the inside of the card so that I could write a message

The numbers are cut with the Large Numbers Framelits from Silver Foil and again from Thick Whisper White.  I stuck the two layers of numbers together, sandwiching some strips of Window Sheet between the layers at the bottom.

Using a balloon image from the Birthday Banners stamp set, I used Night of Navy ink to stamp onto Whisper White ink and heat embossed the same image in Silver onto Night of Navy cardstock then punched out the images with the matching Balloon Bouquet Punch.  I also punched some extra balloons and made a "sandwich" with a couple of strips of Window Sheet.  For the balloon strings, I used the long curly die from the Cupcake Cutout Framelits and snipped and glued pieces of it here and there. 

I adhered the numbers and balloon bouquets to the back of the lower panel for card front before positioning the panel. 
Stampin Up, #thecraftythinker, Easel Card with Pop Up balloons, Floral Boutique, 60th birthday card, Fun Fold, Stampin Up Australia demonstrator
The stitched look on this banner is very appropriate for a friend who likes to sew!

The banner and Happy Birthday greeting are both from the Birthday Banners stamp set and the word Friend is from the Bloomin Love stamp set.  I adjusted the greetings on the acrylic blocks to have the same curvature as the banner.  I stamped all of these in Versamark onto Night of Navy cardstock (banner first and then placing the greetings into the banner) and then heat embossed with silver before cutting out the banner with the matching Bunch of Banners Framelit.

For the decoration on the easel support, I cut a piece of Night of Navy cardstock 5" x 2" and punched the ends with the Banner Triple Punch.  Deciding I wanted to have a white matt for it, I cut a piece of Whisper White cardstock to 5 1/8" x 2 1/8", and carefully centred each end in the Triple Banner Punch.

I cut two flowers in Silver Foil using the Flourish Thinlits and adhered them to the blue banner.  To cover the join, I cut the smallest of the Lots of Labels in Night of Navy and adhered a Silver Foil decoration cut with a die from the Cheerful Tags Framelits set, sticking it to the centre with a dimensional.

Stampin Up, #thecraftythinker, Easel Card with Pop Up balloons, Floral Boutique, 60th birthday card, Fun Fold, Stampin Up Australia demonstrator
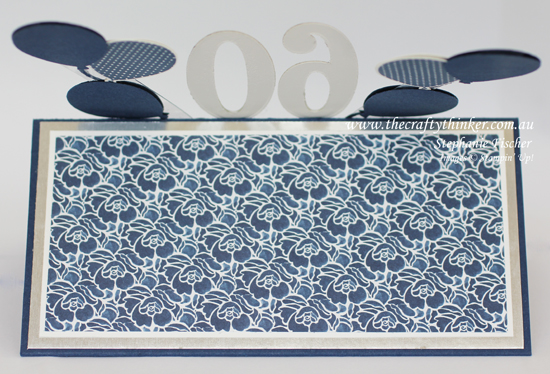
The back view of the easel card
 I hope you like this card.

Thank you for visiting
'Til next time!
Stephanie


Product List - To shop in my online store, click on a product image below (Australian Residents only)

Wednesday 28 September 2016

Merry Tags & Plaid

I've had extra bits of pine sitting on my desk from a card I made a few weeks ago and decided it was time to stop moving them out of the way and use them up!

Stampin Up, #thecraftythinker, Christmas Card, Xmas, Merry Tags, Pretty Pines, Multicoloured Merry Tags, Stampin Up Australia Demonstrator, Castle Hill
I used a combination of metallics in this card to contrast against the green plaid and plain grey cardstock

I kept it quite simple and just created some layers of Smoky Slate and Warmth & Cheer Designer Series Paper on my Basic Gray card.

In one corner I added the pine branches (Garden Green and Pear Pizzazz) and cone (Copper Foil) that had been knocking around for some time.  I only glued a little bit of the boughs, so that they remain loose.

I cut one of the Merry Tags once in Silver Foil and once in Copper Foil.  I then cut the reindeer and treese from the copper version, leaving enough of a "tail" so that I could attach them to the back of the silver one.
Stampin Up, #thecraftythinker, Christmas Card, Xmas, Merry Tags, Pretty Pines, Multicoloured Merry Tags, Stampin Up Australia Demonstrator, Castle Hill
Leave a "tail" for the glue when cutting the Merry Tag
I cut the reindeer off the silver bauble, following the "snow line".  I kept him for use on a later card - thus continuing my ever-present pile of elements awaiting use!

I carefully removed the smaller tree from the silver bauble then with Multi-Purpose Glue on the "tails", I adhered the copper reindeer and tree into position.

I cut some Basic Gray cardstock with one of the Layering Circle dies and adhered it to the back of the bauble.

I made a loop with some of the gold bakers twine from the Trio Pack, looped it over a pine bough and used a glue dot to keep it in position.  I positioned the bauble with a dimensional.

The final touch was the bow of silver Glitter Ribbon in the top corner.

This card could easily be stepped up by using an embossing folder or ink on the top layer or perhaps shaping the edges with some die-cutting.

Thank you for visiting
'Til next time!
Stephanie

Product List - To shop in my online store, click on a product image below (Australian Residents only)

Monday 26 September 2016

Father Christmas Spinner Card

So this is my first ever spinner card!  Better late than never, I guess!

Stampin Up, #thecraftythinker, Christmas card, Spinner Card, Slider Card, Father Christmas, Xmas card, Stampin Up Australia Demonstrator
Santa has his sack nice and close to him.


If you slide the sack across with a finger - it stays facing up.  Or, you can just tip the card and it spins around as it moves across the page - lucky everything stays in the sack!
Stampin Up, #thecraftythinker, Christmas card, Spinner Card, Slider Card, Father Christmas, Xmas card, Stampin Up Australia Demonstrator
The sack seems to be getting away from poor Santa!

I stamped the images from Father Christmas onto Shimmery White cardstock with Archival Basic Black ink and then coloured them with Stampin' Write Markers (I used Real Red, Cherry Cobbler, Pink Pirouette, Delightful Dijon, Crushed Curry, Cucumber Crush, Garden Green, Smoky Slate, Basic Gray, Basic Black, Sahara Sand, Crumb Cake, Soft Suede and Early Espresso).  There's a touch of Gold Wink of Stella on the watch and trumpet and Clear Wink of Stella on the train.

I chose the Shimmery White cardstock because it's pretty and easy to stamp and colour but at the same time it's heavier weight than Whisper White cardstock

Once coloured, I then cut out the two images.

Stampin Up, #thecraftythinker, Christmas card, Spinner Card, Slider Card, Father Christmas, Xmas card, Stampin Up Australia Demonstrator
Stampin' Write Markers are easy to use and give lovely strong colours for a Christmas card

I made the Real Red card by folding an A5 piece of card in half.  I cut a layer of Shimmery White cardstock to size and then cut a slightly smaller Whisper White piece which I adhered to the card front so that the slider slot would appear white.

I cut the spinner slot using a die from the Sliding Star Framelits set and then embossed it with the Softly Falling embossing folder.  It's important to cut first and then emboss otherwise the embossing would be flattened when being run through the Big Shot again to die cut.

I placed Foam Adhesive Strips on the back of the embossed and die cut piece of card - taking care to leave enough space around the slot for a 5c coin to run freely.  I then adhered the piece to the card front (over the Whisper White piece) with a 5c coin under the slot.

I placed a dimensional in the centre of the 5c piece and stuck another 5c piece on top.  I then adhered the sack image to the 5c piece with another dimensional.

I attached the image of santa at one end of the slot using dimensionals.

I stamped the greeting from the Star of Light stamp set with Basic Black ink onto Whisper White card and cut it out with the banner from the Bunch of Banners set.  Using Real Red cardstock, I then cut the banner from the Cupcake Cutouts Framelits, folded it and attached the greeting before adhering it to the card front with dimensionals.

Thank you for visiting
'Til next time!
Stephanie

Product List - To shop in my online store, click on a product image below (Australian Residents only)