Sunday 30 September 2018

Wild About You Giraffe

Well, I'll admit that when I received the Animal Outing stamp set as a gift from Stampin' Up at On Stage in April, I was grateful for the freebie but not "wild about" the stamp set and it has languished, unused, on the shelf ever since.
#thecraftythinker  #animalouting  #boyscard  #stampinup  #cardmaking  #rubberstamping , Animal Outing, Rooted in Nature, Boy's card, Giraffe card, Stampin' Up Australia Demonstrator, Stephanie Fischer, Sydney NSW
Card for a young boy with a leaf-eating giraffe

However, it caught my eye while I was looking for something appropriate for my small great nephew's birthday card and suddenly the possibilities started rolling into my mind!

I've combined it with the branch from the Seasonal Layers Thinlits and leaves stamped and cut out with the Rooted In Nature bundle.

I never bought the Animal Friends Thinlits that coordinate with the Animal Outing stamp set and didn't feel inclined to fussy cut the giraffe, so I stamped him with Soft Suede ink directly onto the Balmy Blue cardstock.  Of course, this created something of a colouring challenge - I didn't want an overly dark giraffe but, then again, nor did I want him to be green! Hopefully, he looks sufficiently giraffe-like!

Thank you for visiting.
'Til next time!
Stephanie

Product List - All available in my online store

Friday 28 September 2018

Very Vintage - Black & Gold

I've revisited one of my true loves - black and gold!  Broadway Bound  Designer Series Paper, Gold Cord and shimmer paint are like seventh heaven for me!
#thecraftythinker  #stampinup  #cardmaking  #shimmerpaint  #stampingwithshimmerpaint  #veryvintage , Shimmer Paint, Black & Gold card, Stamping with Shimmer Paint, Very Vintage, Stampin Up Australia Demonstrator, Stephanie Fischer, Sydney NSW
The glamourous shine is hard to capture - stamping with two of the Shimmer paints

This gorgeous stamp set is a Host set, available for purchase with Stampin' Rewards from orders of $250.  The best way to qualify is to host a party - either in person or online.

#thecraftythinker  #stampinup  #cardmaking  #shimmerpaint  #stampingwithshimmerpaint  #veryvintage , Shimmer Paint, Black & Gold card, Stamping with Shimmer Paint, Very Vintage, Stampin Up Australia Demonstrator, Stephanie Fischer, Sydney NSW
A close up to try to capture the glow of the Vegas Gold Shimmer Paint
and the sparkly glitter of the Champagne Mist Shimmer Paint
This post is worth visiting if you'd like to know more about stamping with Shimmer Paint.

Thank you for visiting.
'Til next time!
Stephanie

Product List - All available in my online store

Wednesday 26 September 2018

A Beautiful Shimmery Bauble Under The Mistletoe

This is another of the stenciled baubles I made the other day with my home made stencil and Vegas Gold Shimmer Paint.  All the instructions can be found here.
#thecraftythinker  #stampinup  #christmascard  #xmascard  #homemadestencil  #cardmaking , Christmas card, home made stencil, Shimmer Paint, Stampin' Up Australia Demonstrator, Stephanie Fischer, Sydney NSW
A traditional Christmas card made with a home made stencil and some Shimmer Paint

Although my photos don't really show it, the basket weave pattern on the white square has been sponged with Frost White Shimmer Paint for even more glamour.
#thecraftythinker  #stampinup  #christmascard  #xmascard  #homemadestencil  #cardmaking , Christmas card, home made stencil, Shimmer Paint, Stampin' Up Australia Demonstrator, Stephanie Fischer, Sydney NSW
This photo almost, but not quite, captures the Frost White Shimmer on the basket weave
The two embossing folders used for this card are Subtle and Basket Weave.  You'll find a complete list of products below.

Thank you for visiting.
'Til next time!
Stephanie

Product List - All available in my online store

Sunday 23 September 2018

Crazy Crafters Blog Hop with Special Guest: Sarah Berry

Image may contain: text
Welcome to the Crazy Crafters' Blog Hop with our Special Guest stamper, Sarah Berry - we are thrilled to have Sarah join us this month and so excited to CASE (Copy And Selectively Edit) any project that has been created by her.

Whether you are starting the blog hop here at my blog, Stephanie Fischer - The Crafty Thinker, or have come from the person before me, be sure to click on the person listed under me further down the page to continue your journey through the blog hop.

To the left is Sarah's gorgeous card that I chose to CASE.  It was a very difficult choice - I found so many of her cards that I admire!  I love the neutral colours in this card that form the perfect backing to the pop of colour.  I also love the layout and simplicity and the background of repeating stamped images ... well, the list of what I like about it could go and on!

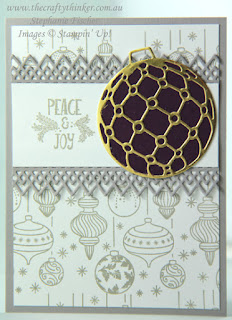
I decided to take the basic premise of Sarah's card and make a Christmas card using the Beautiful Baubles bundle (Beautiful Baubles stamp set and Detailed Baubles dies sold together at a saving of 10%).
#thecraftythinker  #stampinup  #christmascard  #cardmaking  #beautifulbaubles #crazycraftersbloghop , Christmas card, Crazy Crafters Blog Hop, Beautiful Baubles, Stampin Up Australia Demonstrator, Stephanie Fischer, Sydney NSW
A neutral coloured Christmas card with a pop of colour
Sarah used the lovely soft, warm neutral, Sahara Sand for her romantic card.  I chose the slightly cooler Granite Gray to go with the Christmas theme.

I was gratified by how quickly and easily the card came together.  I probably spent the most time tying the little knot in the Gold Cord and then keeping it in place with the application of some glue.  So I made another four in a variety of colours.  In order to keep them simple, easy to post and with minimised product cost, I omitted the Gold Cord and and Metallic Pearls and I'm still happy with the result.  I'll be making quite a few more of these as I need to make a lot of Christmas cards in a short space of time.
#thecraftythinker  #stampinup  #christmascard  #cardmaking  #beautifulbaubles #crazycraftersbloghop , Christmas card, Crazy Crafters Blog Hop, Beautiful Baubles, Stampin Up Australia Demonstrator, Stephanie Fischer, Sydney NSW
This design is brilliant for making multiple Christmas cards quickly and easily
#thecraftythinker  #stampinup  #christmascard  #cardmaking  #beautifulbaubles #crazycraftersbloghop , Christmas card, Crazy Crafters Blog Hop, Beautiful Baubles, Stampin Up Australia Demonstrator, Stephanie Fischer, Sydney NSW
A Blackberry Bliss version
#thecraftythinker  #stampinup  #christmascard  #cardmaking  #beautifulbaubles #crazycraftersbloghop , Christmas card, Crazy Crafters Blog Hop, Beautiful Baubles, Stampin Up Australia Demonstrator, Stephanie Fischer, Sydney NSW
With Real Red
                           
#thecraftythinker  #stampinup  #christmascard  #cardmaking  #beautifulbaubles #crazycraftersbloghop , Christmas card, Crazy Crafters Blog Hop, Beautiful Baubles, Stampin Up Australia Demonstrator, Stephanie Fischer, Sydney NSW
Night of Navy
#thecraftythinker  #stampinup  #christmascard  #cardmaking  #beautifulbaubles #crazycraftersbloghop , Christmas card, Crazy Crafters Blog Hop, Beautiful Baubles, Stampin Up Australia Demonstrator, Stephanie Fischer, Sydney NSW
Tranquil Tide

Thanks for following our blog hop.  Remember that currently you are at my blog - Stephanie Fischer - so click on the next name in the list to ensure that you don't miss out on seeing any of the blogs and the amazing inspiration that they contain.

Thanks for visiting.
'Til next time!
Stephanie


Product List - All available in my online store

Friday 21 September 2018

Ink it! Stamp it! Design Team Blog Hop: 3D Project - Christmas Table Favours

Image may contain: text

Welcome to the Ink It! Stamp It! Design Team Blog Hop - we hop every month so be sure to pop back and visit us again!  Today our theme is: 3D Project.  
You are currently at my page - Stephanie Fischer, The Crafty Thinker.  At the end of my post there is a full line of team members, please click on the name after mine in the list to continue the hop.


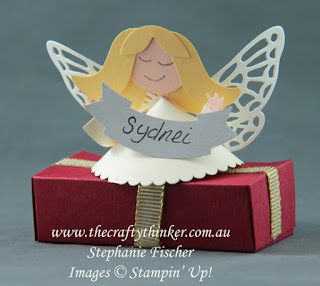
A couple of trays of angels ready for the Christmas table!
I'll be honest, 3D projects are not generally "my thing" but I do like to make something for the Christmas table every year - so here goes!
#thecraftythinker  #inkitstampitbloghop  #stampinup  #3dangel  #christmastablefavour  #christmasplacename  #punchartangel  , 3D angel, Christmas table favour, Christmas place name, Punch art Angel, Stampin' Up Australia Demonstrator, Stephanie Fischer, Sydney NSW
A little 3D angel place name holder for my Christmas table
I always like to make something for each table setting that has the place name and a little gift inside.  Last year it was lip salve, this year I've returned to chocolate!

These are the ingredients for the angel: the largest of the scalloped Layering Circles dies, the wings from the Springtime Impressions dies, 1" circle punch, Duet Banner Punch, Fox Builder Punch.

The colours I used are: Very Vanilla, Whisper White, Petal Pink, Smoky Slate and So Saffron.  This is a great way to use up that collection of little leftovers!
#thecraftythinker  #inkitstampitbloghop  #stampinup  #3dangel  #christmastablefavour  #christmasplacename  #punchartangel  , 3D angel, Christmas table favour, Christmas place name, Punch art Angel, Stampin' Up Australia Demonstrator, Stephanie Fischer, Sydney NSW
Ingredients for the 3D angel place name holder
    #thecraftythinker  #inkitstampitbloghop  #stampinup  #3dangel  #christmastablefavour  #christmasplacename  #punchartangel  , 3D angel, Christmas table favour, Christmas place name, Punch art Angel, Stampin' Up Australia Demonstrator, Stephanie Fischer, Sydney NSW
    This angel is waiting to go on top of the little box that I'll fill with chocolate
     - but at the last minute so it doesn't melt in the Christmas heat!
Instructions:
  1. For the dress/body Make a cone from the scalloped circle by cutting to the centre, wrapping and gluing.
  2. Assemble the head next:
  3. Attach one end of the Petal Pink strip to the back of the Petal Pink circle.
  4. Attach one of the So Saffron Fox Builder tails to the top of the head at the front.
  5. Repeat on the other side.
  6. Attach the fringe.
  7. Draw on the facial features as desired.
  8. Attach the remaining pieces of hair to the back of the head, placing glue only at the top of each piece.
  9. Glue the So Saffron circle to the back of the head.
  10. Glue the "neck" to the seam in the back of the dress, gently bending the head back to a good angle.
  11. Use a bone folder to gently curl back the wings a little.
  12. Slip the wings under the centre two pieces of hair at the back of the angel.  Glue the wings to the back of the dress, covering the neck attachment.  
  13. Glue a "hand" to the top of the cut edge of one half of a Very Vanilla Duet Banner
    Glueing the hand between the two sides of the sleeve
    The finished arm


  14. Glue the other half of the banner "sleeve" to sandwich the hand.
  15. Glue the sleeve to the dress, gently bending the arm out a bit.
  16. Repeat with the other arm.
  17. Write the place name on the Smoky Slate banner.  
  18. Place a glue dot to the back at bottom centre of the banner .
  19. Position the banner in an appropriate position in relation to the angel's hands and gently press to adhere glue dot to the dress.
#thecraftythinker  #inkitstampitbloghop  #stampinup  #3dangel  #christmastablefavour  #christmasplacename  #punchartangel  , 3D angel, Christmas table favour, Christmas place name, Punch art Angel, Stampin' Up Australia Demonstrator, Stephanie Fischer, Sydney NSW
The derriere of the 3d angel place name holder
#thecraftythinker  #inkitstampitbloghop  #stampinup  #3dangel  #christmastablefavour  #christmasplacename  #punchartangel  , 3D angel, Christmas table favour, Christmas place name, Punch art Angel, Stampin' Up Australia Demonstrator, Stephanie Fischer, Sydney NSW
This view shows the arm attachment


TIPS:

  • If, like me, you're making a lot of these - work in batches (cut everything, assemble all the heads, wrap all the dresses etc)
  • When cutting elements from the Fox Builder Punch, use strips of cardstock to save wastage.  EG  When cutting the hair, I used 3/4" wide strips which I fed into the punch from the right.  
  • Using strips of cardstock will also help save wastage when using the Duet Banner Punch.
  • For perfectionists - consider cutting two "sleeve" banners together (having carefully aligned them).  This way you can be sure that the "sleeve sandwich" will perfectly match when you glue them together with the hand between.
To attach the angel to the little box, I used two little bits of ribbon - one end glued inside the dress and the other to the box.
#thecraftythinker  #inkitstampitbloghop  #stampinup  #3dangel  #christmastablefavour  #christmasplacename  #punchartangel  , 3D angel, Christmas table favour, Christmas place name, Punch art Angel, Stampin' Up Australia Demonstrator, Stephanie Fischer, Sydney NSW
The angels will be attached to little boxes containing chocolate
#thecraftythinker  #inkitstampitbloghop  #stampinup  #3dangel  #christmastablefavour  #christmasplacename  #punchartangel  , 3D angel, Christmas table favour, Christmas place name, Punch art Angel, Stampin' Up Australia Demonstrator, Stephanie Fischer, Sydney NSW
I'll have to add the chocolate at the last moment so that it doesn't melt in the summer heat!
Since this post is already so long, I've not included the instructions for the box but am happy to supply it - just comment or email me.

Thank you so much for joining us today and we hope you'll join us again next month! I'm Stephanie Fischer and to keep hopping around see the list below to see who is up next with another great project.

Thanks for visiting
'Til next time
Stephanie


Product List - All available in my online store