Welcome to the Ink It! Stamp It! Design Team Blog Hop - we hop every month so be sure to pop back and visit us again! Today our theme is Technique.
If there's an actual name for this technique, I don't know what it is but I call it the Glitter Stencilling Technique.
 |
| Stencilling with blue and white glitter using Pattern Party Decorative Masks |
Warning: If you can't cope with unconstrained mess - this technique is probably not for you! No matter how hard I try to keep things clean and controlled; no matter how quickly I use the vacuum cleaner or step on old towels in the door of my craft room - the glitter spreads and pretty soon I'm finding it all over the house!
Instructions:
Step 1: Apply Multipurpose Adhesive Sheet to one side of your chosen cardstock (I've used Whisper White).
Step 2: Cut your desired shape using punch, die or trimmer. (I've used Layering Circle and Sweet and Sassy framelits)
Step 3: Remove the protective cover to reveal the adhesive. Place sticky side up on a piece of scrap paper (to catch the glitter) Tip: Try not to touch the adhesive
Step 4: Apply a thin layer of soap to the back of your chosen stencil. This will prevent the stencil from sticking too firmly to the adhesive. Tip: Time and care taken on this step will pay dividends! I like to moisten a small bar of soap with my fingers until it produces a creamy lather and then carefully spread it onto the mask with my fingers. If necessary, I remove any soap that finds its way to the front of the mask.
Step 5: Lay the mask, soap side down, onto the sticky shape.
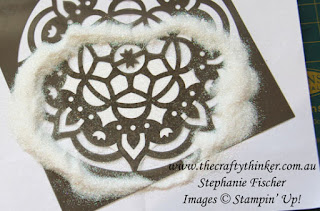
Step 6: Tip some glitter on top - be generous. Tip: Use very fine glitter (the finer the glitter, the more consistent the coverage). You'll need two colours of glitter.
 |
| Glitter Stencilling step 6 - adding the first glitter |
Step 7: Use clean, dry fingers to press the glitter down through the mask. Use small circular motions to ensure complete coverage over the project. Tip: Take your time to "burnish" the glitter well.
 |
| Glitter Stencilling Step 7, burnishing the first glitter colour |
Step 8: Tap off all the excess glitter and put it away then carefully remove the mask/stencil. Tip: I like to work in gently from the edges. Avoid touching the adhesive.
 |
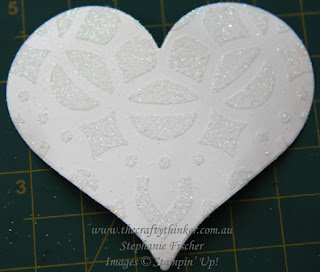
| Glitter Stencilling Step 8 - the mask has been removed to reveal the rest of the adhesive |
Step 9: Place the project on a clean piece of scrap paper to catch the glitter and then pour the second colour of glitter on top of the project. Tip: You will probably be a little nervous the first time you do this but don't worry - the second glitter will stick to the newly revealed adhesive.
 |
| Glitter Stencilling Step 9 - pouring the second colour of glitter on top of the first |
Step 10: Press and "burnish" (use those small circular movements) the glitter onto the project.
Step 11: Tap off the excess glitter and put it away for next time.
Step 12: Burnish or polish the project a little more with your finger to ensure that all the glitter is well adhered and enhance the shine.
 |
| Glitter Stencilling |
 |
| I added more glitter to the embossed panel by using the Fine Tip Glue Pen on the embossed stars |
Here's the card I made with the red and gold circle.
 |
| Christmas card using traditional colours in Glitter Stencilling and the Garden Trellis embossing folder |
Same method with different colours.
 |
| Glitter Stencilling Step 7, burnishing on the first colour of glitter through the stencil |
 |
| Glitter Stencilling Step 9, adding the second colour of glitter on top of the first |
 |
| The aftermath! Not a technique for anyone unwilling to find a bit glitter all over the house. |
 |
| The little bow on this Christmas Card is cut with a die from the Santa's Sleigh Thinlits |
Both cards were finished with pine pieces cut in Tranquil Tide and Lemon Lime Twist using Christmas Staircase dies. The labels are made with the Labels To Love and Hearts Come Home stamp sets. They're cut with the Everyday Label Punch.
I hope you've enjoyed this this project and I welcome your comments.
Thank you so much for joining us today. We hope you'll join us again next month for our Christmas projects! I'm Stephanie Fischer and to keep hopping around see the list below to see who is up next with another great project .
Thanks for visiting
'Til next time
Stephanie
'Til next time
Stephanie
Product List


Ohhhh wow!!! Great technique & tutorial Stephanie
ReplyDeleteThank you, Carolina!
DeleteOMG Stephanie, this looks amazing! I MUST try this! I MUST!
ReplyDeleteThank you, Kim! Just be prepared for the glitter spread effect!
DeleteWow Stephanie. Amazing cards and technique. Thanks for sharing the detailed steps. I'd love to try this, but not sure a carpeted craft room would be the best place to try this out :)
ReplyDeleteThank you, Kirsten. I kind of feel that the type of flooring doesn't make much difference - the glitter ends up all over the house anyway!
DeleteStephanie the card is so pretty.
ReplyDeleteI just have to tell you that every time I see your name I think of my granddaughter. Her first and last name is exactly like yours! Fischer, is her married name.
Lovely to hear from you, Lora! What a coincidence! I've been a Fischer for nearly 30 years now and I certainly wish as much happiness for your granddaughter! Funnily enough, there's another lady with the same name living in the same area as me - apparently there are more of us than one might think!
DeleteWow! Love this! Beautiful cards!
ReplyDeleteThank you, Nikkirae, for your very welcome comment!
DeleteWow....that's great Stephanie.....now I have a heap of ideas.....thanks for the inspiration
ReplyDeleteThank you, Vicki and you're welcome!
Delete