Showing posts with label Butterflies Thinlits. Show all posts

Sunday, 14 August 2016

Crazy Crafters Blog Hop with Jennifer Michalski - Bold Butterflies

Welcome to the Crazy Crafters Blog Hop with our Special Guest stamper, the very talented Jennifer Michalski - we are thrilled to have her join us this month and so excited to CASE (Copy And Selectively Edit) any project that has been created by her.  We hope you find great inspiration from the projects.

http://stampingserenity.blogspot.com.au/2016/07/sweet-sassy-for-ppa310.htmlWhether you are starting the blog hop here at my blog, Stephanie Fischer - The Crafty Thinker, or have come from the person before me, be sure to click on the person listed under me further down the page to continue your journey on this blog hop.


This is Jennifer's card that I have chosen to CASE.  I like the colour combination of Dapper Denim and Peekaboo Peach and also the simplicity of the design.  To see more details about Jennifer's card, click on the image to link to her blog.

For my card, I kept the colour combination and the basic layout design.

This is my CASE of Jennifer's card.
Stampin Up, #thecraftythinker, #crazycraftersbloghop, Bold Butterflies, Stampin Up Australia Demonstrator
Dapper Denim and Peekaboo Peach make good companions for each other!


I exchanged butterflies for hearts, changed to the Seaside embossing folder and used Ruched Ribbon rather than a die cut.

The top butterfly is adhered flat to the card front, the middle butterfly is popped up on a layer of dimensionals and the lower butterfly has a double layer of dimensionals.  

The greeting is from Teeny Tiny Sentiments stamped in Peekaboo Peach on Whisper White cardstock that has been cut with one of the dies from Bunch of Banners.

I hope you've enjoyed this card and I welcome your comments. 

Thanks for following our blog hop. Remember that currently you are at my blog - Stephanie Fischer - so click on the next name in the list to ensure that you don't miss out of seeing any of the blogs and the amazing inspiration they contain.

'Til next time
Stephanie

Product List - To shop in my online store - click on a product image below (Australian Residents only)

Wednesday, 20 July 2016

Floral Butterfly Wishes

Am I odd or does anyone else keep the leftover pieces of paper when they make an envelope with the Envelope Punch Board?  I just think that the Envelope paper is too pretty to waste!
Stampin Up, #thecraftythinker, Detailed Floral Thinlits, Butterfly, Envelope Paper, Vellum, Stampin Up Australia Demonstrator
Just can't waste any of that pretty Envelope Paper!

I made a Rich Razzleberry card and added a layer of Sweet Sugarplum (they go so well together!)  I then added a piece of leftover Sweet Sugarplum Envelope Paper and some strips of Rich Razzleberry - one embossed with Softy Falling and the other with the Seaside embossing folder.  I sponged the horizontal edges of the Seaside panel with Basic Black ink.

I cut a butterfly with the Butterflies Thinlits and sponged the edges with Basic Black ink.  I drew in the body with a Basic Black Stampin' Write marker and added a Rhinestone for its head.  I then coloured some more rhinestones with a black Sharpie before adding them to the body.  I then curled the wings a little with a bone folder and adhered the body to the front of the card.

I cut some Sweet Sugarplum card with the Detailed Florals thinlits and adhered that to a piece of Vellum.  I then used one of the Layering Circles framelits to cut out a patterned disc.  I cut a piece of Whisper White card to size and then used the same circle framelit to cut one end so that it fits snugly up against the floral disc.  I used Rich Razzleberry ink to stamp a greeting from Butterfly Basics and added a Rhinestone in the corner.

Thank you for your visit
'Til next time
Stephanie

 Product List - Click on a product image below to shop in my online store (Australian Residents only)

Tuesday, 5 April 2016

Swallowtail black and gold twisted easel

I so enjoyed making the swallowtail tri-fold a few days ago that I decided to make another card featuring the Swallowtail stamp and the Gold Fancy Foil Designer Vellum!
SU, Swallowtail, Twisted Easel Card, Fancy Foil Vellum, Bleaching
It's easier to see where I used the bleach in this close up.

This is a birthday card for my loving mother-in-law who loves the drama and elegance of black especially combined with metallics or red.  For her 85th last year I used black and silver so I've changed to gold this year!

I heat embossed the Swallowtail stamp in clear onto Basic Black cardstock.  I then bleached it before adding Gold Wink of Stella.  It's so shimmery and glamorous in person but really hard to photograph!  I had been pondering what to do next with the swallowtail and was thinking of some sort of Out of the Box die cut again but once it had its coat of gold I knew I was going to fussy cut it.

SU, Swallowtail, Twisted Easel Card, Fancy Foil Vellum, Bleaching
The greeting is from Birthday Blossoms

This time I've made a 5.5" twisted easel card (instructions below) and have been able to use the entire butterfly image!  

To hold the card open, I've made a black and gold butterfly with the Butterflies Thinlits and Bold Butterflies Framelits and popped it onto a Dimensional.  The bottom layer is Basic Black and the top (filigree) is cut from Gold Foil Sheet.  Since I still haven't restocked my supply of Black Candy Dots (!), I followed the sage advice that Cheryl Algie provided in her comment on my Black Gold and Vellum card and used a Sharpie on some Basic Rhinestone Jewels to produce lovely black embellishments!  Thank you Cheryl!

Some of you may be wondering how I invisibly adhered the vellum - especially the sheet with the little hearts.  The answer is:  I wrapped the vellum around pieces of Gold Foil Sheet and stuck it down at the back.  But then, won't that show and look ugly from the back in that top corner?  Well, yes, it would - so I put a piece of black cardstock on the back to cover it all up!

(I know it must be time to stop writing and get some sleep when I start having entire conversations with myself - in print!)
SU, Swallowtail, Twisted Easel Card, Fancy Foil Vellum, Bleaching
Black and Gold is such a class combination!


Basic instructions and sizes:
  • Cut a piece of A4 black cardstock to 11" x 5.5"
  • Score at the half way point ie 5.5"
  • On the front of the card only, score diagonally from the bottom left (closest to the fold) to top right corner..
  • Fold down on this scoreline to create a mountain fold.
  • Cut a piece of Gold Foil Sheet to 5.25" square.
  • Cut a piece of Fancy Gold Foil vellum to 5.75" and place face down onto the work surface.
  • Place glue close to the edges on the back of the foil sheet.
  • Place the foil sheet face down into the centre of the vellum sheet.
  • Fold the edges of the vellum over the foil sheet and press to adhere it firmly.  (You may find this easier if you score the vellum first)
  • (For the vellum piece for the front of the card only) - cut a piece of black cardstock to 5.25" square (or whatever size is appropriate for your project) and adhere to back of gold foil sheet to hide the untidy edges of vellum.

SU, Swallowtail, twisted easel card, vellum, fun fold, black and gold
The closed card

Thank you for visiting.

'Til next time
Stephanie

If you would like to visit my online store, click on a product image below.
Product List

Saturday, 20 June 2015

Crazy Crafters Blog Hop - June 2015


Welcome to the Crazy Crafters blog hop for June. This month we are excited to show off our favourite Stampin’ Up! products from the just released 2015 – 2016 Annual Catalogue. We hope you find great inspiration from the projects. Get your wish list ready! 

You may just be starting the blog hop here at my blog - Stephanie Fischer - or may have come from the person before me in the list below. If you get off track at any time, the full line-up below will help you move along from blog to blog so you see all the projects. At the moment you are visiting Stephanie Fischer, The Crafty Thinker. 

It's no secret that I have LOTS of favourites in the new Catalogue but perhaps my most favourite is the Watercolour Wings stamp set.  Why?  Because it's so versatile and that's what I look for in my purchases!  It combines beautifully with Butterfly Basics and both of the matching die sets - Butterflies Thinlits and the new Bold Butterfly Framelits.  In fact I love this set so much that I made two projects for this blog hop!

SU, Latch card, fun fold, Stampin Up, Butterfly Basics, Heat Embossing
Bleach technique, sponging. Best Thoughts & Watercolour Wings stamp sets
The first is a simple latch card - thank you to Dina Kowal at Splitcoaststampers for the great tutorial.  I heat embossed the flower image from Best Thoughts and "reverse coloured" by painting with bleach, using more bleach in some areas than others to for shading and highlights.  I stamped the Watercolour Wings butterflies twice, cutting one with the plain die and one with the matching filligree die.  I then glued the two layers together at the centre and adhered them onto the floral base, popping up the wings on dimensionals. 
SU, Latch card, fun fold, Stampin Up, Butterfly Basics, Heat Embossing
Inside
The colours I used are Island Indigo, Bermuda Bay and Pool Party.  I stamped the butterflies in these colours onto Soft Sky cardstock.  The butterfly bodies are Soft Suede.  I decorated the latch edge of the card with the Boho Chic embossing folder - using just the end and carefully embossing twice in order to cover the entire length of the card (the only way I could fit it all through the big shot as my card is quite large).

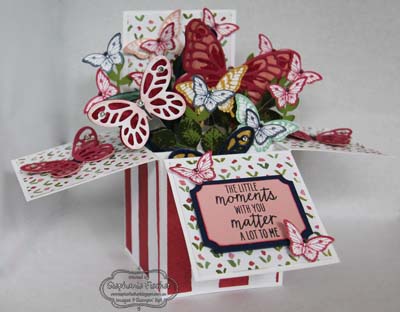
SU, Kinda Eclectic, Butterfly Basics, English Garden DSP PaperThe second is a card in a box.  I made it with the new thick Whisper White card stock (so it's VERY sturdy!) which I decorated with English Garden DSP and filled with a variety of butterflies and foliage.   

The sentiment from Watercolour Wings is stamped onto Blushing Bride card and cut out with the Tags & Labels Framelits. I stuck that onto a slightly larger Night of Navy layer.  

Foliage is from Kinda Eclectic (hand cut) and the Bird Builder Punch.  

All the colours are drawn from the English Garden DSP.
 
I hope you've enjoyed these projects, I would really welcome your comments.

Thanks for taking part in our blog hop, there are so many amazing ideas and inspiration you don't want to miss. Remember that currently you are at my blog - Stephanie Fischer, so check the blog hop line up list to see who is next in the list as you don't want to miss out on seeing any of the blogs and the amazing inspiration they contain.

Built for Free Using: My Stampin Blog