Showing posts with label Classic Label Punch. Show all posts

Sunday, 12 May 2019

Negative Space Frosted Bouquet Butterfly

It's been a scary week for me.  As I shakily set out on my breast cancer journey, I think this card is a timely reminder to look for the beauty in the negative.

As some of you may know, I tend to hang on to bits and pieces "because they might be useful later"!  So long ago now that I can't even remember it (although my son would tell you that doesn't really narrow things down too far!) I cut a black sprig from a scrap piece of cardstock.  Then I looked at the negative piece and thought it might be useful later!
#thecraftythinker #stampinup #cardmaking #diecutnegativespaces #frostedbouquet , Using the negative spaces of die cuts, Frosted Bouquet, Stampin' Up Australia Demonstrator,Stephanie Fischer, Sydney NSW
A beautiful negative: Frosted Bouquet Die

So here it is - later has arrived!  I trimmed the scrap into a neat rectangle with one of the Stitched Rectangle dies and then layered it onto some Champagne Foil Sheet.

Then there's another black layer that I ran though the Big Shot with the Subtle embossing folder and a little edge of Champagne Foil (I always cut out the middle to use for other projects).
#thecraftythinker #stampinup #cardmaking #diecutnegativespaces #frostedbouquet , Using the negative spaces of die cuts, Frosted Bouquet, Stampin' Up Australia Demonstrator,Stephanie Fischer, Sydney NSW
Discarded pieces from die-cutting can be turned into pretty cards

I added a wrapping of black ribbon before adhering it all to the Basic Black card front.

The greeting is from Itty Bitty Greetings and is cut out with the Classic Label Punch.  I used this method to shorten it.

I used Stazon ink to stamp just a small butterfly from the Butterfly Gala stamp set and then used the coordinating Butterfly Bouquet punch to punch it out and also a second, unstamped butterfly.  I adhered these to the card, using bits of Stampin' Dimensional to pop up the wings of the stamped butterfly.

Then I went crazy with gold Metallic Pearls!

I rather liked the result, so I made a variant that includes some butterfly themed paper that I had left from Saleabration.  Now I've got a little black sprig die cut that might be useful later .....!
#thecraftythinker #stampinup #cardmaking #diecutnegativespaces #frostedbouquet , Using the negative spaces of die cuts, Frosted Bouquet, Stampin' Up Australia Demonstrator,Stephanie Fischer, Sydney NSW
Using the negative space to create a pretty card when die-cutting

Thank you for visiting.
'Til next time!
Stephanie

Product List - All products available for purchase in my online store

Monday, 17 October 2016

Pretty Pink Paisley

I CASEd this card from this one that I made a few weeks ago that I liked so much I have been unable to part with it! 
Stampin Up, #thecraftythinker, Paisleys & Posies, Mini Tassel, Stampin Up Australia Demonstrator Stephanie Fischer, NSW
The sequins are from the Project Life Good Vibes Accessory Pack

This time I used a silver tassel and some Pink Pirouette.

Stampin Up, #thecraftythinker, Paisleys & Posies, Mini Tassel, Stampin Up Australia Demonstrator Stephanie Fischer, NSW
The inside of the card is also decorated with the Paisley motif

Stampin Up, #thecraftythinker, Paisleys & Posies, Mini Tassel, Stampin Up Australia Demonstrator Stephanie Fischer, NSW
This time I placed another paisley decoration under the flap instead of a greeting

Thank you for visiting.
'Til next time!
Stephanie

Product List - To visit my online store, click on a product image below (Australian Residents only)

Monday, 25 July 2016

A Playful Palette of Detailed Florals

I suppose we all have favourites and I have to admit that the Playful Palette Designer Series Paper does not feature as one of my favourites.  I think the colour combinations and patterns aren't a natural fit for my style - so I find it quite challenging.

Stampin Up, #thecraftythinker, Detailed Floral Thinlits, Layered Card, Playful Palette DSP, Stampin Up Australia Demonstrator
I think the bold patterns of the DSP are detracting from the beauty of the oval panel.


I was determined to used some of that paper when I made this card - but I really do think I would have preferred it without!

The main colours in the card are Peekaboo Peach, Cajun Craze and Basic Black.

I cut a panel of Cajun Craze with the Detailed Floral Thinlits and layers that onto a piece of Peekaboo Peach before cutting it out with one of the Layering Oval Framelits.  I then added a Peekaboo Peach frame cut with the same Oval framelit and one the next size down.  I adhered that oval to a Basic Black rectanble and added some Rhinestones and Enamel Shapes.  I cut a banner from the DSP and Cajun Craze and added a piece of Peekaboo Peach Ruched Ribbon.  I also added a bow made with the same ribbon.  There is also a darker panel of the Playful Palette DSP.  The man card is 5.5" square, layered with some Peekaboo Peach card.

The greeting is from Sunburst Sayings and I cut it out with the Classic Label Punch. 

Sometimes the smallest things can make a big difference to the result.  I've included a photo below of the card before I added the Peekaboo Peach oval frame.  I thought it was finished and really didn't like the result.  So I tried adding the frame to the oval.  I still don't love this card, but I think it's acceptable now.  

I decided it was worth posting this little experiment here, particularly for newcomers to card-making, to show that there's very littled that can't be salvaged.  If you're feeling unhappy with a card, it's worth persevering and experimenting with little finishing touches or small changes to layout and you may be pleasantly surprised with the difference.

Stampin Up, #thecraftythinker, Detailed Floral Thinlits, Layered Card, Playful Palette DSP, Stampin Up Australia Demonstrator
This version of the card really bothered me.  I think the addition of the frame helped smooth over the clash of patterns
Thank you for visiting
'Til next time
Stephanie

Product List - To shop in my online store - click on a product image below (Australian Residents only)

Monday, 13 June 2016

Festive Sombrero

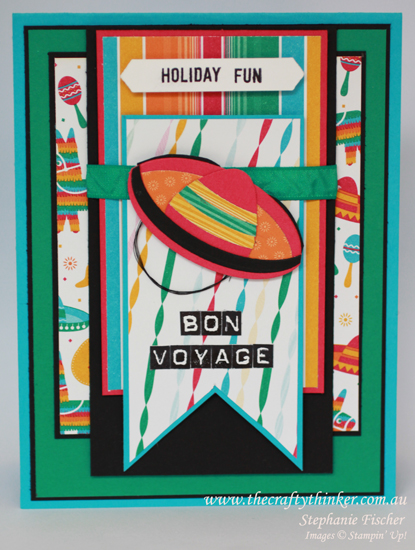
My friend, Margaret, and I have been studying Spanish together for about four years now and she's about to go to Mexico for a holiday.  How could I resist making her a Bon Voyage card with the Festive Birthday Designer Series Paper?!

Stampin Up, #thecraftythinker, layered card, sombrero, Festive Birthday, Stampin Up Australia Demonstrator
A very layered card with a "die-art" sombrero

The design of the card is very loosely based on a sketch I saw on Pinterest by Pam Callaghan for Chickaniddy Crafts.
Stampin Up, #thecraftythinker, layered card, sombrero, Festive Birthday, Stampin Up Australia Demonstrator
Pieces required for the sombrero
I don't have the stamp set or framelits that match this paper so, inspired by the sombreros on the paper, I set about making my own sombrero.  I used one of the Layering Ovals framelits and one of the shapes from the Blossom Builder punch.


Stampin Up, #thecraftythinker, layered card, sombrero, Festive Birthday, Stampin Up Australia Demonstrator
Positioning the oval die to trim off an edge
I first took an oval that I'd cut from another sheet of the DSP and used the same oval framelit to trim a little edge from each long side.  The resulting elipse formed the large brim of the hat. 

I then glued the piece of blossom builder (Melon Mambo) to the front edge of the elipse for form the crown of the hat.  Using the same method as before, I trimmed the long edge off one side of a Melon Mambo Oval and both from a Basic Black oval.  I kept only the edges of the black one.
Stampin Up, #thecraftythinker, layered card, sombrero, Festive Birthday, Stampin Up Australia Demonstrator
Elipse for the sombrero

To create the back turned up hat brim, I used the untrimmed edge of the Melon Mambo oval and lined up and adhered the main piece of hat, with the crown, a little lower to create the pink edge.  I then adhered a black edge behind the pink and trimmed where necessary.

I then used the remaining Melon Mambo and Basic Black strips to create the front edge of the hat and adhered them in position - just covering the "petal" edge of the hat crown.

To make the hat trim, I used the same oval framelit to cut strips of  DSP.  I decided to position them at the end though, so that I could make sure they lined up with the hat brim once I'd made it.  

I needed  to fill a bit more space, so I created a loop with Black Metallic Thread and stuck it to the back of the sombrero.

Stampin Up, #thecraftythinker, layered card, sombrero, Festive Birthday, Stampin Up Australia Demonstrator
The sombrero
The top greeting is created with two words in the Thoughtful Banners stamp set and I punched it out with the Classic Label Punch.

The Bon Voyage greeting was created with the Labeler Alphabet.  I stamped the letters, cut them out and stuck them to another piece of card.  I used the corner and edge of that piece of card to ensure that the letters were straight.  I then cut around each word and adhered it to the front of the card.  Since the letters are photopolymer, it's easy enough to line them and stamp a word at a time but I didn't want the white space between the letters.
Stampin Up, #thecraftythinker, layered card, sombrero, Festive Birthday, Stampin Up Australia Demonstrator
Layers & dimension!

I used Tempting Turquoise, Basic Black, Melon Mambo and Emerald Envy cardstock to create layers with a variety of the DSP patterns - there are a lot of layers and more than a few Dimensionals!  As I put it together I was thinking about Bruno Bertucci and Brian King who LOVE layers and dimensionals!

I hand cut the tails in the banner - only because they were too big for the Banner Triple Punch and I don't yet own the Banners Framelits (note the use of the word "yet"!"
 
Thanks for visiting
'Til next time

Stephanie

In order that I may provide you with VIP service - when setting up your account, please click "Yes" that you allow your Demonstrator to contact you.


Product List - To shop in my online store - click on one of the product images below (Australian Residents only)