 |
| A simple and elegant Christmas card featuring the Brightly Gleaming Suite, Copper Foil and Ornate Frames die |
This elegant Christmas card is virtually nil effort to make! The stunning Brightly Gleaming Specialty Designer Series Paper does all the heavy lifting!
The greeting is black heat embossed onto a scrap of Copper Foil Sheet and I cut it out with one of the Ornate Frame dies. I've included instructions below on how I made the contrast edge for it.
I cut a piece of Copper Foil Sheet with one of the Stitched Shapes dies and then glued it all into place. That's it!
TIPS:
I don't like to waste foil by having it hidden underneath other papers - so I cut out the centre and just glue the edge to the card before adhering the designer paper.
I always give foil sheet a really good wiping with my Embossing Buddy to make sure that the embossing powder only sticks where I want it to.
Take extra care when stamping the Versamark onto the foil sheet in order to avoid slipping and smudging.
This card template (and the Brightly Gleaming paper) is very versatile. I also made a Fathers' Day card using the Geared Up Bundle.
 |
| A Fathers' Day card featuring the Brightly Gleaming paper and Geared Up Garage Bundle |
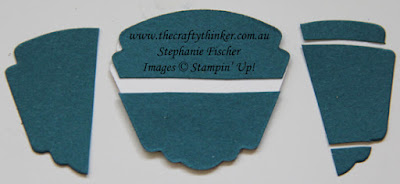
To add a contrasting edge to a punched or die cut label:
- Cut out your label (mine is one of the Garage Gears dies cut from Copper Foil Sheet)
- Cut two more in a contrasting colour (here I've used Pretty Peacock)
- Cut one of the contrasting labels in half horizontally
- Cut the other in half vertically
- Glue the top piece into position - offsetting it a fraction above the main (copper) label
- Glue to bottom piece into position - offsetting it a fraction below the main (copper) label
- Check to see whether the side pieces need any adjustment before gluing.
(In this case - I needed to remove the top and bottom to prevent messy overlap) - Glue the side pieces into position, offsetting as before.
 |
| Cutting & positioning: adding a contrasting edge to a punched or die cut label |
'Til next time!
Stephanie
Product List - All products available in my online store


Thanks for the instructions on cutting a contrasting edge - so helpful!
ReplyDeleteYou're so welcome, Raechel!
Delete