Showing posts with label 2016 Occasions Catalogue. Show all posts

Monday, 26 December 2016

Inside the Lines with Copper Wing Dragonfly


I just love this new pack of black and white paper perfect for colouring!  Colouring in is just so therapeutic!   I had fun colouring with the new Watercolour Pencils and an Aqua Painter but anything would work: watercolours, inks, markers, acrylics ...  What could be better than that?  It's FREE with a $90 purchase!!!  Contact me for more information about Sale-A-Bration.

I coloured an entire sheet.  On one half I left the background white and on the other half, I coloured the background blue.  
#thecraftythinker, Stampin Up, Sale-A-Bration, Inside The Lines, Dragonfly Dreams, Sneak Peek, Stampin Up Australia Demonstrator, Stephanie Fischer, Sydney NSW
At the end of this post I've included photos of the watercolour pencils blended with Clear Wink of Stella and the Blender Pen


I also experimented with blending the watercolour pencils with a Blender Pen and with a Clear Wink of Stella.  The Blender Pen worked like magic.  It moved the colour around so smoothly and easily.  The Wink of Stella didn't work out so well for me but I think it would have been better if I'd filled the area with watercolour pencil rather than trying to blend it out.
#thecraftythinker, Stampin Up, Sale-A-Bration, Inside The Lines, Dragonfly Dreams, Sneak Peek, Stampin Up Australia Demonstrator, Stephanie Fischer, Sydney NSW
The bee is part of the printing on this beautiful paper, the dragonfly has been cut out and added.

This is the first card I made with my freshly coloured paper.  I added a dragon fly with copper embossed vellum wings.This paper goes perfectly with the Dragonfly Dreams Bundle!
#thecraftythinker, Stampin Up, Sale-A-Bration, Inside The Lines, Dragonfly Dreams, Sneak Peek, Stampin Up Australia Demonstrator, Stephanie Fischer, Sydney NSW
The coloured card front is applied to the white base card with dimensionals for added interest.

I propped the wings up on little pieces of  Dimensionals for added pop.
#thecraftythinker, Stampin Up, Sale-A-Bration, Inside The Lines, Dragonfly Dreams, Sneak Peek, Stampin Up Australia Demonstrator, Stephanie Fischer, Sydney NSW
Graphic illustration of just how easy it is to use the Stampin' Up! Watercolour Pencils!

The photo above gives an idea of how simple it is to colour in this paper - no special knowledge or technique is required to get a nice effect.  I coloured in very roughly with the watercolour pencils and the Aqua Painter smoothed it all out!

On Wednesday (28 December) I'll be sharing the card I made with the area with the blue background.
#thecraftythinker, Stampin Up, Sale-A-Bration, Inside The Lines, Dragonfly Dreams, Sneak Peek, Stampin Up Australia Demonstrator, Stephanie Fischer, Sydney NSW
This flower was coloured in with the Watercolour Pencils and smoothed over with a Blender Pen

#thecraftythinker, Stampin Up, Sale-A-Bration, Inside The Lines, Dragonfly Dreams, Sneak Peek, Stampin Up Australia Demonstrator, Stephanie Fischer, Sydney NSW
This flower was coloured with the Watercolour Pencils in exactly the same way then blended with Clear Wink of Stella
Thank you for visiting.
'Til next time!
Stephanie

Product List - To visit my online store, click on one of the product images below (Australian Residents only)

Tuesday, 16 February 2016

Embossed Rose Garden - no stamping

SU, Rose Garden thinlit, embossing with a thinlit, card with no stamping
Embossing with a thinlit or framelit is very effective

This is another "no stamp" card.

I started by embossing the Rose Garden thinlit into Crushed Curry cardstock which I layered onto Cajun Craze cardstock before placing on my Early Espresso card.

I cut the label from the die in the Rose Garden thinlit set and adhered it to the card with dimensionals.

I cut the "hello" from the Greetings thinlits and trimmed it to fit into the label.  I added an Early Espresso Candy Dot to the centre of the "o" just to add a bit of depth.

The finishing touch was a bow made from Early Espresso Seam Binding ribbon.

The Early Espresso card is 5.5" square
The Cajun Craze layer is 5.25" square
The Crushed Curry layer is 4.75" square

To emboss with a die using a Big Shot
To achieve this effect you will need a Sizzix Rubber Mat and Impressions Pad.
Open the Big Shot Multipurpose Platform to Tab 1 and place a clear cutting plate on top of it.  Next, place your die on top with the cutting surface facing up.  Place your cardstock on top of the die and cover with the rubber mat.  Lastly, place the Impressions Pad on top and run it through the Big Shot.

'Til next time
Stephanie

Thursday, 4 February 2016

Kissing the Botanical Builder

It's never nice to make a sympathy card but, sadly, it's something that we need to do from time to time.

SU, Sympathy Card, Everything Eleanor, Birthday Blossoms
The flowers have quite a lot of depth.
I was demonstrating thekissing technique (pertaining only to stamping!) to my class this week and came home with the Everything Eleanor panel.  I decided to put it to good use in this card for a colleague who has suffered a bereavement.

I inked up the label image from Everything Eleanor with Smoky Slate ink and the floral image from Birthday Blossoms with Blackberry Bliss.  Then I kissed the floral stamp against the plain stamp.  The now patterned plain stamp was now ready to stamp onto Whisper White cardstock and afterwards I cut it out.

SU, Sympathy Card, Everything Eleanor, Birthday Blossoms
Using a bone folder, Simply Scored Stylus and Stampin Pierce Mat gives great depth to the flowers
I cut flowers and leaves with the Botanical Builders framelits from a Blackberry Bliss, Smoky Slate and Basic Grey cardstock.

I stamped the banner from Bloomin' Love in Blackberry Bliss onto Whisper White cardstock and then added the sentiment from Teeny Tiny Sentiments in Basic Grey before cutting it out with the Large Numbers framelits.

I layered Smoky Slate cardstock onto the Blackberry Bliss card followed by the Perfect Plum panel which I had embossed with the Elegant Dots embossing folder.

The finishing touches were a couple of Perfect Plum Candy Dots and some Rhinestone Jewels.

'Til next time
Stephanie
Built for Free Using: My Stampin Blog

Sunday, 20 December 2015

Crazy Crafters and Pootlers Blog Hop December 2015 - Occasions Catalogue Sneak Peek

Welcome to the Crazy Crafters Blog Hop for December. This is a very exciting Blog Hop - it's international - since we have the opportunity to mix with a wonderful and talented group called the Pootlers who are based in the UK. This month we are providing sneak peeks at the products in the new Occasions Catalogue. We hope you like our choices and find great inspiration from the projects.

You may just be starting the blog hop here at my blog - Stephanie Fischer, The Crafty Thinker - or you may have come from the person before me in the list. If you get off track at any time, the full lineup below will help you to move along from blog to blog so that you see all of the projects.
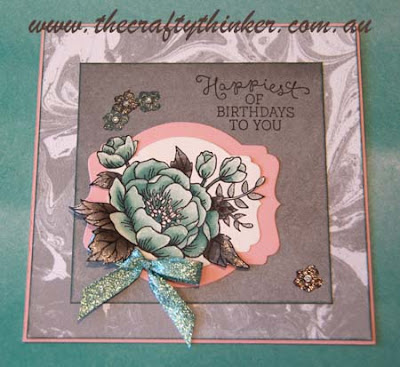
SU, 2016 Occasions Catalogue, New Occasions Catalogue, out of the box technique
Birthday Blooms stamp set & Perfectly Artistic DSP available from 5th January 2016
.
We are also combining our hop with a challenge of sorts - we were challenged to use just one: just one ink, one stamp set, one DSP set etc.  It was a great learning experience for me - I hadn't realised just how much I normally rely on using a mix of colours.  BUT there's sooo much to love in the new Occasions Catalogue that this imposed discipline really was a good thing!

My Just One is:
  • The Birthday Blooms stamp set (140658 available 5th January 2016 from the Occasions Catalogue)
  • Pool Party Glitter Ribbon (140561 available 5th January 2016 from the Occasions Catalogue)
  • Deco Labels Collection Framelits
  • Pool Party Ink
  • Perfectly Artistic DSP (141021 available FREE from  5th January to 15th February 2016 with an order of $90 of products)
To this I added a little black ink and some basic rhinestone jewels.
SU, 2016 Occasions Catalogue, New Occasions Catalogue, out of the box technique
Close up of the Wink of Stella glitter on the flowers
The glittery effect on the petals and leaves comes from the new Wink of Stella Glitter Brush in clear (141897 available 5th January 2016 from the Occasions Catalogue).  I LOVE this product because it makes it so easy to apply the glitter to exactly the spot you want it!

I stamped the flower onto Shimmery White cardstock (121717 available 5th January 2016 from the Occasions Catalogue) and watercoloured it using the Pool Party and black inks - I'm so excited about this cardstock and much prefer it to watercolour paper.

I hope you've enjoyed this card and I welcome your comments. 
SU, 2016 Occasions Catalogue, New Occasions Catalogue, out of the box technique
The Pool party glitter ribbon is just gorgeous.  The DSP is edged with Pool Party ink to match.
Thanks for taking part in our blog hop. Remember that currently you are at my blog - Stephanie Fischer - so check the blog hop line up list to see who is next in the list and click on their name as you don't want to miss out on seeing any of the blogs and the amazing inspiration they contain.

'Til next time
Stephanie
                                               
Sam Hammond Donald