Friday 31 July 2015

Dinosaur Hunt

Today I needed to make a birthday card for my pre-school age great-nephew.  I'm not sure what it says about me but this was my creative thought process:
"Must make a card for Hunter ... oooh, I haven't used those dinosaur stamps yet ... boys like dinosaurs ... Hunter ... T-Rex hunting vegesaurs" !!

SU, boy card, dinosaurs, Hunting dinosaur scene, Tin of Cards
Dinosaur scene - are they being hunted?
I like to think of the lead Triceratops saying to the other one "Run, Forest, Run!"

It all ends well though .... the T-Rex just wants to invite them to a birthday celebration!
SU, boy card, dinosaurs, Hunting dinosaur scene, Tin of cards
No, it's just a dinosaur birthday party!

I was a bit pressed for time, so it's a very simple card.  The base is Cajun Craze followed by a layer of Lost Lagoon and the stamped layer is Crushed Curry.

I stamped the leading Triceratops first and masked it.  Then stamped the second Triceratops and masked that too.  Then I stamped the tree, leaves and foreground dots (I'm not sure if they're footprints or rocky ground!).  Then I stamped the T-Rex and sentiment.  I stamped the T-Rex right in the corner to try to give a little more depth to my simple little scene.  I used Mossy Meadow ink.

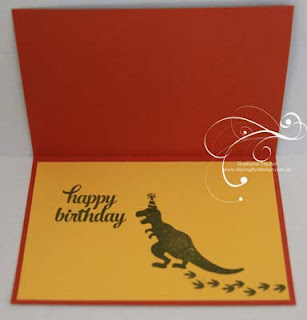
For the inside I stamped the T-Rex again, this time giving him a party hat and some foot prints.  The birthday sentiment is from the Tin of Cards set - it's one I use a lot.

I hope you like my simple little card - it was a lot of fun to make.  My mind is now spinning with more dinosaur scenes with more details (like a sky!).

Til next time
Stephanie

Built for Free Using: My Stampin Blog

Monday 27 July 2015

Timeless Love Wreath

SU, Kinda Eclectic, Butterfly Basics
Timeless Love stamped twice
I have a very simple card for you today.  For me it was mainly about the colour combination - I've always liked yellow and grey together. 
In this card, I stamped the flowers from Timeless Love twice to form a circle which I then cut and added a mat of Smoky Grey.  I watercoloured the flowers with Crushed Curry, Delightful Dijon, Mint Macaron and Wild Wasabi.

The base card is Crushed Curry topped with a panel of Basic Grey that I embossed with the Elegant Dots embossing folder.

Then I used up some leftover strips of Crushed Curry and Basic Grey to add some more interest.  Using black ink I stamped them with a variety of patterns from the Butterfly Basics, Kinda Eclectic and Bohemian Borders stamp sets.

Thanks for looking.
Stephanie

Saturday 18 July 2015

Crazy Crafters Blog Hop July 2015 - Favourite Colour Combo

 
Welcome to the Crazy Crafters blog hop for July.

You may just be starting the blog hop here at my blog or may have come from the person before me in the list below. If you get off track at any time, the full line-up below will help you move along from blog to blog so you see all the projects. At the moment you are visiting Stephanie Fischer, The Crafty Thinker.


This month we are excited to show off our favourite Stampin’ Up! colour combinations. We hope you find great inspiration from the projects. 

I have a confession - I don't really have a favourite colour combination ..... I just love colour!  One of the most attractive things about Stampin' Up! is that colours are carried through from ink to cardstock, patterned DSP, ribbons and embellishments.  So it's really easy to play with colours and combinations, which is one of my favourite occupations!

Sometimes I draw colour inspiration from a DSP (patterned paper) and sometimes I just pick up bits of cardstock and play with them.  That's what I did this time.  I really like the top four colours in combination - they give a lovely soft colour scheme.  But I wasn't really in a soft,  muted mood and wanted a bright and focussed splash which the Tangelo Twist provided.
SU, Stencil, Heat Embossing, 3D flower, Colour Combo
Leaves from Awesomely Artistic & Butterfly Basics. 
Flower inspired by Miriam Spiess.
The leaves (from Awesomely Artistic & Butterfly Basics) are stamped in Elegant Eggplant onto Tip Top Taupe cardstock then fussy cut.

The flower is made from Tangelo Twist (see Miriam Spiess' tutorial here).  The centre is filled with a little bit of white 3-D Puff paint sprinkled with Dazzling Diamonds glitter. I could have used one of those beautiful Metal Rimmed Pearls but I was experimenting!

The base card is Lost Lagoon with layers of Perfect Plum, Tip Top Taupe and Lost Lagoon.  Each of those layers is stuck to a layer of Elegant Eggplant cardstock that is just 1/16"  larger to give a very fine edge of the darker colour.

The top layer of Lost Lagoon was clear heat embossed.  To do this, I placed one of the stencils from Happy Patterns over the cardstock and patted my Versamark pad over it until I was satisfied with the coverage.  Then I removed the stencil, sprinkled on the clear embossing powder and heated it with the heat gun.  I placed a Rhinestone Jewel in each of the little circles.

There's a little bit of Tangelo Twist ribbon (now retired I'm sorry to say) to finish it all off. 
 
I hope you've enjoyed this project, I would really welcome your comments.


Thanks for taking part in our blog hop, there are so many amazing ideas and so much inspiration you don't want to miss. Remember that currently you are at my blog - Stephanie Fischer, so check the blog hop line up list to see who is next in the list and click on their name as you don't want to miss out on seeing any of the blogs and the amazing inspiration they contain. 

See you next time
Stephanie


Built for Free Using: My Stampin Blog

Thursday 2 July 2015

Splitcoaststampers Creative Crew Challenges - July 2015 - Part 2

LIFE'S A PICNIC

With the Northern Hemisphere heading into Summer, the focus this month is on the sights, smells, colours, places, food and family that Summer brings: Summer birthdays, graduations, family reunions, a day at the beach or just a backyard BBQ with family and friends!

Play along with the Creative Crew Challenges to get those creative juices flowing! 
See the Creative Crew Gallery here for further inspiration.

CCREW0715, CreativeCrew, SUO -Scrapbook & More Focus
A food or family Scrapbook Page, table favours, signs etc!
SU Vintage Leaves, Punch art grapes, bunch of grapes, Table Favour, thanksgiving
Curvy Keepsake box, A World of Thanks stamp, Vintage Leaves
I made a Curvy Keepsake Box with Perfect Plum cardstock, which I stamped with Versamark using the A World of Thanks stamp.
The leaf is made with the Vintage Leaves stamp set and matching Leaflets Framelits.  The grapes are lots of 1/2" circles punched from Rich Razzleberry cardstock and edged with Blackberry Bliss.  These are overlapped and stuck together to form a bunch on top of the leaf and I gave them a coating of Crystal Effects for shine.  I stuck my bunch of grapes to the box and finished it off with a bow of Tip Top Taupe Dotted Lace Ribbon.


CCREW0715, CreativeCrew, SUO - Holiday Focus
SU, Ice Cream Cone, Ribbon & bow, triple scoop icecream cone
Bohemian DSP with Early Espresso
& Delightful Dijon
Apparently July is National Ice Cream Month for our American friends who provided these fun facts:
1st July - Creative flavour day, how creative can you get with icecream?
7th July - Ice cream cone day
23 July - The ice cream cone's birthday.  It was invented in 1904, so the ice cream cone is 111 years old this year!

The ice cream cone is stamped onto Whisper White cardstock and coloured (I used the new thicker version because it stands up to watercolouring so well).  The cone is Crushed Curry and Delightful Dijon.  The ice cream flavours are Chocolate Chip, Watermelon Wonder and Mint Macaron. The cherry is (rather appropriately) Cherry Cobbler with a coat of Crystal Effects for shine.  The base cardstock is Early Espresso with panels of Delightful Dijon and Bohemian DSP.  The ribbon is Early Espresso Seam Binding.  I was inspired by this card by Sharon L Johnson.
Inspiration provided by this
card by Sharon L Johnson


Built for Free Using: My Stampin Blog

Splitcoaststampers Creative Crew Challenges - July 2015 - Part 1


LIFE'S A PICNIC


With the Northern Hemisphere heading into Summer, the focus this month is on the sights, smells, colours, places, food and family that Summer brings: Summer birthdays, graduations, family reunions, a day at the beach or just a backyard BBQ with family and friends!

Play along with the Creative Crew to get those creative juices flowing!
See the Creative Crew Gallery here for further inspiration.


SU Double Porthole Fun Fold, Fancy Fold, Fun Fold
Double Porthole card
CCREW0715CF, CreativeCrew, SUO - Catalog Focus
Anything foodie related, a stamp set, punches, you name it!

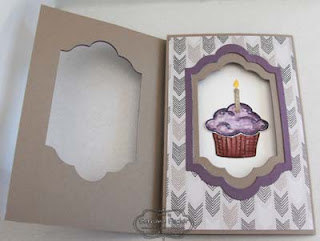
Sprinkles of Life really is turning into one of my "go to" stamp sets - I love it because it's so versatile!  Here I've stamped and coloured the image using Chocolate Chip, Perfect Plum and Elegant Eggplant.  The candle is Tip Top Taupe with a Daffodil Delight and Crushed Curry flame.  I added Dazzling Details to the icing. 

I really don't know what this fold should be called but I call it a double porthole.  The base cardstock is Tip Top Taupe with three designs from the Go Wild DSP stack.

How I did it:
  1. I started with a 6" x 12" piece of Tip Top Taupe which I scored at 4" and 8" (neatly dividing it into three).  
  2. I folded both sides in towards the centre, overlapping them with the left side on top.
  3. I adhered a piece of DSP to the top flap.
  4. I unfolded the card, used the second largest Lots of Labels framelit and carefully positioned it on top of the top flap and ran in through the Bigshot so that only the top layer was cut.
  5. Using Perfect Plum cardstock I cut a frame using the largest and second largest of the Lots of Labels framelits and adhered it to the front of the card.
  6. I refolded the card and lightly drew around the inside of the cut with a pencil to help me centre the die cut in the second flap.  
  7. I wanted to leave a frame of Tip Top Taupe showing around the inside edge when the card is closed.
  8. I opened out the card again and centred the third largest die in the set and ran it through the Bigshot.
  9. I cut a piece of DSP to size, held it in position on top of flap 2 (with the smaller die cut), folded the top flap over and lightly drew around the inside of the cut shape again.
  10. Then I placed the DSP in the Bigshot with the second largest die in position directly lined up with the pencil marks) and ran it through. 
  11. Then I adhered the DSP to the second flap, being careful to line it up with the die cut in the front flap.  So now I had decorated my second flap but still kept the Tip Top Taupe frame that I wanted. 
  12. I cut another Perfect Plum frame by repeating step 5 and adhered it to this second layer.
  13. I centred a piece of Whisper White to the inside of the card and then cut a third piece of DSP to size.  I didn't want any of this DSP to show when the card is closed, so I repeated steps 9 & 10 and then adhered this DSP to the Whisper White.
  14. I then added a Perfect Plum frame by repeating step 5.
  15. I then closed the card before I adhered the cupcake, to help me position it where I wanted within the frame I had just created for it.
  16. I placed a piece of Whisper White on the back of the card to provide somewhere to write a message.
    SU Double Porthole Fun Fold, Fancy Fold, Fun Fold
    Sprinkles of life & Go Wild DSP

    The sentiment is from Endless Birthday Wishes.  I stamped it in black onto a 1" strip of thick Whisper White and then trimmed just the ends with one of the Tags & Labels Framelits (I've included instructions for this below).  Then I edged the resulting label with Tip Top Taupe and attached a couple of Perfect Plum Candy Dots (even they sound foodie!).  I repeated the process with normal Whisper White cardstock (without the sentiment and candy dots!) but just a tad longer.  I adhered the longer layer with snail and then added the top layer with dimensionals.
  

SU Double Porthole Fun Fold, Fancy Fold, Fun Fold
Sprinkles of life, custom made label


Making a symetrical label with the Tags & Labels Framlits:
  1. I stamped my sentiment on a 1" strip of cardstock.  
  2. I then fed one end of the strip through the framelit so that only the end of the strip was under the cutting blade (making sure it was straight).  I cranked just that end through the Bigshot to avoid leaving any impressions on the rest of the strip.
  3. I then repeated the process on the other end of the strip.
Partial die-cutting, SU
Custom made
label, Step 3

Partial die-cutting, SU
Custom made
label, Step 2


Partial die-cutting, SU
Custom made label - to simply extend the length
of the die cut, stop at this step


CCREW0715DF, CreativeCrew, SUO - DSP/Colour Focus
Cucumber  Crush, Hello Honey and Watermelon Wonder - for more inspiration use the Cherry On Top DSP Stack!

OK, I'm going to be brutally honest here - I really don't like Cucumber Crush; either on its own or in combination.  So..... I've really struggled with this challenge. I'm not thrilled with my results but I'm happy that I managed to produce something.  I suppose the flowers, wall and leaf give it a very loose outdoors connection, then we have to make a leap to picnic!
SU Colour Me Irristable, Striped Scallop Thinlit, Cucumber Crush
Beautiful Bunch, Striped Scallop Thinlit
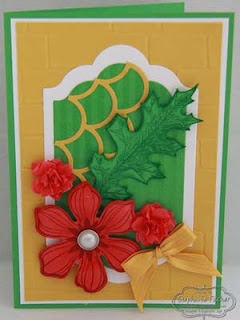
The base card is Cucumber Crush layered with Whisper White and Delightful Dijon (which was embossed with the Brick Wall embossing folder.  The two layers from Lots of Labels Framelits are Whisper White overlaid with the Cucumber Crush Colour Me Irresistable card.

The leaf is stamped in Garden Green onto Cucumber Crush using the Vintage Leaves stamp set and cut with the matching Leaflets Framelit.  I also added a little bit of Delightful Dijon cut with the Striped Scallop Thinlit.

The large flower is stamped with Cherry Cobbler ink onto Watermelon Wonder cardstock with the Beautiful Bunch stamp set and cut with the matching Fun Flower Punch.  I added the largest of the Metal Rimmed Pearls to the centre.

The two smaller flowers are cut from the Watermelon Wonder Cotton Paper with the Petite Petals Punch and then scrunched up around a really small brad.

I wanted to add a bow but didn't want to use the Dotted Lace Trim, so I used the now retired Stitched Satin Ribbon in Crushed Curry which seemed to do the trick.

The remaining two July Challenges follow in Part 2.


Built for Free Using: My Stampin Blog