Thursday 24 September 2015

Stencilled glitter Christmas cardsI

SU, Christmas card, Happy Patterns stencils, Jac paper
Everything except the glitter is from Stampin' Up!
This is a card that I made as a sample for one of the lessons in the nine week course I'll be teaching soon.

It uses die cutting and embossing using the Big Shot and a fun but messy technique with glitter!

To create the glittery ornament I first die cut a piece of double sided adhesive Jac paper using the Delicate Ornaments Thinlits Dies.  Having adhered one side to my label, I then peeled off the protective backing to reveal the sticky film.

I put a little soap onto the back of my stencil (in this case I used one of the Happy Patterns stencils) and placed it - soap side down - onto the sticky die cut (the soap is to make it easy to remove again).

Next I sprinkled on my first colour of glitter (in this case purple).  I rubbed it in well (burnished it) with my finger before removing all the excess glitter with a large, soft brush.  It's important to use ultra fine glitter for this technique.

The next step was to carefully remove the stencil, revealing the remaining sticky parts, which I then coated with the second colour of glitter (green) and rubbed in with my finger.  Don't worry - if you're careful to remove all the excess glitter, you won't up end up with contaminated glitter.

The last step was to add the little ornament top and a bow using the new glitter ribbon.

Here's another card I made using this glitter technique but this time I used one of the dies from the Delicate Ornaments set as the stencil.  The sentiment is from the matching Embellished Ornaments stamp set (available as a bundle with a saving of 15%).

SU, Christmas card, Happy Patterns stencils, Jac paper, Centre Step card
I used a die as the stencil when I added the glitter to the ornament
My nine week course is being held at Learning in the Hills, Baulkham Hills starting Tuesday 13th October.  Places are limited so if you'd like to attend call to book your place:  (02) 9639 7918
 
Built for Free Using: My Stampin Blog

Sunday 20 September 2015

Crazy Crafters Blog Hop September 2015 - Holiday Catalogue - Poinsettia


Welcome to the Crazy Crafters Blog Hop for September!  

You may be just starting the blog hop here at my blog or may have come from the person before me in the list below.  If you get off track at any time, the full line-up below will help you move along from blog to blog so you see all the projects.  At the moment you are visiting Stephanie Fischer, The Crafty Thinker.  

This month we are excited to showcase some of the fantastic new products in the Holiday Catalogue - what a feast!  

Where has the time gone?!!  The year is disappearing so quickly and many of us are already well into the joyous swing of Christmas/Seasonal Card  production!  I love this time of year.  Christmas cards seem to not only condone but encourage the use of bling, glitter and glitz and I can be as over the top as I like!
SU, Festive Flower Builder Punch, Poinsettia, Christmas card, Versatile Christmas
Easel Card featuring a poinsettia created with
the the Reason for the Season Bundle

Having said that, the card I've chosen to include in this blog hop is really quite restrained (for me!) and I decided not to use traditional Christmas colours - I think I haven't quite reached the red and green stage of the year yet! 

 For some reason, I'm making a lot of easel cards these days.  Maybe because they look quite impressive even though they're so quick and easy to make!

I made the card in Tip Top Taupe and added a panel of Early Espresso followed by a panel of Dazzling Diamonds Glimmer Paper.  

I stamped and punched two poinsettias using the Reason for the Season Bundle (a 15% saving as well as everything I need to make a beautiful flower!) and then intermingled the parts - one I stamped with Early Espresso on Tip Top Taupe card
SU, Festive Flower Builder Punch, Poinsettia, Christmas card, Versatile Christmas
Dimensionals add enough height to
keep the card propped open. 
 and the other I heat embossed with Gold onto Early Espresso Card.  I put a Metal Rimmed Pearl in the centre for a little more restrained bling. 

The sentiments are from Versatile Christmas - heat embossed in Gold onto Tip Top Taupe card and die cut with the Project Life Cards & Labels Framelits.

I "prettied-up" the strip of glimmer paper on the inside by trimming the ends with the smallest of the Deco Labels Collection Framelits.
SU, Festive Flower Builder Punch, Poinsettia, Christmas card, Versatile Christmas
Alternative colours for the card

Then I used the other poinsettia to make a second, similar card.

Afterwards I wished I'd mixed up the petals even a little bit more.

I hope you've enjoyed these cards, I would really welcome your comments.

Thanks for taking part in our blog hop, there are so many amazing ideas and so much inspiration that you don't want to miss.  Remember that currently you are my blog - Stephanie Fischer - so check the blog hop line up list to see who is next in line in the list and click on their name as you don't want to miss out on seeing any of the blogs and the amazing inspiration they contain.


Built for Free Using: My Stampin Blog

Tuesday 8 September 2015

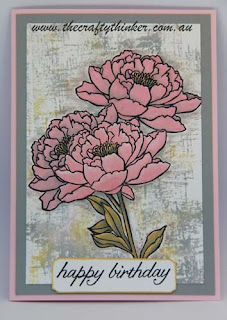
You've Got This in pastel

I was very excited when Kylie Bertucci announced the launching of the Global Design Project challenge site.  The team of people involved are all SO talented that I'm sure it'll soon be a great source of inspiration to all of us.
http://www.global-design-project.com/p/about-designers.html

This first colour challenge has really reinforced for me the creative and growth value of doing challenges.  These are definitely not colours that I use much - either together or individually - but I like the result so much, I think I'll be using them again!

SU, Baby Wipe Stamping Technique, Changing the size of a die cut,#GDP001
You've Got This with sentiment from Birthday Blossoms
I stamped the front flower with the new Basic Black Archival ink, masked it, stamped another flower, masked that and stamped the third flower.  Then I masked that flower too before stamping the background using the baby wipe stamping technique with the three inks; Smoky Slate, Pink Pirouette and So Saffron.

I watercoloured the flowers, using Pink Pirouette for the flowers, to which I added a little Smoky Slate for the flowers at the back.  The flower centres are So Saffron with some Smoky Slate shadows and the stems and leaves are So Saffron and Smoky Slate.

I added a little bit of Smoky Slate shading around the bunch of flowers.

The painted panel is layered onto Smoky Slate and Pink Pirouette card stock.

The sentiment is from Birthday Blossoms.  I cut it with the smallest of the rectangular Tags & Labels framelets and extended the length using the method I describe in this post.  Then I edged it with So Saffron.

Thank you for looking at my card and I would welcome any comments.

Til next time

Stephanie

Built for Free Using: My Stampin Blog