Friday 29 May 2020

Punch Art - Pokemon - Voltorb & Electrode

#thecraftythinker #punchartpokemon #voltorb #electrode #cardmaking #stampinup , Punch Art Pokemon Voltorb & Electrode, Stampin' Up Demonstrator, Stephanie Fischer, Sydney NSW
A punch art card for a young boy: Voltorb and its evolution - Electrode
The other day I shared my punch art Gastly, now meet some more of the pokemon crew!

These are sooo easy! And I love the fact that I can use up little oddments of leftover cardstock!

With a 2" circle punch, I punched two white circles and one red one and divided the red one into two, not quite equal, pieces.  I cut with a curve rather than straight across to continue the feeling of an orb.

The eyes and the mouth involved a little bit of free cutting but it wasn't too arduous.  Then I simply drew in the features with a Basic Black Stampin' Blend.

#thecraftythinker #punchartpokemon #voltorb #electrode #cardmaking #stampinup , Punch Art Pokemon Voltorb & Electrode, Stampin' Up Demonstrator, Stephanie Fischer, Sydney NSW
The pieces I used to make my Voltorb Pokemon
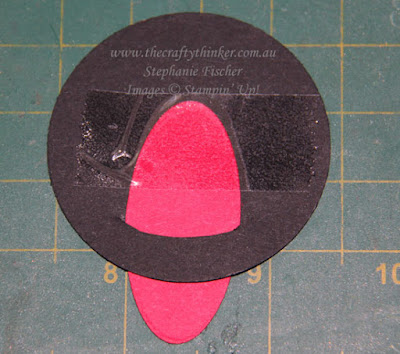
I cut two of the labels, one in red and one in white and then cut the red one in half, fixing the pieces behind the white one

The black background was embossed with the new Old World Paper 3D folder (available from 3rd June 2020).  Then I simply finished it off with a few Rhinestones that I coloured with a Dark Real Red Stampin' Blend.

Thank you for visiting.
Til next time!
Stephanie

Product List - Available for purchase from my online store

Monday 25 May 2020

Magnolia Blooms in a Garden Lane

#thecraftythinker #magnoliablooms #cardmaking #stampinup #sneakpeek2020catalogue , Magnolia Blooms, Painting white on Craft, Tasteful Labels, Sneak Peek 2020 Annual Catalogue, Stampin' Up! Demonstrator, Stephanie Fischer, Sydney NSW
The retiring Magnolia Blooms image stamped onto Soft Suede card and coloured with Whisper White Craft Ink
How sad I am that the gorgeous stamp set Magnolia Blooms is retiring in a few weeks time!

This is the card I promised to share that I made at the same time as this card but using a different colouring technique.

I stamped the image onto Soft Suede cardstock with Early Espresso ink and then used a small paintbrush and some Whisper White Craft Ink to colour the petals.  I let it dry a bit and then added another coat to the outer parts of the petals.

Then I brushed some Early Espresso ink into the shadow areas.

I mixed a little yellow ink into my white to paint the centre and some green with the white to paint the leaves.  TIP:  I have a little palette with inky bits in it, including some mixed with Whisper White.  They're basically colours left over from previous projects and can be enlived with a touch of water to use any time I need just a little bit of something.  I tend to use a few drops of ink from the reinkers for watercolouring.

The base card is one of the new In-Colours, Bumblebee, to which I added a layer of the Soft Suede and some of the retiring Garden Lane paper.

I used the new Tasteful Labels Dies to cut the image and pieces of Bumblebee and another new In-Colour, Just Jade.  I then cut the Just Jade and Bumblebee layers in half and positioned then under the main label with the image.

You might also spot a piece of the new Just Jade ribbon and some In-Colour Enamel Dots.

The new products will be available for purchase from 3rd June 2020 and the retiring products will be available (while stocks last) until 2nd June 2020.

Thank you for visiting.
'Til next time!
Stephanie

Product List - visit my online store to make a purchase

Friday 22 May 2020

Forever Gold Simple Cards: Annual Catalogue Sneak Peek

#thecraftythinker #stampinup #cardmaking #sneakpeek2020annualcatalogue #forevergold #greenery , sneak peek 2020 annual catalogue, Forever Gold Laser Cut, Greenery embossing folder, Stampin' Up Demonstrator, Stephanie Fischer, Sydney NSW
Not sure what I like more: the Forever Gold laser cut or the Greenery embossing folder
I love both!  Used here with the new Just Jade In-Colour
Wow - I just love this Forever Gold Laser Cut Specialty Paper!!  It's amazing!  Why? Well, I'm glad you asked! 
  • One side is gold - irresistable for a magpie like me!
  • The other side is white - sooo versatile: I can use it white or I can add colour of my choice! Wow!
  • The designs are BEAUTIFUL!  And, again, very versatile - lots of designs.
  • Best of all .... no cutting required!  Just pop them out (very easily) and they're ready to use!
#thecraftythinker #stampinup #cardmaking #sneakpeek2020annualcatalogue #forevergold , sneak peek 2020 annual catalogue, Forever Gold Laser Cut, Greenery embossing folder, Stampin' Up Demonstrator, Stephanie Fischer, Sydney NSW
The Forever Gold Laser Cut Specialty Paper makes card making soooo simple!
I'm still hung up on the shiny gold side at the moment!

I created lots of cards in no time flat and had fun on the way!

All I did was add a little gold heat embossing but even that's not absolutely necessary!

#thecraftythinker #stampinup #cardmaking #sneakpeek2020annualcatalogue #forevergold #greenery , sneak peek 2020 annual catalogue, Forever Gold Laser Cut, Greenery embossing folder, Stampin' Up Demonstrator, Stephanie Fischer, Sydney NSW
Greenery Embossing Folder, Forever Gold Laser Cut Specialty Paper, Forever Fern Trim
Now let's talk about the Greenery Embossing Folders.
There are two in the pack (2 different patterns) as they're smaller than normal - they measure 6 1/4" x 3 3/8" (15.9cm x 8.6cm) - perfect for embossing a strip, edge or a smaller piece of card.
But I wanted to use it over my entire card front piece.  Good news:  it's really easy to enlarge the pattern!
  • Run it through the first time
  • Move the card over inside the folder, ensuring that at least one row of pattern is nicely lined up (I find this helps me keep the pattern going straight
  • Before running through the embossing/cutting machine a second time, ensure that you place the plate on top so that it doesn't reach the edge of the embossing folder (to avoid ending up with a ridge and a flattened bit) - see my photos below.
  • This method works really well with any embossing folder with a repeating pattern like this. 
#thecraftythinker #stampinup #cardmaking #embossingtechniques #greenery #2020cataloguesneakpeek , sneak peek 2020 annual catalogue, Greenery embossing folder, How to enlarge embossing pattern, Stampin' Up
Greenery embossing folder - enlarging the pattern area.  First run through the embossing machine

#thecraftythinker #stampinup #cardmaking #embossingtechniques #greenery #2020cataloguesneakpeek , sneak peek 2020 annual catalogue, Greenery embossing folder, How to enlarge embossing pattern, Stampin' Up
Greenery embossing folder - enlarging the pattern area - result after first run through the Big Shot
#thecraftythinker #stampinup #cardmaking #embossingtechniques #greenery #2020cataloguesneakpeek , sneak peek 2020 annual catalogue, Greenery embossing folder, How to enlarge embossing pattern, Stampin' Up
Greenery Embossing Folder - enlarging the pattern area - preparing for the second pass through the machine

#thecraftythinker #stampinup #cardmaking #embossingtechniques #greenery #2020cataloguesneakpeek , sneak peek 2020 annual catalogue, Greenery embossing folder, How to enlarge embossing pattern, Stampin' Up
Greenery Embossing Folder - enlarging the pattern area - final result after the second pass through the Big Shot
Thank you for visiting.
'Til next time!
Stephanie

Product List - Available for purchase from my online store from 3rd June 2020

Monday 18 May 2020

World Dies with Forever Gold Grid: Annual Catalogue Sneak Peek

#thecraftythinker #stampinup #cardmaking #worldmap #masculinecard , Sneak Peek 2020 Annual Catalogue, World Map Dies, Forever Gold Laser Cut, Stampin' Up Demonstrator, Stephanie Fischer, Sydney NSW
A masculine card made with the new World Map dies and Forever Gold Laser Cut Specialty Paper
I'm always on the lookout for stamps and dies to use for masculine cards so I was very excited to see the World of Good suite in the new 2020-2021 Annual Catalogue!

For this card I only used the dies (I purchased them with the Beautiful World stamp set as a bundle to save 10%) and teamed it with some Forever Gold Laser Cut Specialty Paper.  TIP: using adhesive sheets on the back of the Brass Foil makes it easy to adhere the gorgeous scrolls.

To give the die cuts a bit of "lift",  I used the new Brass Foil Sheets and layered them, slightly offset, onto black die cuts.

I threaded the Just Jade (one of the new In-Colours) ribbon through the slots mostly to add a pop of colour but also to help disguise where I had cut the ends!

The Antiqued Corners & Slides (I've only used corners here) also form part of the World of Good suite in the new catalogue which will be current from 3rd June 2020 until 3 May 2021.

Thank you for visiting.
'Til next time!
Stephanie

Product List - Available from my online store from 3rd June 2020


Friday 15 May 2020

Ink It! Stamp It! International Blog Hop : Kids - Punch art Pokemon Gastly


Welcome to the Ink It! Stamp It! Design Team Blog Hop - we hop every month so be sure to pop back and visit us again!  

Today our theme is Kids.

You are currently at my page - Stephanie Fischer, The Crafty Thinker.  At the end of my post there is a full line up of team members, please click on the name after mine in the list to continue the hop.
#thecraftythinker #stampinup #cardmaking #inkitstampitbloghop #pokemongastlypunchart , Punch Art Pokemon Gastly, Ink it! Stamp it! Blog Hop, Stampin' Up
A punch art Pokemon Gastly
I really don't have any kid type stamps sets at the moment, so I resorted to some "punch art".  I put that in inverted commas as some of the pieces are cut with dies rather than punches.

Meet Gastly - I'm sure we all know that he's a Pokemon character!

The purple background is a watercoloured "splodge" on watercolour paper.
#thecraftythinker #stampinup #cardmaking #inkitstampitbloghop #pokemongastlypunchart , Punch Art Pokemon Gastly, Ink it! Stamp it! Blog Hop, Stampin' Up
The pieces required for the Gastly
These are the pieces I used.  The white one is cut twice on the diagonal to create the eyes.
#thecraftythinker #stampinup #cardmaking #inkitstampitbloghop #pokemongastlypunchart , Punch Art Pokemon Gastly, Ink it! Stamp it! Blog Hop, Stampin' Up
I cut a slit in the black circle to house the tongue!

I also made a Voltorb - but I'll show you that one another time!

Thank you so much for joining us today and we hope you'll join us again next month when our theme will be the new 2020-2021 Annual Catalogue!

I'm Stephanie Fischer and to keep hopping around see the list below to see who is up next with another great project.

Thanks for visiting
'Til next time!
Stephanie


Product List - All available in my online store 

Thursday 14 May 2020

Stampin' Dreams Blog Hop: Annual Catalogue Sneak Peek - Forever Gold Foil Laser Cut

Welcome to the monthly Stampin' Dreams Blog Hop.  This month we are providing sneak peeks from the new Annual Catalogue for 2020 to 2021 which goes live on 3rd June.  Sooo exciting! 

You are currently visiting Stephanie Fischer (The Crafty Thinker) from Australia.  I hope you enjoy my card and then click on "Click here to enter" and click through the little images to see all of the other great projects in the hop!
#thecraftythinker #stampinup #cardmaking #tastefultextile  #2020annualcataloguesneakpeek #forevergold , 2020 Annual Catalogue Sneak Peek, Forever Gold Laser Cut, Forever Flourishing dies, Stampin Up! Demonstrator, Stephanie Fischer, Sydney NSW
This card provides sneak peeks of products in the new 2020-2021 Annual Catalogue
I haven't included a greeting, so it's multipurpose, but I'm thinking it's very suitable for a Sympathy Card.
I'm completely head over heels for the Forever Gold Laser Cut Specialty Paper!  Making cards with it is so simple and, well .... addictive!  The pieces all pop out really easily - no cutting involved.  There are card fronts, greenery accents and decorative label bases.  One side is gold and the other is white (which can be coloured for example by sponging) - so they're really versatile.

The Forever Gold pieces don't really need much, if anything else to create a lovely card but I really went to town here so that I could show you several new things on the one card.

Onto my Basic Gray base card I placed a layer that is embossed with the Tasteful Textile 3D embossing folder.  I can see myself using this folder a lot because it's so versatile!

Then I attached the Forever Gold wreath by placing a few small dots of Multipurpose glue behind the more solid leaves.  Then I added some more foliage in a design inspired by a pre-Christmas afternoon flower arranging workshop!

The black foliage was cut with the new Forever Flourishing dies which are also available as part of a bundle with the coordinating Forever Fern stamp set.  

The little grey flower was cut with one of the smaller dies included in the Many Layered Blossoms die set with is also available as a bundle with the coordinating Blossoms In Bloom stamp set.  At the centre of the flower is one of the new 2020-2022 In Colour Enamel Dots - this one is Bumblebee.

I hope the project you've seen here on my blog today has inspired you, brightened your day and whetted your appetite for the amazing new catalogue!  

You are currently visiting Stephanie Fischer.  Please click on "click here to enter" below and click on each of the little images to hop through all of the people on the list to see all our projects.  You don't want to miss any!

Thank you for visiting.
'Til next time!
Stephanie
You are invited to the Inlinkz link party!
Click here to enter
Product List - Available from 3rd June 2020