Monday 30 May 2016

Birthday Blooms - Mint Macaron & Island Indigo on Tip Top Taupe

If you saw my last post, you'll recognise that I made this card at the same time as the one I entered into the GDP037 Colour Challenge.  It uses the same colours and .... remember that piece of Whisper White cardstock with the scalloped oval cut out of it? ......
Stampin Up Australia, #thecraftythinker, #GDP037, Birthday Blooms, Watercolouring, Stampin Up Demonstrator
The colours are Mint Macaron, Tip Top Taupe and Island Indigo

The card base is an A5 piece of Island Indigo cardstock folded in half.  On top of that I've layered Mint Macaron and a piece of Tip Top Taupe that I embossed with the Elegant Dots embossing folder and added a piece of the Island Indigo cotton ribbon (retiring).

I stamped the Birthday Blooms image in Mint Macaron ink onto Tip Top Taupe cardstock and watercoloured it, using my usual method, with Mint Macaron, and Island Indigo ink.  At the very end I added a little Tip Top Taupe with the fine end of a Stampin' Write Marker just to add a bit more depth in places.

I stamped the greeting in Island Indigo ink and cut out the panel with the largest, non-scalloped, Ovals Collection framelit (retiring) and then trimmed off the bottom.

I layered the painted panel onto the Whisper White scalloped oval and trimmed the bottom off that too.  Then I stuck that panel to the card front using dimensionals.

Thanks for visiting.

'Til next time.
Stephanie

Product List - To shop in my online store, click on a product image below (Australian residents only)

Sunday 29 May 2016

Birthday Blooms: GDP037 - Colour Challenge


http://www.global-design-project.com/2016/05/global-design-project-037-colour.html?utm_source=feedburner&utm_medium=email&utm_campaign=Feed%3A+GlobalDesignProject+%28Global+Design+Project%29I hadn't really had much time to compose my thoughts this week so I turned to a Challenge for inspiration.  I thought these colours were an interesting mix.  
Click on the GDP image to see all the great cards inspired by these colours or to enter yourself.
I stamped the Birthday Blooms image in Mint Macaron Ink onto Mint Macaron cardstock and watercoloured it, using my usual technique, with Mint Macaron, Tip Top Taupe and Island Indigo.

I stamped the greeting in Island Indigo ink.  
Stampin Up Australia, #thecraftythinker, #GDP037, Birthday Blooms, Watercolouring, hand made card,Stampin Up Demonstrator
The ribbons and framelit are retiring but I'm happy to say Birthday Blooms will be available for the next year at least.

I used the largest of the Ovals Collection framelits (retiring) to cut the scalloped oval shape from the whisper White cardstock (I used that on another card that I'll share later) and glued the panel down to a square of Island Indigo cardstock.  

I then added the White Jute ribbon and Island Indigo cotton ribbon (both retiring) and then glued the panel onto the 6" square Tip Top Taupe card.

Thanks for visiting.
'Til next time

Stephanie

Product List - To shop in my online store, click one of the product images below (Australian Residents only)

Friday 27 May 2016

Project Life - Gift Albums

I have included this project in the Crazy Crafters Team Project Highlights this week.  Click here to see the other projects submitted and to vote for your favourites.

Knowing that two of my nieces were coming to lunch to, belatedly, celebrate their birthdays, I was wracking my brain to think of a good gift.  Then it hit hit me (the idea, not the gift!) .... what better gift for a young mother than a Project Life album, already partially completed?!

Stampin Up, #thecraftythinker, Project Life, gift idea, photo album, scrapbooking,
Project Life album covered with Watermelon Wonder cardstock & Affectionately Yours DSP
Stampin Up, #thecraftythinker, Project Life, gift idea, photo album, scrapbooking,
Project Life album covered with Crumb Cake Cardstock
& Affectionately Yours DSP


I used two of the Espresso 6" x 8" albums and covered them with cardstock and DSP.  Since I've been very active on the #loveitchopit front, I only had one sheet each of the Affectionately Yours DSP and needed 2 sheets per album to fully cover them.  So I cut two 1" strips of cardstock (one for the back cover and one for the front) and adhered them next to the fabric spine.  Then I cut a sheet of DSP in half and used one half each for the front and back cover.  I trimmed the corners (cutting at a slight diagonal into towards the corner) and glued the paper to the inside of the cover.  I then hid all those edges by cutting a matching piece of cardstock to size and glueing it over the inside of the cover.

I then set about finding and printing wedding and family photographs that I particularly liked.  I started each album with some photographs of the couple (a reminder of the romantic before children days!) followed by fairly randomly organised family photographs.  I wasn't too concerned about time lines - it was more about which photos I liked together.

Stampin Up, #thecraftythinker, Project Life, gift idea, photo album, scrapbooking,
Watermelon Wonder cardstock covers all the untidy edges on the inside of the cover
I stamped a piece of Whisper White card, created a flower to match those in the bride's hair &
left plenty of space for the couple to write something about their wedding day

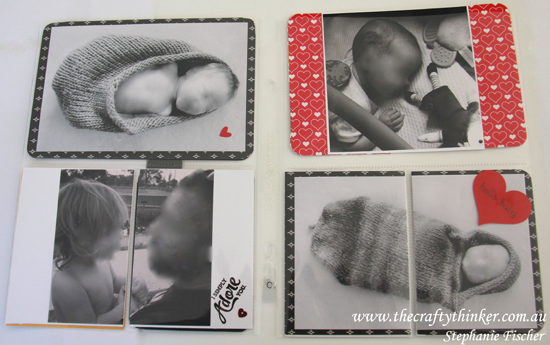
I didn't have any Project Life cards - which would have made the process even quicker and easier - so I made my own using DSP or cardstock that I trimmed to size.  Some I round cornered with the Project Life Corner Punch and some I didn't and it doesn't seem to matter!  I tried to find colours to go with colours in the photographs.
Stampin Up, #thecraftythinker, Project Life, gift idea, photo album, scrapbooking,
Crushed Curry and Basic Black cardstock pick up the colours in the large photograph
and the little heart sequin picks up the pop of red in the sock

Stampin Up, #thecraftythinker, Project Life, gift idea, photo album, scrapbooking,
Hearts were called for here!

I took courage from the great results that I had seen others achieving and chopped photographs to fit.  The first one was the hardest one - after that I was chopping people in half (so to speak) at a rate of knots!
Stampin Up, #thecraftythinker, Project Life, gift idea, photo album, scrapbooking,
I used retiring DSP on these pages, picking up patterns or colours in the images
Stampin Up, #thecraftythinker, Project Life, gift idea, photo album, scrapbooking,
For these pages, I tried to pick images with similar colours and I left journalling spaces
Stampin Up, #thecraftythinker, Project Life, gift idea, photo album, scrapbooking,
I got really courageous here and chopped the photo into four pieces!  I matted it before I chopped.
I left some  spaces for my nieces to journal or write little comments and I also left lots of spaces for them to add more photographs - I simply cut more DSP to size and included a few lined cards (I drew the lines old school with a pen and ruler).
My nieces have two good hands and are capable of turning the album, so I wasn't too concerned about putting some of the photos in sideways!

By the time I'd finished the first few pages of the first album I had overcome the intimidation that I had been feeling about putting together a Project Life album.  By the time I had finished, I had lost all inhibitions about chopping or placing photos and was having so much fun I'd started thinking about the next project!  

Stampin Up, #thecraftythinker, Project Life, gift idea, photo album, scrapbooking,
A Flirty Flamingo label and new Rouched Ribbon with
Flirty Flamingo and Watermelon Wonder flowers.
To finish the gifts, I wrapped them in pretty paper and made gift cards using the Tags & Labels framelits and Botanical Builder flowers with Metal Rimmed Pearl centres. Stampin Up, #thecraftythinker, Project Life, gift idea, photo album, scrapbooking, 
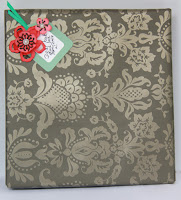
Both nieces were thrilled with their gifts.  One said that she thought it might be the best gift she'd ever received and the other immediately started looking through the images on her phone, deciding which ones she was going to add to the album. 

If you have photographs stored electronically - on your phone, computer, laptop etc - consider printing at least some and putting together a Project Life album of your own.  It's quick, fun and simple (you can keep it super-simple or dress it up as much as you like) but more importantly it will ensure that your photographs are secured and seen and memories shared.  

A little while ago my computer turned up its heels and drew its last breath and I hadn't been backing up as carefully as I should.  I lost several years' worth of photographs - precious mementos - that I'll never be able to get back but I'll be creating some Project Life albums for myself now with my current photographs!

'Til next time
Stephanie


Product List - to shop in my online store - click on one of the product images below (Australian Residents only)

Wednesday 25 May 2016

You've Got This Black Swirly Line - sneak peek

I'm really taken by those swirly lines in the Swirly Scribbles thinlits set.  I knew they'd be going onto my shopping list as soon as I saw them!

Stampin Up,  #thecraftythinker.com.au, You've Got This, Swirly Scribbles thinlits
I love the contrast of the soft flower with the graphic lines

I made a 5.5" square card from the new Flirty Flamingo cardstock and added layers of Basic Black and the new Affectionately Yours DSP.  I then used the 2-way glue pen to glue the black scribbles to the card and finished with my You've Got This panel.

The flower in the You've Got This set continues to be one of my favourites.  It looks so delicate once it's coloured.

For the flower:
I stamped the You've Got This flower with Blushing Bride onto Whisper White cardstock.  I then watercolored it using Blushing Bride, Flirty Flamingo and Watermelon Wonder reinkers.  If you're interested in how I watercolour - you'll find links to my videos here.
I used a Cherry Cobbler Stampin Write marker for the centre of the flower.
I watercoloured the little bit of stem and leaf  with Smoky Slate ink and a dab of Basic Gray.
I cut the flower with one of the retiring Ovals Collection framelits (these are being replaced with the more comprehensive Layering Ovals framelits) and sponged the edge with Basic Gray ink.

'Til next time
Stephanie


Product List - to shop in my online store - click on one of the product images below (Australian Residents only)