Friday 24 April 2020

Beautifully Braided Simple Stamping and stepping it up

#thecraftythinker  #stampinup  #cardmaking  #beautifullybraided  #simplestamping , Beautifully Braided, Simple Stamping, Thank you card, Stampin' Up Demonstrator, Stephanie Fischer, Sydney NSW
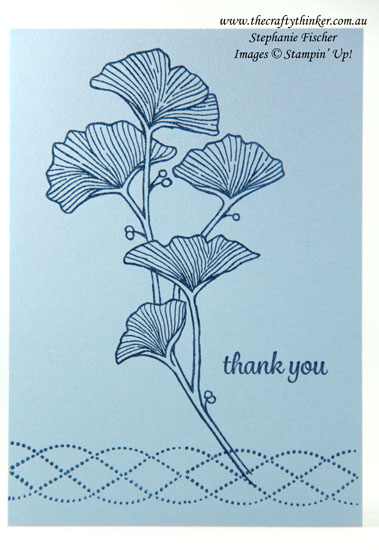
Pure and Simple stamping


One stamp set (Beautifully Braided), one ink pad (Blueberry Bushel), one piece of cardstock (Balmy blue) - pure simple stamping.
#thecraftythinker  #stampinup  #cardmaking  #beautifullybraided  #simplestamping , Beautifully Braided, Simple Stamping, Thank you card, Stampin' Up Demonstrator, Stephanie Fischer, Sydney NSW
Step it up by adding some colour to the flowers

To step it up a little, add some colour to the flowers.  I used Stampin' Blends in the Balmy Blue Combination.

#thecraftythinker  #stampinup  #cardmaking  #beautifullybraided  #simplestamping , Beautifully Braided, Simple Stamping, Thank you card, Stampin' Up Demonstrator, Stephanie Fischer, Sydney NSW
Use a sentiment from a different stamp set if you wish


Step it up in a different way by using a sentiment in a larger font from a different stamp set (this one is from Magnolia Blooms).

#thecraftythinker  #stampinup  #cardmaking  #beautifullybraided  #simplestamping , Beautifully Braided, Simple Stamping, Thank you card, Stampin' Up Demonstrator, Stephanie Fischer, Sydney NSW
This simple stamping card uses the Beautifully Braided stamp set, Purple Posy cardstock and Gorgeous Grape ink


Then step this up by adding colour to the flowers - I used the Highland Heather and Purple Posy Combination packs of Stampin' Blends alcohol markers.
#thecraftythinker  #stampinup  #cardmaking  #beautifullybraided  #simplestamping , Beautifully Braided, Simple Stamping, Thank you card, Stampin' Up Demonstrator, Stephanie Fischer, Sydney NSW
For the final step up, add a layer to the card.  Rhinestones, ribbon and/or sequins would be other good additions
Step it up one more time by stamping onto a layer and adhering that to a base card - in this case I made my base card from Gorgeous Grape cardstock.

Thank you for visiting.
'Til next time!
Stephanie

Product List - All products available for purchase from my online store

Monday 20 April 2020

Beautiful Day Butterfly - Fun Fold Easel Card

This birthday card is for a young great-niece - I thought she'd like a colourful butterfly.
#thecraftythinker #cardmaking #stampinup #beautifulday #funfold #easelcard , Beautiful Day, Fun Fold, Easel Card, adjusting die cutting, colouring rhinestones, Stampin' Up Demonstrator, Stephanie Fischer, Sydney NSW
An Easel Fold card featuring the butterfly image from the Beautiful Day stamp set
I stamped the butterfly image onto Window Sheet (acetate) with Stazon ink and then used some Stampin' Blends alcohol markers to colour it in .... on the back.  As it turned out, I decided it needed a piece of white cardstock behind the image to make it pop more and to obscure the easel fold.

To make the easel fold - I cut my base card to 11" x 5 1/2" and scored at 2 3/4" and 5 1/2".
A side view of the easel fold
I used the method shown at the bottom of this post to "resize" the Stitched Rectangle with the greeting.  The butterflies were cut with the Butterfly Beauty dies from Lovely Lipstick cardstock and adhered to So Saffron cardstock before trimming around the butterflies.  I find this quicker and easier than paper piecing when I'm time-poor.

I coloured Basic Rhinestone Jewels with the alcohol markers so that they would match.

I wanted to ensure that I cut identical frames for the back and front of the piece and so I used some old washi tape to keep them in the correct position, allowing for multiple identical frames to be cut.
#thecraftythinker #cardmaking #diecuttingtips #stampinup #stitchedrectangles , Die cutting multiple identical frames, Stitched Rectangles, Stampin' Up
I use my cutting mat to help align the dies for my frame

I then use washi tape to keep the frame in the correct position for cutting multiple identical frames

The closed easel card


I also made a variant of this card for a sympathy card.  This butterfly is stamped onto vellum but I still added the piece of white behind it to make it pop more.

Looking back at these photos has been really interesting.  Believe it or not, both cards were made with the same Bermuda Bay cardstock but I photographed one with my phone and the other with my Canon camera - they look quite different.  I do apologise for that!
Beautiful Day butterfly stamped onto vellum and coloured with Stampin' Blends alcohol markers


The view of the closed card
To make the die cut narrower, I positioned the die as required and then placed the top cutting plate only over the area to be cut - as shown in the image below. TIP:  I "wiggle" the die gently until I can feel the blade of the die fitting into the die cut to match what has already been cut.

#thecraftythinker #cardmaking #diecuttingtips #diecuttingsmallerrectangle #stampinup , Die cutting a smaller rectangle , Stampin' Up
This is how I resized / reshaped the die cut.

Thank you for visiting.
'Til next time!
Stephanie


Friday 17 April 2020

Ink it! Stamp it! Blog Hop: 2018-2020 In-Colours - Masculine Card Mountain Air Clubhouse

Welcome to the Ink It! Stamp It! Design Team Blog Hop - we hop every month so be sure to pop back and visit us again!  

Today we are saying farewell to the outgoing In-Colours 2018-2020.  They've been wonderful, my favourites being the Blueberry Bushel and Call Me Clover, but I can't wait to see what new colours await us in the new Catalogue!

You are currently at my page - Stephanie Fischer, The Crafty Thinker.  At the end of my post there is a full line up of team members, please click on the name after mine in the list to continue the hop.
#thecraftythinker #stampinup #cardmaking #masculinecard #inkitstampit #clubhouse #foreverblossoms , Golf Card, Masculine Card, Clubhouse Bundle, Forever Blossoms, Mountain Air, Ink it! Stamp it! Blog Hop, 2018-2020 in-colours, Stampin' Up
A golfing scene coloured with nearly all of the outgoing 2018-2020 In-Colours
I did cheat a little.  I didn't use the Pineapple Punch or Blueberry Bushel colours but I did mix in a few other colours.

Forever Blossoms is stamped onto Whisper White paper with Grapefruit Grove ink and then coloured with Grapefruit Grove, Crumb Cake, Early Espresso and Call Me Clover Markers blended with a Blender Pen.

The mountains are stamped with Gray Granite ink and coloured with a Purple Posy Marker and Blender Pen.

I tapped the stamp with the golf ball and tee into Smoky Slate ink and then used a Call Me Clover Marker to add green ink to the grass bit before stamping.  Then I used the Call Me Clover and Lovely Lipstick Markers to colour the grass blades and the tee.  The tee looked too bright, so I didn't mask it before sponging with the green.

Having masked the golf ball, I sponged with Call Me Clover (very lightly) and then used the same ink colour to stamp the laurel wreath.  The shield is cut with the coordinating die, edged with Smoky Slate and the sentiment stamped with Call me Clover ink.

I masked the blossoms and then very lightly sponged the sky with Balmy Blue ink.

Thank you so much for joining us today and we hope you'll join us again next month when our theme will be "Kids"!

I'm Stephanie Fischer and to keep hopping around see the list below to see who is up next with another great project.

Thanks for visiting
'Til next time!
Stephanie


Product List - all products available for purchase from online store
Thursday 16 April 2020

Stampin' Dreams Blog Hop - Birthday - Everyday Hero

Welcome to the monthly Stampin' Dreams Blog Hop.  This month our theme is - Birthday.  You are currently visiting Stephanie Fischer (The Crafty Thinker) from Australia.  I hope you enjoy my card and then click on "Click here to enter" and click through the little images to see all of the other great projects in the hop!
#thecraftythinker #stampinup #cardmaking #everydayhero #SDBH , Everyday Hero, Tween Boy birthday card, Stampin' Dreams Blog Hop, Stampin' Up Demonstrator, Stephanie Fischer, Sydney NSW
Everyday Hero is a great stamp set for making a tweeny boy birthday card
I have to admit that I made this card in a bit of hurry for my great-nephew's birthday.  I don't seem to have many sets in my collection that are suitable for a tween aged boy so this seemed the obvious choice.  It was only afterwards I realised that this card bears a remarkable resemblance to one I've made before - oh well!  I guess I accidentally "CASEd" myself!

[EDIT] And OOPS!  I've just realised that a retired set managed to escape and sit on my shelf, encouraging me to use it!  I do apologise for that!

I hope the project you've seen here on my blog today has inspired you and brightened your day.  You are currently visiting Stephanie Fischer.  Please click on "click here to enter" below and click on each of the little images to hop through all of the people on the list to see all our projects.  You don't want to miss any!

Thank you for visiting.
'Til next time!
Stephanie
You are invited to the Inlinkz link party!
Click here to enter
Product List - All available for purchase from my online store