Wednesday 30 December 2020

More ways with Gilded Leafing Embellishment: Flowering vines Dies & Poppy Moments Dies

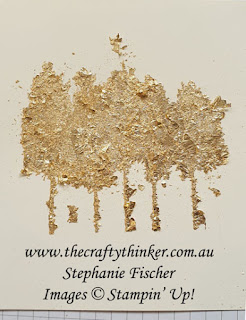
Gilded Leafing Embellishment will be available in the new January - June 2021 Mini Catalogue.  They are very fine flakes of gold leaf that can be adhered to a multitude of surfaces with a variety of tacky adhesives.

They are very lightweight and have a tendency to be "static" - the following preparations will be of benefit:

  • Turn off the air-conditioning and fan to limit air movement
  • Refrain from sneezing! ... or breathing heavily!
  • Ensure you have clean, dry hands (a dusting with your embossing buddy or some talcum powder will help)
  • Have a box handy to store the excess flakes after use.
  • If you're stamping with glue, have a shallow container of water nearby in which to immediately deposit the stamps until you're ready to properly clean them.
  • You'll also need a brush or sponge to remove excess flakes and burnish your project (although you can use your finger but it will give a different effect)

#thecraftythinker #stampinup #cardmaking #gildedleafingembellishment #usinggoldflakes #goldflakesandadhesivesheet #2021minicatalogue , Gilded Leafing Embellishment flakes, Flowering Vines Dies, Poppy Moments dies, Tasteful Textile embossing folder, Sneak Peek 2021 Mini Catalogue,  Stampin' Up Demonstrator, Stephanie Fischer, Sydney NSW
Gilded Leafing Embellishment flakes used with Adhesive Sheet and
Flowering Vines and Poppy Moments dies.

In my last post I shared cards I had made using the Gilded Leafing Embellishment and stamp sets - adhering the gold flakes with either Heat & Stick powder or Multipurpose Liquid Glue.

This time I've used the flakes in a much more basic way to produce some stunning backdrops and accents with the use of Adhesive Sheets ... and it's sooooo easy!

  • Place the Adhesive Sheet on the cutting plate of your die cutting machine and cut with the die of your choice.
  • Remove the protective layer from one side and adhere into position on your project.
  • Remove the remaining protective layer from the top of the die cut to reveal the sticky surface.
  • Top with Gilded Leafing Embellishment flakes and press down gently with your finger.
  • Then remove the excess gold flakes with a brush, your finger or sponge.

If you require a thicker (more substantial) look to your die cut, adhere the Adhesive Sheet to a piece of scrap cardstock before die cutting.  If the die is intricate, you may wish to place  Adhesive Sheet to both sides of the card.  Check that the die has cut through all the layers before you remove it and run it through your die cutting machine again if necessary.

For the card above, my base card is Mango Melody to which I added a layer of Basic Black embossed with the Tasteful Textile folder.

I cut my adhesive sheet with a Flowering Vines Die - these dies will be available from 5th January to 30th June 2021 in the new Mini Catalogue.

I applied the die cut to my card front and then embellished with the gold flakes as described above.

I cut the base layer of the poppy from Mango Melody cardstock and the top, intricate layer, from adhesive sheet with a backing of Mango Melody card (because I wanted a raised look).  Having adhered the top layer to the base layer, I then applied the gold flakes as described above and added the centre cut from black cardstock.

To add a bit more interest to the card, I adhered the poppy to the cardfront by using Multipurpose Liquid Glue at the bottom the flower and a Stampin' Dimensional towards the top of the flower so that the top of the flower pops out a bit from the gold background.

#thecraftythinker #stampinup #cardmaking #gildedleafingembellishment #usinggoldflakes #goldflakesandadhesivesheet #2021minicatalogue , Gilded Leafing Embellishment flakes, Flowering Vines Dies, Poppy Moments dies, Tasteful Textile embossing folder, Sneak Peek 2021 Mini Catalogue,  Stampin' Up Demonstrator, Stephanie Fischer, Sydney NSW
Gilded Leafing Embellishment adhered to Flowering Vines die cut with Adhesive Sheets

I used very similar techniques for the next card, however, for this one, I stuck the adhesive sheet to a piece of scrap card before die-cutting.  

If you look carefully (because I hid most of it when I added the flower centres!) you'll see that the embossed lines on the Cherry Blossoms flowers show nicely through the Gilded Leafing,

To make the stitched square frame to the size I wanted, I used two of the Stitched Rectangles dies but used this method to shorten them into a square.

In my next post I'll continue the experimentation with Gilded Leafing, using stencils and "mixed media".

Thank you for visiting.
'Til next time!
Stephanie

Product List - Available for purchase from my online store

Friday 25 December 2020

Gilded Leafing Embellishment: Winter Wood, Christmas Gleaming, Gnome For The Holidays

MERRY CHRISTMAS TO YOU ALL!!!  

... DESPITE THE LOCKDOWNS AND CHALLENGES.

Now for some cards - better late than never?  Perhaps some inspiration for next Christmas?!

#thecraftythinker #gildedleafing #sneakpeek #2021minicatalogue #stampinup #cardmaking  ,Sneak Peek, Gilded Leafing, Tips & Tricks, 2021 Mini Catalogue, Stampin' Up Demonstrator, Stephanie Fischer, Sydney NSW
The bauble and greeting were stamped with glue before receiving a coat of Gilded Leafing

These cards (including the greetings) feature the Gilded Leafing which is new to Stampin' Up in the Mini Catalogue which will run from 4 January 2021 to June.
#thecraftythinker #gildedleafing #sneakpeek #2021minicatalogue #stampinup #cardmaking  ,Sneak Peek, Gilded Leafing, Tips & Tricks, 2021 Mini Catalogue, Stampin' Up Demonstrator, Stephanie Fischer, Sydney NSW
A variant of the the Christmas Gleaming teamed with Gilded Leafing

Although this product is new to Stampin' Up, I've been using similar metallic leaf flakes for several years and love the results and the fun of creating with them (although it can be a bit messy!).  So when I saw the flakes in the new catalogue, it was the first thing to hit my wish list.
#thecraftythinker #gildedleafing #sneakpeek #2021minicatalogue #stampinup #cardmaking  ,Sneak Peek, Gilded Leafing, Tips & Tricks, 2021 Mini Catalogue, Stampin' Up Demonstrator, Stephanie Fischer, Sydney NSW
This little gilded fellow was "coloured' with white craft ink and a Water Painter

#thecraftythinker #gildedleafing #sneakpeek #2021minicatalogue #stampinup #cardmaking  ,Sneak Peek, Gilded Leafing, Tips & Tricks, 2021 Mini Catalogue, Stampin' Up Demonstrator, Stephanie Fischer, Sydney NSW
I fussy cut (quite roughly) the foliage once I'd applied the Gilded Leafing

Once I have them out and I'm making a bit of a happy mess, I tend to set up lots of images for later use - I sort of maximise my glue / gold leaf mess to creation ratio!

Stampin' Up recommend using the Gilded Leafing flakes in conjunction with the Heat & Stick powder (it's much like using embossing powder but results in a slightly sticky image.)

However, for some reason, I've never got on well with Heat & Stick - perhaps my methodology is incorrrect - so I tend to use the Multipurpose Liquid Glue.

So this is what works for me:
  • Spread some glue onto a suitable surface.  You don't need as much as you think - a little goes a long way.
  • Suitable surfaces would include something that's smooth but with a little bit of give - a bit like a stamp pad.  My favourite is this little rectangle of foam that has a rubber backing, it's called Phat Foam.
#thecraftythinker #gildedleafing #sneakpeek #2021minicatalogue #stampinup #cardmaking  ,Sneak Peek, Gilded Leafing, Tips & Tricks, 2021 Mini Catalogue, Stampin' Up Demonstrator, Stephanie Fischer, Sydney NSW
I spread my glue on my old and favourite bit of Phat Foam.  This is enough glue to stamp several images

I also use this craft foam that has a cotton cover.  I remember that I bought a large piece at a craft store and cut it into smaller pieces.
#thecraftythinker #gildedleafing #sneakpeek #2021minicatalogue #stampinup #cardmaking  ,Sneak Peek, Gilded Leafing, Tips & Tricks, 2021 Mini Catalogue, Stampin' Up Demonstrator, Stephanie Fischer, Sydney NSW
An alternative "pad" for the glue - stamp pad foam

  • Tap the stamp into the glue (alternatively use a piece of sponge to evenly tap some of the glue onto the stamp) - remember you don't need a lot, then stamp the image onto your cardstock.
  • Leave the glue to dry a little, so that it's just tacky (it won't take long).
  • Press Gilded Leafing flakes all over the image. 


#thecraftythinker #gildedleafing #sneakpeek #2021minicatalogue #stampinup #cardmaking  ,Sneak Peek, Gilded Leafing, Tips & Tricks, 2021 Mini Catalogue, Stampin' Up Demonstrator, Stephanie Fischer, Sydney NSW
Press the flakes of gold leaf down onto the sticky image

  • Then gradually, and gently, start to burnish off the excess gold with a finger tip.
#thecraftythinker #gildedleafing #sneakpeek #2021minicatalogue #stampinup #cardmaking  ,Sneak Peek, Gilded Leafing, Tips & Tricks, 2021 Mini Catalogue, Stampin' Up Demonstrator, Stephanie Fischer, Sydney NSW
GENTLY start buffing off the excess Gilded Leafing with a finger tip

  • Then finish the burnishing/cleaning process by VERY GENTLY (as in hardly touching the surface) buffing with a soft brush, a soft sponge (see below - this is Scoochi Foam) or - if all else fails - your finger.  Let me stress again ... GENTLY ... so that you don't rub off all of that beautiful gold leaf!
#thecraftythinker #gildedleafing #sneakpeek #2021minicatalogue #stampinup #cardmaking  ,Sneak Peek, Gilded Leafing, Tips & Tricks, 2021 Mini Catalogue, Stampin' Up Demonstrator, Stephanie Fischer, Sydney NSW
Finish the burnishing process with a soft sponge or a finger tip ... VERY GENTLY!

TIPS:
  • I like to keep a little container of warm water nearby and drop the stamps into it as soon as I finish stamping with them.  This make the glue residue removal easy.
  • I keep an old toothbrush in my craft room and employ this to remove the glue residue from the stamps.
  • As soon as I've finished with my "glue mat", I rinse it thoroughly under running warm water and then give it a bit of a soapy wash and a final rinse.  Let it dry thoroughly before using it again.
  • The gold flakes are incredibly light and float all over the place at the slightest opportunity.  So, instead of trying to get the unused flakes back into their original pot, I keep a little box handy and pop them in there.  Cardboard is better than plastic or acrylic because of the effect of static on the flakes!
Have fun with these gorgeous flakes - try gilding 3D articles or gilding a straight line by applying some Tear & Tape and then the gilding flakes.

Thank you for visiting.
'Til next time!
Stephanie

Product List - Available for purchase from my online store

Monday 21 December 2020

Hey Girlfriend Christmas Card: Mini Catalogue Sneak Peek

 This gorgeous image is one of three young ladies in the Hey Girlfriend stamp set - available from 4 January 2021 until June 2021 in the new Mini Catalogue.

#thecraftythinker #stampinup #heygirlfriend #2021minicataloguesneakpeek #cardmaking , Hey Girlfriend, Mini Catalogue 2021 Sneak Peek, Stampin' Up Demonstrator, Stephanie Fischer, Sydney NSW
There are three gorgeous girl images in the new Hey Girlfriend stamp set

I've given her a Christmas outfit and added a greeting from the Itty Bitty Christmas stamp set.  I've also given her pink and blue hair to reflect the beautiful recipient of the card.  The image was stamped with Tuxedo Black Memento ink and coloured with Stampin' Blends alcohol markers.

I used a die from the Stitched Triangles set to cut the banner.

Thank you for visiting.
'Til next time!
Stephanie

Product List - Available for purchase from my online store

Thursday 17 December 2020

Stampin' Dreams Blog Hop: SAB / Mini Catalogue - Flowering Vine Dies

Welcome to the monthly Stampin' Dreams Blog Hop.  This month we are providing sneak peeks of products from the new January-June 2021 Mini Catalogue.

You are currently visiting Stephanie Fischer (The Crafty Thinker) from Australia.  I hope you enjoy my card and then click on "Click here to enter" and click through the little images to see all of the other great projects in the hop!

#thecraftythinker #stampinup #sdbh #floweringvinedies #sneakpeek #2021minicatalogue cardmaking , Flowering Vine Dies, Sneak Peek Jan to June 2021 Mini Catalogue, Stampin' Dreams Blog Hop, Stampin' Up Demonstrator, Stephanie Fischer, Sydney NSW
A trio of cards created with the new Stampin' Up Flowering Vine Dies

I've selected the Flowering Vines Dies which I can see myself using a lot!  They coordinate with the Vine Design stamp set and will be available as a bundle for a 10% saving.  If the budget stretches to the bundle - that's a great way to go, but if not - the dies work very well just on their own!  

#thecraftythinker #stampinup #sdbh #floweringvinedies #sneakpeek #2021minicatalogue cardmaking , Flowering Vine Dies, Sneak Peek Jan to June 2021 Mini Catalogue, Stampin' Dreams Blog Hop, Stampin' Up Demonstrator, Stephanie Fischer, Sydney NSW
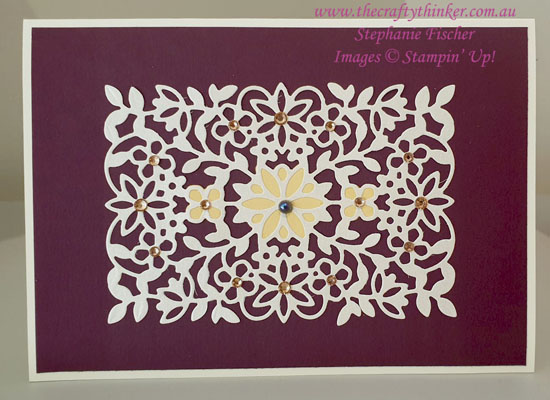
The Flowering Vine die cut sits on a Blackberry Bliss background on a Very Vanilla card

For the card above, I used the matching floral dies to cut some So Saffron which I adhered behind the Flowering Vine.  Then I simply added some rhinestones and a pearl to finish. 
#thecraftythinker #stampinup #sdbh #floweringvinedies #sneakpeek #2021minicatalogue cardmaking , Flowering Vine Dies, Sneak Peek Jan to June 2021 Mini Catalogue, Stampin' Dreams Blog Hop, Stampin' Up Demonstrator, Stephanie Fischer, Sydney NSW
The background for this Flowering Vine is Just Jade embossed in the Tasteful Textures
embossing folder

For the jade version, the flowers are backed with Just Jade with Red Rhinestone centres.  To add a bit more interest, quickly and easily, I simply adhered strips of cardstock in So Saffron, Gray Granite and Soft Seaspray with a few scattered Wonderful Gems.  Behind the Flowering Vine is a circle of So Saffron cut with one of the Layering Circles Dies.
#thecraftythinker #stampinup #sdbh #floweringvinedies #sneakpeek #2021minicatalogue cardmaking , Flowering Vine Dies, Sneak Peek Jan to June 2021 Mini Catalogue, Stampin' Dreams Blog Hop, Stampin' Up Demonstrator, Stephanie Fischer, Sydney NSW
This card features the Flowering Vine Dies, Old World Paper embossing folder

I used one of the Layering Ovals Dies to cut some Bumblebee cardstock to put behind the Flowering Vine die cut.  The three flowers are backed with Magenta Madness card.

Three really easy and quick cards with one set of dies!

I hope you've enjoyed the cards you've seen here on my blog today.  You are currently visiting Stephanie Fischer.  

Please click on "click here to enter" below and click on each of the little images to hop through all of the people on the list to see all our projects.  You don't want to miss any!

Thank you for visiting.
'Til next time!
Stephanie

You are invited to the Inlinkz link party!

Click here to enter
Product List - Current products available for purchase from my online store

Friday 11 December 2020

Christmas Bauble Table Favors, decorations

#thecraftythinker #stampinup #christmastablefavors #xmastablefavours #baubles #3dpaperproject #cardmaking , Christmas Table Favors, Christmas Baubles, 3D paper project, Stampin' Up Demonstrator, Stephanie Fischer, Sydney NSW
Christmas table favors that contain a chocolate

These little baubles are my Christmas table favours - they contain a wrapped chocolate.

I used a great tutorial by Nigezza of Nigezza Creates who adapted an idea by Sam Calcott of Mixed Up Crafts.  I have used the same methodology but reduced the dimensions.  
#thecraftythinker #stampinup #christmastablefavors #xmastablefavours #baubles #3dpaperproject #cardmaking , Christmas Table Favors, Christmas Baubles, 3D paper project, Stampin' Up Demonstrator, Stephanie Fischer, Sydney NSW
I followed a tutorial by Nigezza Creates but reduced the dimensions 

I used a piece of Cinnamon Cider, decorated with the gorgeous Brightly Gleaming paper and some Copper Foil Sheet.
#thecraftythinker #stampinup #christmastablefavors #xmastablefavours #baubles #3dpaperproject #cardmaking , Christmas Table Favors, Christmas Baubles, 3D paper project, Stampin' Up Demonstrator, Stephanie Fischer, Sydney NSW
This is the flat, decorated piece just before I glued it into shape

The smaller size is perhaps a little more fiddly but it's still surprisingly easy to make .... and very satisfying when it pops into shape!

Since my table favours also serve as place names, I cut little labels with one of the Ornate Frames dies and enlarged the hole a bit so that I could fit the ribbon through.

DIMENSIONS:
  • Cut cardstock to: 10cm x 17cm

  • Score long side at: 2cm, 4cm, 6cm, 8cm, 10cm, 12cm, 14cm and 16cm

  • Turn and score short side at: 2cm, 4cm, 6cm and 8cm.

  • Turn back to the long side again and score, only to the first horizontal line, at: 1cm, 5cm, 9cm and 13cm
Follow either Nigezza's or Sam's tutorial from here to score the diagonals, cut the flaps add the holes for the ribbon and decorate.

I cut my decorative paper and foil into 1.7cm squares (18 of the paper and 8 of the Copper Foil).

I used 18cm lengths of ribbon.

Thank you for visiting.
'Til next time!
Stephanie

Product List - All available for purchase in my online store