Thursday, 2 July 2015

Splitcoaststampers Creative Crew Challenges - July 2015 - Part 2

LIFE'S A PICNIC

With the Northern Hemisphere heading into Summer, the focus this month is on the sights, smells, colours, places, food and family that Summer brings: Summer birthdays, graduations, family reunions, a day at the beach or just a backyard BBQ with family and friends!

Play along with the Creative Crew Challenges to get those creative juices flowing! 
See the Creative Crew Gallery here for further inspiration.

CCREW0715, CreativeCrew, SUO -Scrapbook & More Focus
A food or family Scrapbook Page, table favours, signs etc!
SU Vintage Leaves, Punch art grapes, bunch of grapes, Table Favour, thanksgiving
Curvy Keepsake box, A World of Thanks stamp, Vintage Leaves
I made a Curvy Keepsake Box with Perfect Plum cardstock, which I stamped with Versamark using the A World of Thanks stamp.
The leaf is made with the Vintage Leaves stamp set and matching Leaflets Framelits.  The grapes are lots of 1/2" circles punched from Rich Razzleberry cardstock and edged with Blackberry Bliss.  These are overlapped and stuck together to form a bunch on top of the leaf and I gave them a coating of Crystal Effects for shine.  I stuck my bunch of grapes to the box and finished it off with a bow of Tip Top Taupe Dotted Lace Ribbon.


CCREW0715, CreativeCrew, SUO - Holiday Focus
SU, Ice Cream Cone, Ribbon & bow, triple scoop icecream cone
Bohemian DSP with Early Espresso
& Delightful Dijon
Apparently July is National Ice Cream Month for our American friends who provided these fun facts:
1st July - Creative flavour day, how creative can you get with icecream?
7th July - Ice cream cone day
23 July - The ice cream cone's birthday.  It was invented in 1904, so the ice cream cone is 111 years old this year!

The ice cream cone is stamped onto Whisper White cardstock and coloured (I used the new thicker version because it stands up to watercolouring so well).  The cone is Crushed Curry and Delightful Dijon.  The ice cream flavours are Chocolate Chip, Watermelon Wonder and Mint Macaron. The cherry is (rather appropriately) Cherry Cobbler with a coat of Crystal Effects for shine.  The base cardstock is Early Espresso with panels of Delightful Dijon and Bohemian DSP.  The ribbon is Early Espresso Seam Binding.  I was inspired by this card by Sharon L Johnson.
Inspiration provided by this
card by Sharon L Johnson


Built for Free Using: My Stampin Blog

Splitcoaststampers Creative Crew Challenges - July 2015 - Part 1


LIFE'S A PICNIC


With the Northern Hemisphere heading into Summer, the focus this month is on the sights, smells, colours, places, food and family that Summer brings: Summer birthdays, graduations, family reunions, a day at the beach or just a backyard BBQ with family and friends!

Play along with the Creative Crew to get those creative juices flowing!
See the Creative Crew Gallery here for further inspiration.


SU Double Porthole Fun Fold, Fancy Fold, Fun Fold
Double Porthole card
CCREW0715CF, CreativeCrew, SUO - Catalog Focus
Anything foodie related, a stamp set, punches, you name it!

Sprinkles of Life really is turning into one of my "go to" stamp sets - I love it because it's so versatile!  Here I've stamped and coloured the image using Chocolate Chip, Perfect Plum and Elegant Eggplant.  The candle is Tip Top Taupe with a Daffodil Delight and Crushed Curry flame.  I added Dazzling Details to the icing. 

I really don't know what this fold should be called but I call it a double porthole.  The base cardstock is Tip Top Taupe with three designs from the Go Wild DSP stack.

How I did it:
  1. I started with a 6" x 12" piece of Tip Top Taupe which I scored at 4" and 8" (neatly dividing it into three).  
  2. I folded both sides in towards the centre, overlapping them with the left side on top.
  3. I adhered a piece of DSP to the top flap.
  4. I unfolded the card, used the second largest Lots of Labels framelit and carefully positioned it on top of the top flap and ran in through the Bigshot so that only the top layer was cut.
  5. Using Perfect Plum cardstock I cut a frame using the largest and second largest of the Lots of Labels framelits and adhered it to the front of the card.
  6. I refolded the card and lightly drew around the inside of the cut with a pencil to help me centre the die cut in the second flap.  
  7. I wanted to leave a frame of Tip Top Taupe showing around the inside edge when the card is closed.
  8. I opened out the card again and centred the third largest die in the set and ran it through the Bigshot.
  9. I cut a piece of DSP to size, held it in position on top of flap 2 (with the smaller die cut), folded the top flap over and lightly drew around the inside of the cut shape again.
  10. Then I placed the DSP in the Bigshot with the second largest die in position directly lined up with the pencil marks) and ran it through. 
  11. Then I adhered the DSP to the second flap, being careful to line it up with the die cut in the front flap.  So now I had decorated my second flap but still kept the Tip Top Taupe frame that I wanted. 
  12. I cut another Perfect Plum frame by repeating step 5 and adhered it to this second layer.
  13. I centred a piece of Whisper White to the inside of the card and then cut a third piece of DSP to size.  I didn't want any of this DSP to show when the card is closed, so I repeated steps 9 & 10 and then adhered this DSP to the Whisper White.
  14. I then added a Perfect Plum frame by repeating step 5.
  15. I then closed the card before I adhered the cupcake, to help me position it where I wanted within the frame I had just created for it.
  16. I placed a piece of Whisper White on the back of the card to provide somewhere to write a message.
    SU Double Porthole Fun Fold, Fancy Fold, Fun Fold
    Sprinkles of life & Go Wild DSP

    The sentiment is from Endless Birthday Wishes.  I stamped it in black onto a 1" strip of thick Whisper White and then trimmed just the ends with one of the Tags & Labels Framelits (I've included instructions for this below).  Then I edged the resulting label with Tip Top Taupe and attached a couple of Perfect Plum Candy Dots (even they sound foodie!).  I repeated the process with normal Whisper White cardstock (without the sentiment and candy dots!) but just a tad longer.  I adhered the longer layer with snail and then added the top layer with dimensionals.
  

SU Double Porthole Fun Fold, Fancy Fold, Fun Fold
Sprinkles of life, custom made label


Making a symetrical label with the Tags & Labels Framlits:
  1. I stamped my sentiment on a 1" strip of cardstock.  
  2. I then fed one end of the strip through the framelit so that only the end of the strip was under the cutting blade (making sure it was straight).  I cranked just that end through the Bigshot to avoid leaving any impressions on the rest of the strip.
  3. I then repeated the process on the other end of the strip.
Partial die-cutting, SU
Custom made
label, Step 3

Partial die-cutting, SU
Custom made
label, Step 2


Partial die-cutting, SU
Custom made label - to simply extend the length
of the die cut, stop at this step


CCREW0715DF, CreativeCrew, SUO - DSP/Colour Focus
Cucumber  Crush, Hello Honey and Watermelon Wonder - for more inspiration use the Cherry On Top DSP Stack!

OK, I'm going to be brutally honest here - I really don't like Cucumber Crush; either on its own or in combination.  So..... I've really struggled with this challenge. I'm not thrilled with my results but I'm happy that I managed to produce something.  I suppose the flowers, wall and leaf give it a very loose outdoors connection, then we have to make a leap to picnic!

SU Colour Me Irristable, Striped Scallop Thinlit, Cucumber Crush
Beautiful Bunch, Striped Scallop Thinlit
The base card is Cucumber Crush layered with Whisper White and Delightful Dijon (which was embossed with the Brick Wall embossing folder.  The two layers from Lots of Labels Framelits are Whisper White overlaid with the Cucumber Crush Colour Me Irresistable card.

The leaf is stamped in Garden Green onto Cucumber Crush using the Vintage Leaves stamp set and cut with the matching Leaflets Framelit.  I also added a little bit of Delightful Dijon cut with the Striped Scallop Thinlit.

The large flower is stamped with Cherry Cobbler ink onto Watermelon Wonder cardstock with the Beautiful Bunch stamp set and cut with the matching Fun Flower Punch.  I added the largest of the Metal Rimmed Pearls to the centre.

The two smaller flowers are cut from the Watermelon Wonder Cotton Paper with the Petite Petals Punch and then scrunched up around a really small brad.

I wanted to add a bow but didn't want to use the Dotted Lace Trim, so I used the now retired Stitched Satin Ribbon in Crushed Curry which seemed to do the trick.

The remaining two July Challenges follow in Part 2.


Built for Free Using: My Stampin Blog

Saturday, 20 June 2015

Crazy Crafters Blog Hop - June 2015


Welcome to the Crazy Crafters blog hop for June. This month we are excited to show off our favourite Stampin’ Up! products from the just released 2015 – 2016 Annual Catalogue. We hope you find great inspiration from the projects. Get your wish list ready! 

You may just be starting the blog hop here at my blog - Stephanie Fischer - or may have come from the person before me in the list below. If you get off track at any time, the full line-up below will help you move along from blog to blog so you see all the projects. At the moment you are visiting Stephanie Fischer, The Crafty Thinker. 

It's no secret that I have LOTS of favourites in the new Catalogue but perhaps my most favourite is the Watercolour Wings stamp set.  Why?  Because it's so versatile and that's what I look for in my purchases!  It combines beautifully with Butterfly Basics and both of the matching die sets - Butterflies Thinlits and the new Bold Butterfly Framelits.  In fact I love this set so much that I made two projects for this blog hop!

SU, Latch card, fun fold, Stampin Up, Butterfly Basics, Heat Embossing
Bleach technique, sponging. Best Thoughts & Watercolour Wings stamp sets
The first is a simple latch card - thank you to Dina Kowal at Splitcoaststampers for the great tutorial.  I heat embossed the flower image from Best Thoughts and "reverse coloured" by painting with bleach, using more bleach in some areas than others to for shading and highlights.  I stamped the Watercolour Wings butterflies twice, cutting one with the plain die and one with the matching filligree die.  I then glued the two layers together at the centre and adhered them onto the floral base, popping up the wings on dimensionals. 
SU, Latch card, fun fold, Stampin Up, Butterfly Basics, Heat Embossing
Inside
The colours I used are Island Indigo, Bermuda Bay and Pool Party.  I stamped the butterflies in these colours onto Soft Sky cardstock.  The butterfly bodies are Soft Suede.  I decorated the latch edge of the card with the Boho Chic embossing folder - using just the end and carefully embossing twice in order to cover the entire length of the card (the only way I could fit it all through the big shot as my card is quite large).

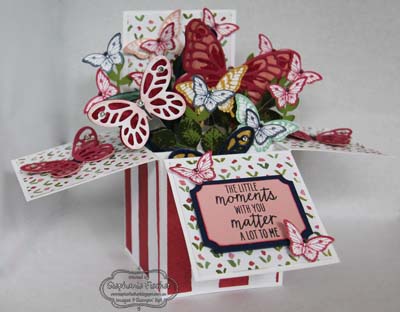
SU, Kinda Eclectic, Butterfly Basics, English Garden DSP PaperThe second is a card in a box.  I made it with the new thick Whisper White card stock (so it's VERY sturdy!) which I decorated with English Garden DSP and filled with a variety of butterflies and foliage.   

The sentiment from Watercolour Wings is stamped onto Blushing Bride card and cut out with the Tags & Labels Framelits. I stuck that onto a slightly larger Night of Navy layer.  

Foliage is from Kinda Eclectic (hand cut) and the Bird Builder Punch.  

All the colours are drawn from the English Garden DSP.
 
I hope you've enjoyed these projects, I would really welcome your comments.

Thanks for taking part in our blog hop, there are so many amazing ideas and inspiration you don't want to miss. Remember that currently you are at my blog - Stephanie Fischer, so check the blog hop line up list to see who is next in the list as you don't want to miss out on seeing any of the blogs and the amazing inspiration they contain.

Built for Free Using: My Stampin Blog

Saturday, 6 June 2015

Hey Girl - Sweet 16

SU, Hey Girl, Watercolouring stamped image, 16th birthday card, teenage girl card
Hey, Girl


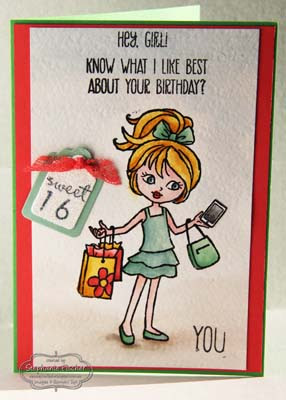
Guess who realised today that it's her niece's 16th birthday?!!  Ooops! So this was a very quickly made card!
The Hey, Girl stamp set is very versatile.  The shopping bags, handbag and smart phone were perfect for this occasion but our sweet girl could be clutching a balloon (or several balloons), some flowers or a dog lead (yes, there's a little dog too!).   Or she could just be standing there with her arms out as if to say "Da-da, here I am!".

The numbers are from the Back to Basics Alphabet set and the word "sweet" comes from the Project Life Remember This stamp set.  It's half of the sentiment that says "Sweet moments".  This little sentiment is die cut with the Tags & Labels Framelits; Watercolour paper layered onto Mint Macaron. I punched two little holes and fed through the little piece of ribbon cut from the Dotted Lace Trim in Watermelon Wonder.  I used the 2-way glue pen over the stamped watercolour paper and added some Dazzling Diamonds.

Stamped in Stazon on watercolour paper and coloured with inks and an aquapainter - Mint Macaron, Delightful Dijon, Watermelon Wonder and Cucumber Crush.  There's a touch of Basic Grey in the phone.  Her skin is Blushing Bride and Calypso Coral with Watermelon Wonder lips.  The background is a soft wash of Marina Mist and Tip Top Taupe.

The base card is Cucumber Crush layered with Watermelon Wonder and the watercolour paper.


Friday, 5 June 2015

Several Shades of Grey!

There are so many beautiful stamp sets and papers in the new catalogue that I'm like a kid in a candy shop at the moment!

Yesterday I had some time to play and decided to try the Timeless Elegance DSP.  I just love it!  It's so gorgeous it really does all the heavy lifting for you, making it really quick and easy to create a beautiful card!  How good is that?!

In just a short space of time, with the addition of of the Watercolour Wonder and Awesomely Artistic stamp sets I made these three cards.

By just letting the beautiful prints on the DSP do all the talking, I could have made even more!

I used the Out of the Box technique to cut out the stamped panel with the new Lots of Labels Framelits.  I stamped the dragonfly with versamark onto Very Vanilla card, applied heat & stick powder and then dazzling diamonds.  I highlighted around the wings with an aquapainter and basic grey ink.
SU, foliage, Lots of Labels, Project Life Cards & Labels, Bitty Banners
Awesomely Artistic stamp set

I watercoloured the Awesomely Artistic foliage with Sahara Sand and Basic Grey inks.  The die cuts were edged with Basic Grey ink.  I stamped the frame and the word "Friend" from the Awesomely Artistic set and cut it out with the matching framelit from the Project Life Cards & Labels Framelit set.

Happy Birthday is from the Sprinkles of Life set.  Since it's photopolymer I was able to bend it to fit the Bitty Banner Framelet.

I layered the Timeless Elegance DSP onto Basic Black cardstock and then onto the Sahara Sand card base.


SU, Butterfly, Project Life Cards & Labels
Watercolour Wonder Stamp Set
 The sentiment on the striped card is from Birthday Blossoms.  I hand cut the Very Vanilla layer to points and layered it onto Sahara Sand cardstock cut with another of the Project Life Cards & Labels Framelits.  Then I applied two of the smallest of the metal rimmed pearl embellishments.  I stamped the Watercolour Wings butterfly with Sahara Sand, Basic Grey and Black.

The Timeless Elegance DSP is layered onto Basic Black and then onto the Sahara Sand card base.  Both the butterfly and the sentiment are popped up on dimensionals.


SU, Butterfly, Dazzling Diamonds
Watercolour Wonder Stamp Set
For the last card, the Timeless Elegance DSP is edged with black ink and layered onto the Basic Grey card.

The sentiment is from That Thing You Did and I stamped it in black directly onto the DSP.

The Watercolour Wings butterfly is stamped in black and Basic Grey.  I then picked out parts of it with the 2-way glue pen and applied Dazzling Diamonds glitter.  The wings are popped up on dimensionals.


In the next few weeks I'll post more pictures of what I make with some of the new products.
Built for Free Using: My Stampin Blog

Tuesday, 2 June 2015

Splitcoaststampers Creative Crew Challenges - June 2015

I can't believe another month has gone by already and here we are in the middle of the year!  The challenges and gallery are up and running for June, so pop over and take a look at all the inspirational creations or, better yet, play along!  These are my entries for the four June challenges.

CCREW0615DF, SUO, Color Focus: 
Stampin' Up! new products, 2015-2016 catalogue, Watercolouring
Hostess stamp set - Best Thoughts
With the focus on the In Colours, I just had to choose Watermelon Wonder - I think it's the pefect pink!  It's not too bright and not too pastel and has a lovely warmth to it.  Perfect!  I've layered the Watermelon Wonder cardstock onto Cherry Cobbler and I like them very much together.  I stamped onto Whisper White cardstock with black Stazon so that I could watercolour the images with ink: all of the new In Colours (Watermelon Wonder, Delightful Dijon, Mint Macaron, Tip Top Taupe, Cucumber Crush) and a touch of Cherry Cobbler to add depth to the flower.  The butterfly wing is popped up with a dimensional, although it doesn't really show in the photo.  The bow uses the new Dotted Lace Trim in Watermelon Wonder.  The flower is from the stamp set Best Thoughts which is available to hostesses (worth holding a party for, I think!).  On this occasion I've used a sentiment from a different stamp set -
A Dozen Thoughts.


CCREW0615CF, SUO, Catalog Focus:
Stampin' Up! new products, 2015-2016 catalogue, WatercolouringI found it really quite difficult to focus on just one new item in the new Catalogue - I love so many of them!  So I cheated a little bit and featured several!  Probably my most favourite at the moment is the stamp set You've Got This (although I think there might be some more favourites once all my new products arrive - I'm fickle like that!).  I stamped the flower onto Whisper White with Stazon and coloured it with Delightful Dijon.  I used a touch of Rich Razzleberry in the centre of the flower, cut it out and gave it a little more glam with a touch of Dazzling Diamonds. 

The cardstock colours are: Blackberry Bliss, Delightful Dijon, Bermuda Bay and Island Indigo.  There's also a touch of Very Vanilla in the banner.  All the colours are drawn from one of my other new favourites - Bohemian DSP.

I punched the top of the DSP framelet with the Scallop Tag Topper and fed a Blackberry Bliss and Very Vanilla banner through it and behind the flower.  I used the new Triple Banner Punch for the banner - oh how it simplifies things!  The sentiment is from Wetlands and is heat-embossed in white.

The final flourish is the Delightful Dijon Blossom Accent which I topped with a Pearl Basic Jewel.

CCREW0615SF, SUO, Scrapbook & More Focus:
Stampin' Up!, Gorgeous Grunge, Everything EleanorWhilst the weather is turning a bit chilly here in Sydney (June being the first month of Winter), elsewhere in the world the focus is turning to weddings! I'll admit this was my favourite of the four challenges because it gave me the perfect opportunity to make a First Anniversary gift for my special friends Rebekah & Luke.  We were so happy to be able to attend their beautiful wedding in England last year and I really enjoyed "revisiting" it for this challenge.

I decorated a fairly plain and simple frame with the Gorgeous Grunge and Everything Eleanor stamp sets.  The leaves were made with the Bird Builder Punch and the flowers with the Petite Petals Stamp set and punch, Itty Bitty Accents punch and two sizes of Scallop Circle punches.  The really tiny little flowers were cut with the new Tree Builder Punch.  Centres for the smaller flowers are pearls or candy dots.  The centres of the three larger flowers are Dazzling Diamonds.  The three larger flowers were inspired by Miriam Spiess's Miriamthiums - but I'm afraid I need more practice!  You'll find Miriam's tutorial and beautiful flowers here.

The sentiments are from the Project Life Remember This stamp set and the ovals at the top of the frame are cut with the Scallop Oval and Large Oval punches. 

Colours used are black, Whisper White, Slate Grey, Basic Grey and Tangerine Tango.

CCREW0615HF, SUO, Holiday Focus:
Fathers' Day is celebrated here in September rather than June, so I shall be very prepared when September comes around - as long as I remember that I've already made the card!
Stampin' Up! new products, 2015-2016 catalogue, Bohemian DSP

It turns out that this card was easier to make than photograph!  I used my favourite Bohemian DSP with Blackberry Bliss, Rich Razzleberry and Delightful Dijon cardstock.  I stamped images and sentiments from the Guy Greetings stamp set using Blackberry Bliss ink on Very Vanilla card.  I anchored the banners with Bermuda Bay and Island Indigo candy dots on candy dot brad bases.  To fill in a bare corner on the front of the card I made a little feature with the new Bohemian Borders stamp set which I coloured with Bermuda Bay and Delightful Dijon Stampin' Write markers and added a little Crystal Effects to the centre to create a little jewel.

The fold is a Pop Up Book Card and Deb Valder has an excellent tutorial here.

I hope you've enjoyed these cards and I do encourage you to play along with the challenges and also to visit the gallery at Splitcoaststampers. 

Friday, 22 May 2015

Blog Hop - Sneak Peek

 
Thank you for joining us for this month's Crazy Crafters Blog Hop.  If you've been following the hop, you should have arrived here from the very talented Angela Lorenz. 

We are all very excited about all the lovely new products in the brand new Annual Catalogue and this Hop is all about giving you a sneak peek of what's in store for us all from 2nd June when the 2015-2016 Catalogue comes into effect.  We hope that you will love the new products as much as we do and that you enjoy our previews and ideas.  If you've already got your copy of the new catalogue you'll understand just why we're so excited! 

I found it really difficult to settle on an item to showcase because I love so many of them!  In the end I decided to make two cards using the Sprinkles of Life stamp set which is just so versatile.  With same set (and without trying very hard!) it can make cupcakes (with our without candles or sprinkles), clouds, rain, ice cream in a cone, a basket of flowers, a basket of apples, a tree (with or without leaves, flowers, fruit) - you get the picture!  There is also a matching punch, just to make it even easier to create the tops of the cupcakes, tree, rain drops etc.

Cupcakes by The Cakery & Co
This first card is a box full of cupcakes for my friend Emma, the Cupcake Queen, who bakes the most beautiful cakes and cupcakes and for whom I'm happy to taste test anytime!  She's super-busy at the moment making beautiful daffodil cupcakes for a Biggest Morning Tea fundraiser.
SU, card in a box, box card,
Bohemian DSP & Blackberry Bliss Cardstock

SU, box card, bohemian DSP,
Sprinkles of Life & I Think You're Great stamp sets


Sprinkles of Life Magic Card showing the magic!
The second card is a "magic card".  There are lots of tutorials for magic cards and the only thing I've done a little differently is to place the magic bit onto the front of a normal card (made by folding a piece of A5 cardstock in half) because I like cards that open.  I used three of the new 2015-2017 In Colours: Tip Top Taupe, Delightful Dijon and Watermelon Wonder.
Sprinkles of Life & Bohemian Borders stamp sets
Stampin' Up! are donating $3 to Ronald McDonald House with every Sprinkles of Life stamp set sold.

Just want to send a warm "hello" to our fellow Crazy Crafter, Em Robinson, who sadly was unable to join in the hop this month but who is avidly following it.

I hope you've enjoyed your visit!  Please click on the "next" button below to hop on to see the great ideas of the next Crazy Crafter - the amazing Angela Westland. 

http://angetreasures.blogspot.com.au/