Wednesday, 8 February 2017

Beautiful You Sympathy - Bleaching Technique

I mentioned last week that I had done a batch of bleaching and this card is the next cab off the rank.

Is it bad that the only bleach I use in my house is in my craft room?

The previous card I showed you was a baby card with the Moon Baby stamp set, this card is for a less jolly occasion and uses the Beautiful You stamp set.  The steps I took, however, were the same for both cards (as explained in the Moon Baby post).


www.thecraftythinker.com.au, Beautiful You, Sympathy card, Bleaching Technique, #thecraftythinker, Stampin Up Australia Demonstrator, Stephanie Fischer, Sydney NSW
The simple, frame-type layering of the card focuses attention on the stamped image

I coloured her with Pink Pirouette and Sahara Sand Stampin' Write Markers

www.thecraftythinker.com.au, Beautiful You, Sympathy card, Bleaching Technique, #thecraftythinker, Stampin Up Australia Demonstrator, Stephanie Fischer, Sydney NSW
The simple bleaching technique is so rewarding!
The image above shows the stamped panel after bleaching but before colouring.  I didn't bleach her hair - we'll leave that to her hairdresser!

Thank you for your visit.
'Til next time!
Stephanie


Product List - To visit my online store, click on one of the product images below (Australian Residents only)

Monday, 6 February 2017

Moon Baby - Bleaching & Colouring Technique

This card uses the another gorgeous image from the Moon Baby stamp set as well as the bleaching technique which I described in this previous Moon Baby card.

www.thecraftythinker.com.au, Moon Baby, baby card, bleaching technique, #thecraftythinker, Stampin Up Australia Demonstrator, Stephanie Fischer, Sydney NSW
The card uses the bleaching technique after which only the baby was coloured with ink markers

On this card, I only coloured the baby.  The shading on the moon was  accomplished during the bleaching process - I used a dryer brush (ie less bleach!)  in the areas I wanted shaded.

The stars are also uncoloured but have a generous splash of clear Wink of Stella (which doesn't show up in the photos!). 

www.thecraftythinker.com.au, Moon Baby, baby card, bleaching technique, #thecraftythinker, Stampin Up Australia Demonstrator, Stephanie Fischer, Sydney NSW
I created shadows by using less bleach in those areas

The mage above shows the panel after the bleaching but before the colouring.

www.thecraftythinker.com.au, Moon Baby, baby card, bleaching technique, #thecraftythinker, Stampin Up Australia Demonstrator, Stephanie Fischer, Sydney NSW
I kept the inside of the card simple

The inside of the card is very simple.

Thank you for visiting.
'Til next time!
Stephanie


Sunday, 5 February 2017

Crazy Crafters Blog Hop with Special Guest: Shannon Lane - Lift Me Up

Image may contain: text
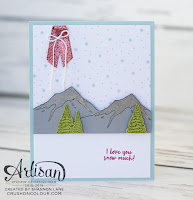
http://crushoncolour.blogspot.com.au/2016/11/snow-much-love.htmlWelcome to the Crazy Crafters' Blog Hop with our Special Guest stamper, Shannon Lane - we are thrilled to have Shannon join us this month and so excited to CASE (Copy And Selectively Edit) any project that has been created by her.

Whether you are starting the blog hop here at my blog, Stephanie Fischer - The Crafty Thinker, or have come from the person before me, be sure to click on the person listed under me further down the page to continue your journey on this blog hop.

This is Shannon's card that I have chosen to CASE.  As soon as I saw the mountain elements, I thought of the gorgeous Carried Away paper in the Sale-A-Bration catalogue (free with a purchase of $90).  


So this is my card based on Shannon's.  I cut the mountains out and glued them onto the sheet of paper with the cloud images (from the same paper pack). 
#thecraftythinker, #crazycraftersbloghop, Lift Me Up Bundle, Stampin' Up! Australia Demonstrator, Stephanie Fischer, Sydney NSW, Hot Air Balloon
I love the Lift Me Up suite and the way that it coordinates with the Carried Away Paper pack
The balloon is stamped in Basic Black ink onto Real Red cardstock and cut out with the matching die (buying the stamp set and thinlits as a bundle gives a saving of 10%). To blend the balloon basket with the sky, I cut off the lower part of the red balloon and replaced it with one I had created with Mint Macaron cardstock.  I used a Chocolate Chip Stampin' Write Marker to colour the basket.  I then adhered the balloon to the card front with Stampin' Dimensionals.

I hope you've enjoyed this card and I welcome your comments. 

Thanks for following our blog hop. Remember that currently you are at my blog - Stephanie Fischer - so click on the next name in the list to ensure that you don't miss out of seeing any of the blogs and the amazing inspiration they contain.

Thanks for visiting
'Til next time
Stephanie

Product List - To browse my online store, click on a product image below (Australian Residents only)


Friday, 3 February 2017

You Beautiful Cat

Image may contain: textThis card is entered into this week's Crazy Crafters Project Highlights.  Click here to see all the great entries and vote for your favourites!  

Edit (10.2.17):  Thank you so much to everyone who voted for this card!  I really appreciate your endorsement which has encouraged me to keep striving.


This stylish lady clearly has a fondness for cats!  I'm giving her the benefit doubt and assuming that she's stroking the cat rather than encouraging it to vacate the seat for her! - Although the cat does look a little grumpy in my opinion.
www.thecraftythinker.com.au, Beautiful You, Mediterranean Moments, #thecraftythinker, Stampin Up Australia Demonstrator, Stephanie Fischer, Sydney NSW, Sitting Here, combining stamp sets
Three stamp sets were used to create this scene on watercolour paper

I love combining two or three stamp sets to create a little scene but it usually takes a lot of patience and a bit of masking.  This combination was so easy!  I stamped the lady first and then used my trusty Stamp-A-Ma-Jig to position the cat's head under her outstretched hand.

To disguise her lack of legs (a minor inconvenience!), I stamped the pot plant from the Sitting Here set in front of her dress.  I added a hint of legs with a few strokes of the watercolour pencil.
www.thecraftythinker.com.au, Beautiful You, Mediterranean Moments, #thecraftythinker, Stampin Up Australia Demonstrator, Stephanie Fischer, Sydney NSW, Sitting Here, combining stamp sets
I couldn't resist adding another cat inside the card!
Once I'd coloured the panel with watercolour pencils and an aqua painter, I assembled the layers: Pacific Point, Basic Gray and a Smoky Slate card.

Thank you for visiting.
'Til next time!
Stephanie 

Product List - To visit my online store, click on one of the product images below (Australian Residents only)


Wednesday, 1 February 2017

Moon Baby - Bleaching Technique

I love the bleaching technique - it's one of my go-to techniques when I feel like doing something a little different with a stamp set.

There seems to be a pending population explosion in my circle of family and friends at the moment - so lots of baby cards will be needed in the not so distant future and I've never been good at baby cards.  However, at least this time, I won't have left it until beyond the last minute to make them!
www.thecraftythinker.com.au, Moon Baby, Bleaching Technique, #thecraftythinker, Baby card, Stampin Up Australia Demonstrator, Stephanie Fischer, Sydney NSW

Yellow seems like a safe bet since I don't know the sex of most of the babies. 

I cut my panels to size before I stamped the images with Versamark and heat embossed with clear embossing powder.

I then painted bleach onto the images and let it dry (I did help a little by using a heat tool at the back of the cardstock).  

When the bleach was dry, I coloured the image of the baby with Daffodil Yellow, Pink Pirouette and Tip Top Taupe Stampin' Write Markers.  I didn't colour the stars but I did give them a liberal covering of clear Wink of Stella.


Tips:
  • This technique works best with medium to dark shades of cardstock
  • Different looks can be achieved by using coloured embossing powder
  • Test the cardstock for its reaction to the bleach to avoid disappointment (see image below)
  • Generally, the more bleach you apply to an area - the lighter it will become.  Therefore, it is possible to achieve varying shades with the bleach by using a dryer or wetter brush in certain areas


www.thecraftythinker.com.au, Moon Baby, Bleaching Technique, #thecraftythinker, Baby card, Stampin Up Australia Demonstrator, Stephanie Fischer, Sydney NSW
This image illustrates how different batches of cardstock can react differently to bleach

The image above perfectly illustrates why I do a bleach test on the cardstock first.  These were offcuts of cardstock.  One of them had been sitting in my collection for a long time (probably at least a couple of years) and the other was from a freshly opened pack.  Both pieces are Night of Navy and look identical.  However, probably because they would be from different dye lots, you can see that they have reacted very differently to the bleach.

www.thecraftythinker.com.au, Moon Baby, Bleaching Technique, #thecraftythinker, Baby card, Stampin Up Australia Demonstrator, Stephanie Fischer, Sydney NSW
The inside of the card is quite plain.
When I get the bleach out, I tend to do a batch of several images at the same time - so there'll be some more examples of bleaching and colouring on my blog in the near future.

Thank you for your visit
'Til next time
Stephanie 

Product List - To visit my online store, click on a product image below (Australian Residents only)