Since I'm including a tutorial, this will be a fairly long post!
 |
| A masculine Magic Card featuring the gorgeous stag from The Wilderness Awaits |
I've made a few changes to the mechanism for this one because I wanted to ensure that the card recipient couldn't accidentally pull out the entire magic section! So I kept the layout from my previous card and incorporated an idea I found on a tutorial by someone clever a long time ago to lock it in place. I'm really cross that I wrote down the instructions but not the website. Try as I might, I haven't been able to find it again. All I can say is thank you, clever lady!
About black ink:
This card is a great example of why I have three different types of black ink in my craft room!
Basic Black Archival: This is really my most used black ink. One reason I like it so much is that I can colour the images with Stampin' Write Markers or watercolour them with Dye Inks and there's no bleeding or lifting of the black ink.
Memento Tuxedo Black: I always used this when I'm using my Stamp-A-Ma-Jig because it wipes off the plastic sheet very easily when I'm finished. Being water-based, it's also great for use with alcohol markers.
Stazon: This ink is necessary for use on shiny surfaces, like the acetate Window Sheets.
 |
| Magic is happening! |
Preparing the magic:
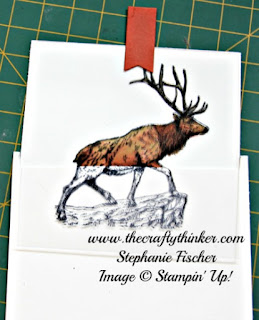
I cut a 3.5" square of Whisper White cardstock and, using Basic Black Archival ink, stamped the image of the stag from The Wilderness Awaits stamp set.
I coloured the image mainly with Stampin' Write Markers but I also used a little watercolouring on the body.
I then used Memento ink to place the image on my Stamp-A-Ma-Jig to help line up the images for the next step.
I cut a 3.5" square of Window Sheet and placed it over the stamped whisper white square. I made sure it was completely straight and kept in place with a couple of pieces of washi tape. I then stamped the stag image onto the window sheet using black Stazon ink, having carefully lined it up with the use of the Stamp-A-Ma-Jig.
 |
| The two layers of the Magic Card held together with a glue dot and the little piece of cardstock |
The mechanism:
I cut a piece of Whisper White cardstock to 7.25" x 3.75", folded it in half then on the folded edge, cut in a short distance from the side for about 1/4" and then across. This should provide a slot wide enough for the stamped and coloured piece to fit into with the window sheet on top.
 |
| The basic mechanism for the magic card |
 |
| A strip of cardstock prevents the coloured card from coming out of the mechanism |
 |
| The coloured section slots into the middle and the acetate layer sits on top |
 |
| The Magic Card Mechanism |
The Magic Card Pocket:
I cut a piece of Delightful Dijon cardstock to 11.5" x 4.5" and scored along the long side at 4" and 8". Turning the cardstock 90 degrees, I scored one side of the card at1/2" .
 |
| I've added some pencil marks to show the score lines more clearly and which pieces to cut away |
I cut and removed the two small pieces on each side - as shown in my photographs.
 |
| This is the shape of the Magic Card pocket waiting for an aperture to be cut |
I cut an aperture in the middle section with the largest of the Layering Square framelits. I find it easier to centre my framelits by marking the centre points with a sharpie and lining then up with soft lines that I draw on the cardstock with a pencil.
 |
| An easy way to ensure that dies are straight before cutting the cardstock |
 |
| Save the die cut piece from the aperture for another project |
I tied some Copper Metallic Thread around the pull tag to draw attention to it a bit.
 |
| When the tag is pulled up the coloured stag stands proudly at the top of the card! |
The base card is a piece of Cajun Craze cardstock cut to 12" x 6" and folded in half. The Paisley layer is 5.75" square.
 |
| I used glue dots to adhere the banner, ensuring they were on the frame, not the window sheet |
I glued the magic card to the centre of the 6" square card.
The banner is from the hostess stamp set Baskets For You, stamped in Basic Black onto Whisper White then cut out with the matching framelit from Bunch of Banners. I glued it to a piece of Cajun Craze cardstock and cut around it to leave a small Cajun Craze border. Having decided I did not like the white edge to the stamped banner, I filled it in with a Cajun Craze marker. It would probably have been easier to cut around the edge of the white banner and glue it to a Cajun Craze banner cut with the framelit!
 |
| The inside of the card is decorated with some extra Designer Series Paper |
I used some leftover pieces of the Paisley paper to decorate the inside of the card.
Thank you for visiting
'Til next time
Stephanie
Product List


No comments:
Post a Comment