Friday, 9 February 2018

Petal Passion Pansy

The Petal Passion Memories & More Card Pack holds a generous amount of beautiful cards - so I decided it was time to use some more of them!  This one is coloured with Stampin' Blends alcohol markers and then trimmed with one of the Lots of Labels Framelits.
#thecraftythinker, #stampinup, #cardmaking, Petal Passion Memories & More, Stampin' Blends, Stampin' Up! Australia Demonstrator, Stephanie Fischer, Sydney NSW
I cut one of the little Enamel Shapes stars in half to better fit the centre of the flower.

I trimmed a little scrap of Whisper White cardstock with another of the Lots of Labels dies, edged it with Pink Pirouette ink and stamped the greeting from the Bunch of Blossoms stamp set in Rose Red ink.

The base card is Pink Pirouette and there's a layer of Rose Red cardstock embossed with the Simple Stripes Embossing Folder.

The flower is made from two layers of Pink Pirouette card cut with the Pansy Punch, shaped a little with a ball tool and lightly sponged with Rose Red ink.

The finishing touches are the Metal Rimmed Pearls, Enamel Shapes and the little piece of Old Olive ribbon.

Thank you for visiting.
'Til next time!
Stephanie

Product List - Click on an image below to shop in my online store (Australian Residents only)

Wednesday, 7 February 2018

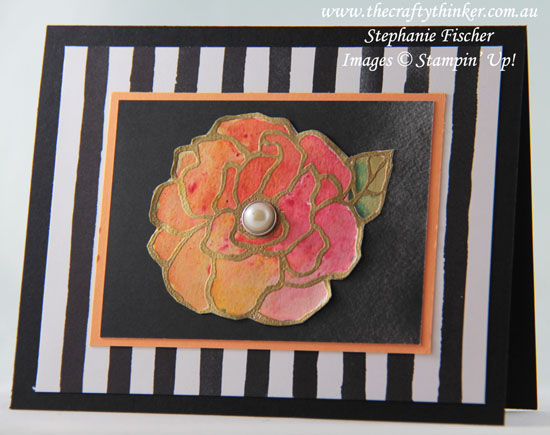
Brusho Rose on Stripes

This morning I gave a very quick demonstration of various techniques with Brusho Crystals and didn't want to waste this flower.  So I cut it out and adhered it to one of the smaller cards in the Petal Passion Memories & More Card Pack.  I've hidden the word "Happy" with the flower!
#thecraftythinker, #brusho, #cardmaking, #stampinup, Brusho, Beautiful Day, Flower, Stampin' Up! Australia Demonstrator, Stephanie Fischer, Sydney NSW
The black & white provide the perfect foil for the Brusho coloured flower.

The striped paper is from the Petal Passion Designer Series Paper pack and I added a layer of Peekaboo Peach card as well as the Metal Rimmed Pearl.

It's a very quick card!

Thank you for visiting.
'Til next time!
Stephanie

Product List - Click on an image below to shop in my online store (Australian Residents only)


Monday, 5 February 2018

Beautiful Day for Petal Passion

The butterfly started out life as an in-class demonstration of Stampin' Blends alcohol markers and then found its natural habitat on this card!
#thecraftythinker, #cardmaking, #stampinup, #stampinblends, Beautiful Day, Stampin' Blends, alcohol markers, Butterfly, Stampin' Up! Australia Demonstrator, Stephanie Fischer, Sydney NSW
The black & white background provides the perfect showcase for the colourful butterfly.  A multipurpose card!

The Petal Passion Designer Series Paper is paired with the use of the coordinating Petal Pair Textured Impressions Embossing Folder.

I added a small strip of Daffodil Delight paper from the Birthday Memories Designer Series Paper pack to which I adhered a tiny strip of the black and white paper that I'd trimmed off - waste not, want not!

Than you for visiting.
'Til next time!
Stephanie

Product List - Click on an image below to shop in my online store (Australian Residents only)

Sunday, 4 February 2018

Rose Wonder Brusho

I experimented a bit with this Brusho background.  I made it at the same time as this one and it started out looking very much the same.   I wanted more muted colours so, while it was still wet with pools of colour all over the glossy cardstock, I spritzed with alcohol.  It worked like magic!  The alcohol repelled the water and I was left with this result.
#thecraftythinker, #brusho, #cardmaking, Brusho background on glossy cardstock, Rose Garden thinlit, Stampin' Up! Australia Demonstrator, Stephanie Fischer, Sydney NSW
Brusho background on Glossy White cardstock, Rose Garden Thinlit.

After I'd adhered the rose, I used Stampin' Blends alcohol markers to colour the leaves and add some shading around the rose.

I wasn't very neat and there were little splodges of marker on the die cut so I attacked them with my Color Lifter.  The poor thing was working overtime and couldn't remove all the colour but it did blend it out and I rather like the result.  I thought the completely white die cut looked a little stark and stiff against the loose background.

The greeting is white heat embossed.

TIPS & TRICKS

  • Use Isopropyl alcohol (rubbing alcohol such as Isocol)
  • I strongly suggest spritzing the alcohol in a well-ventilated area ... or, as I did, vacate the area for a while afterwards!


Thank you for visiting.
'Til next time!
Stephanie

Product List - Click an image to shop in my online store (Australian Residents only)


Friday, 2 February 2018

Birthday Delivery of Brusho

I LOVE creating backgrounds with Brusho Crystals!  I do get very messy hands (perhaps I get too carried away!) and I don't like to waste anything so I tend to make several at a time and keep them to one side until inspiration strikes!
#thecraftythinker, #brusho, #cardmaking, #stampinup, #rubberstamping, Brusho background on glossy cardstock, Birthday Delivery, Stampin' Up! Australia Demonstrator, Stephanie Fischer, Sydney NSW
Brusho background on Glossy White cardstock.  Image coloured with Stampin' Blends alcohol markers
I have created Brusho backgrounds on watercolour paper, Whisper White cardstock and Thick Whisper White cardstock and loved all of the results.  So I decided it was time to experiment with Glossy White cardstock ... and what joy it was!

This little piece is actually what I call a "2nd generation" piece - where I've already created one background and then pressed some scraps into the leftover pools of colour.  Typically I find I'm very happy with the 2nd generation, the 3rd generation is fine but often needs a bit of help but after that it's all a bit muddied up or washed out.

The original background has very intense, strong colouring and this is much more delicate.

I needed to heat emboss the image because I planned to colour with alcohol markers so I couldn't simply use the Basic Black Archival ink as I would normally on Glossy cardstock.  Having wiped the card with my Embossing Buddy, I tapped the stamp onto the Versamark pad first then onto my Basic Black ink pad, stamped the image and added clear embossing powder before heating with the Heat Tool.

The greeting is from the Blooms & Wishes stamp set.  It's photopolymer so it can be shaped to perfectly fit into the Banners For You banner which I then cut out with the coordinating Bunch of Banners framelit die.

Thank you for visiting.
'Til next time!
Stephanie

Product List - Click on an image below to shop in my online store (Australian Residents only)